You are using an out of date browser. It may not display this or other websites correctly.
You should upgrade or use an alternative browser.
You should upgrade or use an alternative browser.
C3po tutorial
- Thread starter waldo kent
- Start date
-
- Tags
- star wars
TurboTrey03
Well-Known Member
ahhh ive been wanting to get into a 3po..alas i have a 23" head as well. is your helmet the only one that will fit? not sure i could add all those details like you did on your helmet!
also, did you order the larger chest piece from tk409? i should be able to do a 3po costume being i am 5'9'' 150 lbs with a 23" dome (doh!)
also, did you order the larger chest piece from tk409? i should be able to do a 3po costume being i am 5'9'' 150 lbs with a 23" dome (doh!)
Dave Porter
Sr Member
Keep it coming.
Great thread.:thumbsup
Great thread.:thumbsup
waldo kent
New Member
ahhh ive been wanting to get into a 3po..alas i have a 23" head as well. is your helmet the only one that will fit? not sure i could add all those details like you did on your helmet!
also, did you order the larger chest piece from tk409? i should be able to do a 3po costume being i am 5'9'' 150 lbs with a 23" dome (doh!)
What little information I got back about helmet sizes was for the TK409 fiberglass helmet a head size of 22 1/2" was a pretty tight fit. Knowing a vacuform helmet mostlikely molded from a fiberglass helmet led me to believe it would be larger inside.
Sounds like you and I are the same size. I bought my chest second hand and was told it was a large TK409 but it was pretty tight. There are a few other makers of the Vac helmets and I'm only guessing that they are about the same size as mine. Hope this helps.
Larry Young
Master Member
Man, Anthony Daniels must have really wanted to be in pictures.
waldo kent
New Member
I felt that the detail of the rear of the helmet was just as poor as the front. The "pie shaped" wedges molded into the helmet were had very soft edges and just did not look good so I grinded them down and removed them.

I cut out a 3 inch circle from a sheet of styrene and glued the resin piece in place. I then cut and shaped the wedges from "door shims". You could use a paint stick as well. Glue these in place.
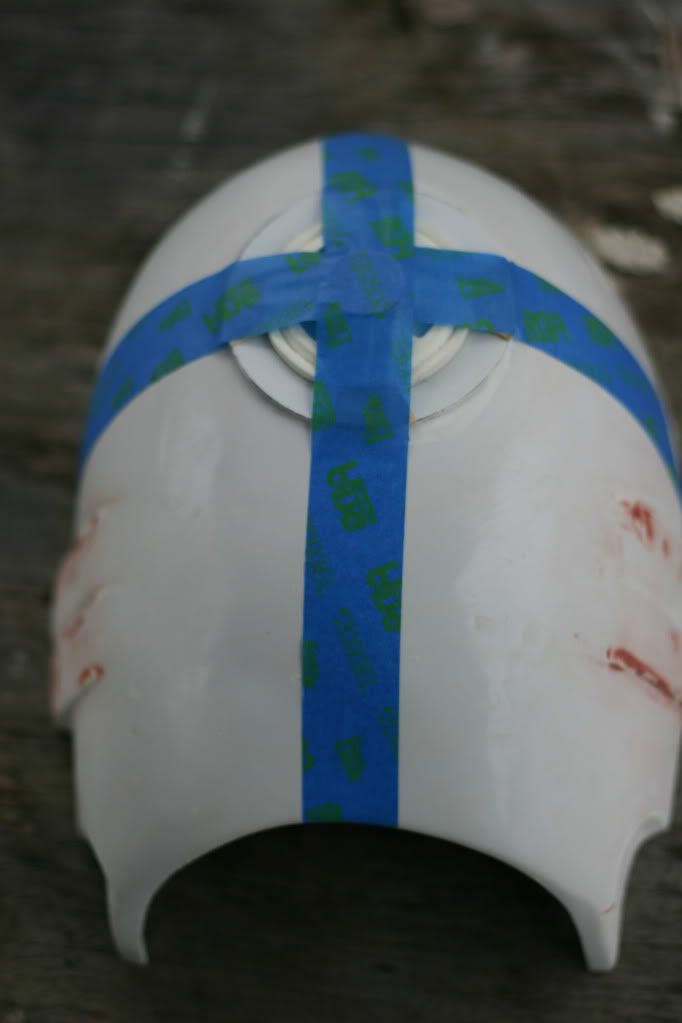
Glue to the back of the head.
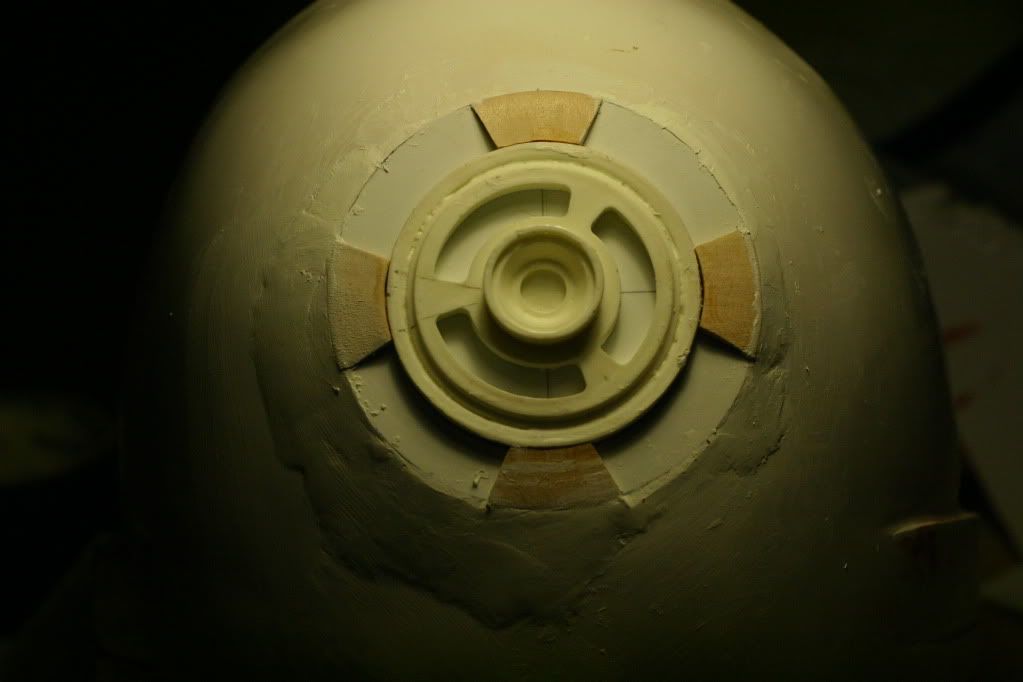
Using milliput, fill in the areas that are needed. and soften the edges.
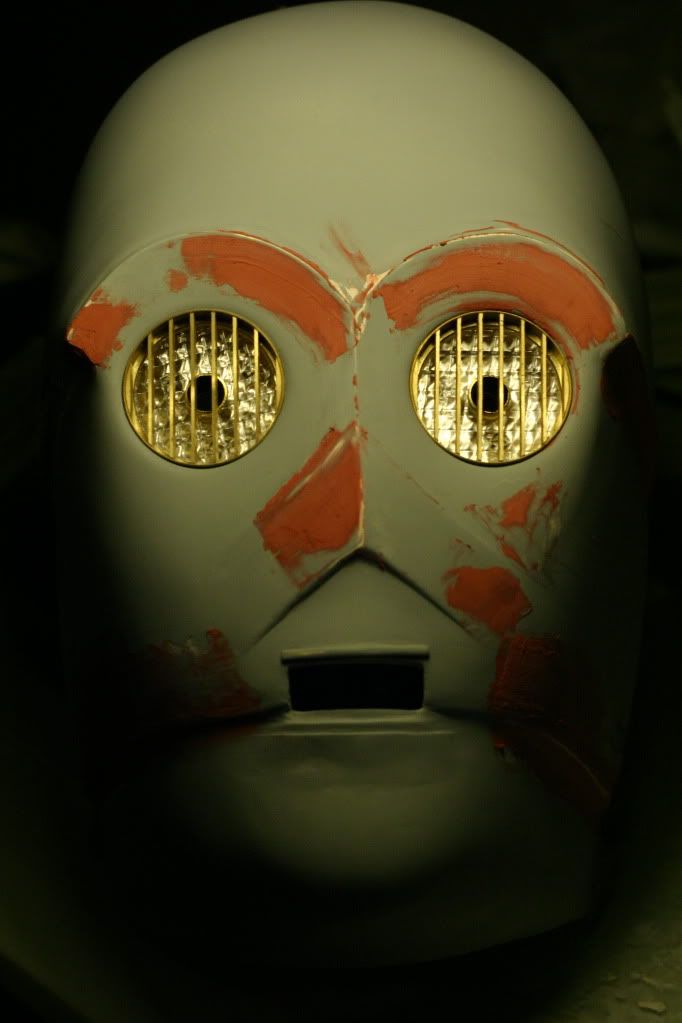
It is hard to see any imperfections so I lightly painted the face with primer. Using a light at an angle you can see where to fill and sand.
I cut out a 3 inch circle from a sheet of styrene and glued the resin piece in place. I then cut and shaped the wedges from "door shims". You could use a paint stick as well. Glue these in place.
Glue to the back of the head.
Using milliput, fill in the areas that are needed. and soften the edges.
It is hard to see any imperfections so I lightly painted the face with primer. Using a light at an angle you can see where to fill and sand.
SailorEarth
Well-Known Member
Thank you for taking the time to post this process, it's both informative and inspiring!
TazVader
Sr Member
I too would like to say "Well Done!" on your tutorial and the brilliant build. It looks pretty intense. Do you plan to plate or paint?
Have you built anything else? I for one would love to see more of your tutorials. With the exception of the Indy Voodoo doll tutorial this has been one of the most enjoyable ones I've read.
100 Points!!
Best
TAZ
Have you built anything else? I for one would love to see more of your tutorials. With the exception of the Indy Voodoo doll tutorial this has been one of the most enjoyable ones I've read.
100 Points!!
Best
TAZ
Nairod
Well-Known Member
Good job! Impressive what you have done on the helmet.
Vacuum forming the helmet wasn't a bad idea, but depending the type of plastic used, it's easy to loose many details. I guess that's an ABS helmet kit?
I really like the idea to add the ring over the face in order to fix the antenna!! (just like the original.)
Keep the good work!!
Vacuum forming the helmet wasn't a bad idea, but depending the type of plastic used, it's easy to loose many details. I guess that's an ABS helmet kit?
I really like the idea to add the ring over the face in order to fix the antenna!! (just like the original.)
Keep the good work!!
waldo kent
New Member
Thanks for the support!
@ TazVader- I plan to have it plated. Also looking at Spectrachrome EDIT(not Cosmichrome) though it's twice the price.
I've built a TK and scratch built my Hasbro E-11. Sorry no other tutorials.
@ Nairod- I chose the vacuform helmet becuase I felt the fiberglass ones would not fit me. The wire connector was actually Moncal's idea. Adding a few washers behind will give me a little more room too.
@ Vexander- Get it going!
Last edited:
GordonTarpley
Member
Cutting apart the back of the head was a great idea and looks like it's going to work really nicely. The fiberglass version has a big lump on the inside of the mask where that thing is which made the mask close to impossible to put on. I chopped it all the way out and sanded the resin detail part to make it much thinner. Now it doesn't really stick into the inside of helmet much at all. That helped me gain more than 1/4" more space front to back and the mask is much easier to put on now. Looks like I may be able to shave it a tad thinner actually...


I'll be following your advice and picking up some millput this weekend. Hopefully my eyes will be here soon and I can get started on my mods.
BTW
Have you purchased the hand pistons yet? After seeing how expensive they are I figured I'll find out what it costs to get them done myself. I contacted a machine shop to find out what they charge. Emailed the drawings today so hopefully get a response tomorrow.
Similar threads
- Replies
- 3
- Views
- 229
- Replies
- 11
- Views
- 732
- Replies
- 0
- Views
- 121