Build Log - Vader Helmet Reveal Stand

zjunlimited

Sr Member
Yeah, I'm pretty late to this game but I finally found some time to finish this up.

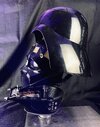
So in short, I've always loved the reveal look when ROTJ came out. And when this helmet was released (this is the first version, not the latest) I had to have it for the reveal display. (This post isn't about the helmet itself so let's not go there.)

I've seen many reveal stands that you and others have shared and drew many inspiration from those photos. This is my version of the stand and hope that other can draw some inspiration and maybe even a bit of DIY for themselves for their Vader reveal helmets.

So that said, let's get started...

Materials
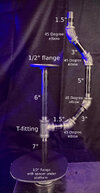
  • 1/2" PVC pipe: 1.5", 3", 6", 7", 10" lengths
  • 1/2" PVC T-fitting x1
  • 1/2" PVC elbows x2
  • 1/2" PVC end cap x3
  • 1/2" PVC connector sleeve x1
  • 1/2" MDF 12" x 18"
  • 1/8" hobby board: 4" round, 5" round, custom to fit jaw piece
  • popsicle sticks
  • rubber pads
  • foam
  • Bicycle light lens
  • JBWeld, spackle
  • Sandpaper: 220, 500
  • Forstner bits: 7/8", 1 1/8"
  • Paint: Rustoleum filler primer, Krylon primer, Krylon satin black, Krylon flat clear


The Mock Up

This clearly isn't a difficult build by any means but I needed to do some initial test fits to see how this would look.

First up is the platform from some scrap material I had. Cut the long side of a T-fitting in half and screwed it to a couple pieces of wood.
01 Test 01.JPG

Cut and assembled some PVC pipe and this was roughly the final design.
01 Test 02.JPG


01 Test 04.JPG
 
Last edited:
Wood and Mount Prep

So without any type of platform the helmet and face are quite wobbly. This was easily solved with 4" and 5" round pieces that I turned down from the 6" round I had a ton of.

The platform for the jaw piece was a bit more involved. I used the inside lip of the underside as my guide and continued to cut, shape, trim until it fit.
03 Platform 01.JPG


My concept of the jaw platform was that I wanted to to have the PVC run through the center but securing gave me a bit of pause until I came up with a simple solution.

But first, I drilled a hole using a 7/8" for forstner bit on the drill press.
03 Platform 02.JPG


I then took one of the PVC end caps and cut off the "end" of the end cap to end up with a sleeve. I will then glue the sleeve to the platform making sure the PVC pipe clears the wood.

03 Platform 03.JPG


Since I had my bits out and the drill press setup I went ahead and drilled the intent in the MDF board for the PVC mount.
04 Base 01.JPG 04 Base 04.JPG

As for the PVC mount, I cut a connector piece that joins two pieces of pipe together in half and used that as the mount. I could have used an end cap but the walls are a bit thicker with this piece and I like that it was open in the center as it allows some of the JBWeld to flow into the inner edge for a bit more "bite".
04 Base 06.JPG


Here are all of the pieces ready for JBWeld. A few things to note...
  • JBWeld was applied to the face of the end cap for the 4" and 5" round pieces, pieces were offset based on my test fitting and preference
  • careful to only apply JBWeld to the perimeter edges of the jaw platform since I needed the pipe to fit through
  • the MDF was the simplest as I applied JPWeld to the bottom and inner edges
05 PVC Supports 01.JPG

All was held down to dry using 3-2-1 blocks and some weights from my weight vest.
05 PVC Supports 03 JBWeld.JPG

Afterwards it dried, I applied a layer of JBWeld to the perimeter corner edges of each PVC mount to give it more strength. Honestly this probably wasn't needed but it made me feel better...lol.

05 PVC Supports 04.JPG 05 PVC Supports 07 JBWeld.JPG 05 PVC Supports 05.JPG

But since I did that, I didn't entirely like the look of the rough edges, sooooo I decided to add some wood filler / spackle to smooth everything out. This was purely for cosmetic purposes....but satisfied my OCD...lol.

05 PVC Supports 13 Spackle.JPG

Annnnd, because I wanted to keep things light I used 1/8" hobby board for the platforms, I was now worried there may be too much flex in the wood so I pulled out some popsicle sticks and attached them to the underside of the platform using some wood glue. Again probably overkill but "do it once, do it right" right? :) Or I could have used 1/4" hobby board....lol.
05 PVC Supports 14.JPG
 
Last edited:
Painting and Final Touches

Primer and Satin black paint. I used PVC pieces from my mock up as holders while painting.

06 Paint 01 Primer.JPG 06 Paint 02 Satin Black.JPG

The PVC mount looked a little plain and boring and as I was rummaging through my greeble box, I came across an old mountain bike light housing that I kept....just for purposes like this :). It had a unique look and the right dimensions. So after a bit of modifying with the dremel...cut the threads off, enlarged the hole in the back of the housing, it was done.

07 Support Greeble 01.JPG 07 Support Greeble 02.JPG 07 Support Greeble 03.JPG
07 Support Greeble 04.JPG


Just when I thought it was done, once I assembled everything the mask was tilting forward. Even after moving the mask as far as possible and the mount as far forward as possible, since the mask is so front heavy it wasn't level enough for my liking.

So back to my greeble box and I pulled out 3 different "foam" pieces. L-R, pad inserts from bicycle helmet, dense packing foam (white), even more dense packing foam (black). Tested all three and went with the bicycle helmet pad.
08 Foam Support, Face 01.JPG


Used some simple 3M double sided tape and applied the foam pad to the front edge of the mask platform.
08 Foam Support, Face 02.JPG

08 Foam Support, Face 03.JPG
 
Finished Project

Some final thoughts...
  • The PVC I used was furniture grade material from Home Depot by Formufit. It was NOT available in my local stores but I ordered online, shipped to store for free and picked it up there. Here's a link. Personally I didn't want to paint PVC pipe and then have flaking issues when you fit everything together. But clearly you can simply paint and it would have been more affordable. I did like the look for the joints better.
  • Everything is press fit together. So I can disassemble or modify as needed.
  • The jaw platform is friction fit. It is currently sitting on the light housing but it will stay in any position I put it in.

11 Stand 02.JPG


11 Stand 03.JPG


11 Stand 04.JPG


11 Stand 05.JPG


10 Finished 02.JPG


10 Finished 03.JPG


10 Finished 04.JPG
 
Last edited:
Magnets would need to be removed. I have a hard enough time separating them myself…lol. But I can’t see why it wouldn’t be possible.
 
So after a couple of weeks staring at this, I noticed a couple of things that I wanted to improve on.

When looking at the side profile (pic below) the rear of the helmet extends quite a bit further that I'd like. It takes up quite a bit of space that overhangs from the rear. And given my display area, it limits the angle that I can place this.
20 Final v1 01.JPG


So I decided to modify the vertical piece of the helmet and introduce a few angles to move the helmet forward a bit. So 5 new pieces were needed while trying to keep the overall height the same (I got it within 0.5").
  • 2x 45 elbows
  • new PVC lengths (1 ea): 1.5" for the platform, 3" for the angle connector, 5" for the vertical piece
22 v1 vs v2.JPG


Here's how they compare
22 v1 vs v2 compare.JPG


20 Final v1 03.JPG 21 Final v2 03.JPG

Overall a slimmer footprint and fits into my space much better now.
 
Thank you for the detailed write up and measurements. It made this quite a simple and quick project.

As I said on YouTube, I'd post mine when finished, its about 95% there, I've only held off painting the base as I'm not sure I'll keep it. It looks a tad too thick, so I might replace it. I just used some handy wood I had spare. If I had the tools I'd chamfer it, which I think would work, but I don't, so I can't.

Construction was pretty much identical to yours with minor differences. Only the PVC connectors had to be purchased, all the rest, including the 20mm pipe, I already had.

20230529_203322.jpg


Changes
  • Rather then using popsicle sticks to strengthen the boards, I made the three platforms from thin hardboard (from a unused drawer) doubled up
  • PVC connectors are dark gray, not black, but left unpainted. You can hardly see them to be honest and they don't stand out. They were a little loose, but after some experimentation I found that a short strip of masking tape wrapped round the ends of the 20mm tube ensured a snug push fit
  • I used thin black adhesive foam sheets from Hobbcraft on the tops of all three platforms to cushion and protect the pieces

20230529_203450.jpg


I drilled a hole in the helmet board for the "nubbin" to drop into

20230529_203534.jpg


I didn't pay full attention to your instructions so did not realise that the connectors for the platforms are off center. You really have to mount the pipe connector at the edge of the faceplate piece for it to balance correctly. After my initial failure trying to mount the helmet, I found balancing the underside of the faceplate on my finger until I found the "sweet spot" helped determine the correct location to drill the screw hole.

All in all, a rewarding couple of days build.

I just need to revisit the base to call this done.
 
Thanks to your tutorial, I dropped around $55 yesterday at the hardware store on mine :cool:
 

Attachments

  • 428662263_10231427177412861_3205928086910051975_n.jpg
    428662263_10231427177412861_3205928086910051975_n.jpg
    1.2 MB · Views: 22
  • 428692519_10231426653199756_227282876420051325_n.jpg
    428692519_10231426653199756_227282876420051325_n.jpg
    364.4 KB · Views: 33
  • 428699081_10231426653319759_4226085760699275343_n.jpg
    428699081_10231426653319759_4226085760699275343_n.jpg
    359.1 KB · Views: 26
  • 428711850_10231426653399761_2025162625403527045_n.jpg
    428711850_10231426653399761_2025162625403527045_n.jpg
    273.4 KB · Views: 32

Your message may be considered spam for the following reasons:

If you wish to reply despite these issues, check the box below before replying.
Be aware that malicious compliance may result in more severe penalties.
Back
Top