Build Log: ED-209 Stop Motion Armature

CheesyGrin

Active Member
Greetings!

For the past 5 months I've been working to recreate the ED-209 stop motion puppet. In those 5 months I've studied pictures, read and re-read "Stop Motion Armature Machining", taken hundreds of screenshots from the movie, built a small machine shop in my garage, and have taught myself basic machining skills. Whew! Lot's of planning, thinking, and buying. :wacko

This project has been SO MUCH work and I get SO LITTLE time to build. I always feel intense pressure to post regular updates! But I'm ready to include others in the build. I could use the power of more brains (and a little encouragement too). The talent in this group is unmatched, imho. I'll do my best to contribute value. Please don't hesitate to offer feedback, criticism, or a kind word. Your input is much appreciated!

Here we go:

Design
I reverse engineered the armature design from two sources: (1) 2 grainy, black and white Cinefex photos and (2) the Horizon vinyl ED-209 kit. I created a 1:1 3D model in SketchUp. I've been using the 3D model to guide the build. SketchUp does not [easily] provide shop drawings automatically from the 3D model. I manually create orthogonal views with dimensions and build details. Here are a few pics of the 3D model, current revision:
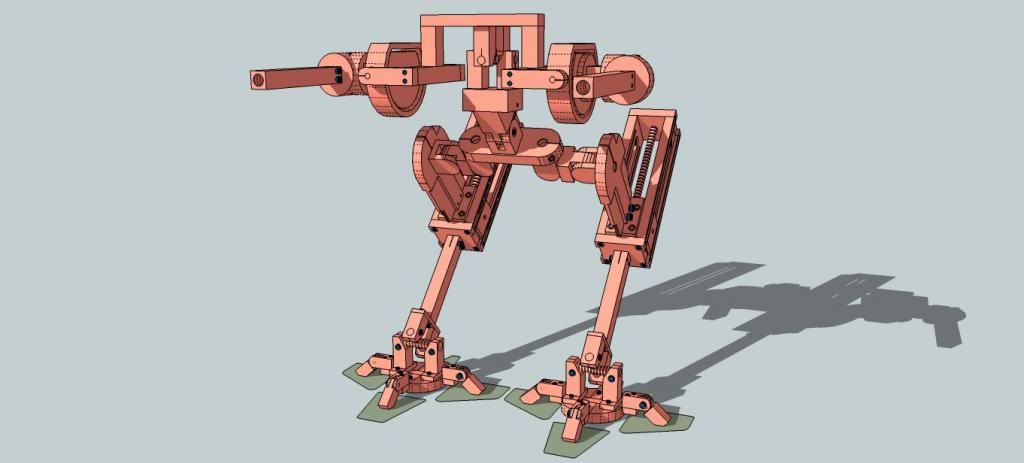


Feedback welcomed!
 
Nice job CheesyGrin. Since you know Sketchup, would it be difficult for you to learn Blender? At least enough to prepare this model for print? That might give you better reference to work with when building the final armature.
 
Nice job CheesyGrin. Since you know Sketchup, would it be difficult for you to learn Blender? At least enough to prepare this model for print? That might give you better reference to work with when building the final armature.

Thanks! By "print" do you mean 3D print? If so, it's a good thought. I'm considering a 3D printer for the outer parts for sure. I'm sure the Horizon parts may need either replacing or augmenting.
 
Hi CheesyGrin - yes, I meant 3d printing. If you get them printed out fine enough you'll be able to match your steel or aluminium armature sections to them. Blender will export (natively) to .stl, which most printers recognise.
 
Hi All,

Thanks for the kinds words everyone! Here's an update:

This is my humble machining area! It took me ~3 months to acquire, install, and setup:


I bought all raw materials from eBay - 6061 aluminum and stainless steel:


Here's the first shop drawing!


This project required a 4-jaw chuck to hold the square stock. This was the first facing operation on the ED-209!


I learned quickly that machining required tools. Lots and lots of tools. I built tools to build tools that helped me to build the actual parts. Seriously. Here you see the "T" stop I made and a tapping guide. The tapping guide was critical to keep from breaking $8 #2-56 taps:


First holes drilled and tapped:


This is the start of the footpad. I turned a section of 2"x2"x1/4" aluminum to get the final part:


After some milling (sorry for the blur):


Here's the first assembly:


I'll have some build time this weekend. I'll post an update for sure. Thanks for following along!
 
Bravo, good sir! Bravo! One day...........one day I will have those machinesas well! Then I will spend lots of money on tools to build tools to build parts.

ED-209 parts!

Joe
 
Very nice to see aluminum being worked that way: nice and crisp! Keep up the good work, I'll make sure to follow your thread from now on:)
 
Yikes! This is awesome. ED-209 is a favorite, but making the actual stop motion armature I thought would just be a dream. Go man go!!
 
Hi All,

Thank for the great feedback! Build Update:

If there's one thing I'm learning about machining it's this - prepare to re-machine, often. Admittedly, I'm an amateur. I found myself examining completed parts and deciding to rebuild this weekend. The original parts (rev. 1) weren't bad but I countersunk the screws too much. Not countersinking was actually more accurate to the original armature. After a rebuild, I'm much happier with rev. 2:


Since I had the equipment setup for drilling, I built all pieces of the ankle (universal joint). These parts are sitting in place:


The next operation was to join the end pieces to the flat bar. This created a challenge though. I did not have a means for clamping the pieces together to allow drilling both pieces simultaneously. So I stopped, went inside, and began to ponder a solution. What I came up with was a custom jig that would hold both pieces in perfect relation, one to the other, and hold them securely to allow drilling. Here's my quick concept sketch:


I decided to go with the quicker, simpler design to save build time. Here's some photos showing the progress and semi-final jig:


I need to tap the holes and make the clamp. The next update will show the jig in action followed up with (hopefully) perfectly joined bases to universal joint sides. Thanks for tracking the thread! :)
 
Looking very professional Chris :thumbsup

Thanks so much!

Finally a build update! I feel like my pace is slightly slower than Mountain Man from Duck Dynasty. If you don't know anything about Duck Dynasty, disregard my analogy, and just know that I'm inching along on this build. Anyway, on to the update:

I built two jigs to help me produce better parts more repeatably. The first is a drilling jig and the second a radius jig. I'm not cutting a radius in this instance but found another great use for the jig. You can see them both in action here:


Here's the universal joint used in the ankle:


After a few hours of work I'm beginning to see something familiar:


And some rough cuts on the second foot assembly:


I might make more progress tomorrow. If so, I'll share! Feedback welcomed.
 
Feedback? Hell, how about money? Is that welcome? Can I have an armature? LOL!

Dammit, this makes me want my own machining equipment even more! Awesome work! Can't wait to see more!

Joe
 
You make it look easy...love the tricks you used to make the pieces: nice and clean for sure. Quick, let's continue that great build:cool
 
Feedback? Hell, how about money? Is that welcome? Can I have an armature? LOL!

Dammit, this makes me want my own machining equipment even more! Awesome work! Can't wait to see more!

Joe

Thanks for that. A veteran machinist recommended I cut 2-3 extra parts with each machine setup. It's wise advice. My first priority has been to ensure the armature is mechanically sound. The universal joint is an example. It's an exotic, precise joint. It must maintain position under the weight of the entire model. Point is - If my design is faulty, I don't want 3 just like it.

So far, all is mechanically sound! I'll likely take the sage wisdom of said machinist. I doubt there will only be one ED when I'm done.

- - - Updated - - -

You make it look easy...love the tricks you used to make the pieces: nice and clean for sure. Quick, let's continue that great build:cool

Thank you for the great compliment!
 
This thread is more than 9 years old.

Your message may be considered spam for the following reasons:

  1. This thread hasn't been active in some time. A new post in this thread might not contribute constructively to this discussion after so long.
If you wish to reply despite these issues, check the box below before replying.
Be aware that malicious compliance may result in more severe penalties.
Back
Top