sweartoeric
Active Member
Rubies tends to be a dirty word in most circles - but I was really interested in doing the cheapest, best looking Fett helmet possible. There are some amazing fan-made pieces to be had out there, but I liked the challenge of taking this sub-standard piece and making it shine.
I started with the Rubies 2-piece Jango Fett. It leaves a lot to be desired, BUT: in my opinion it is a serviceable sculpt - and as a bonus - full visor!

The next step for me was the most obvious omission - the dent. I used a heat gun and a screwdriver handle.

Not the prettiest, but we can fix that later. Next came some sanding and primer.

This piece has a rather flimsy mechanism for locking the 2 pieces of the bucket together, so I used 2 part epoxy on the inside seam, and bondo on the outside, which also helps to hide the seam. I also preweathered some areas prior to the nest step - I really want this thing looking grimy.

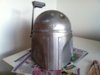
Next came some metal finish. You can see some of the pre-weathering effects underneath this coat. I also sanded out the dent a bit with a dremel to get it looking a little better.
Actually - here's some of that pre weathering I was talking about.

Gives it a nice crusty texture.
I'll leave it here for now - next comes the base painting!
I started with the Rubies 2-piece Jango Fett. It leaves a lot to be desired, BUT: in my opinion it is a serviceable sculpt - and as a bonus - full visor!
The next step for me was the most obvious omission - the dent. I used a heat gun and a screwdriver handle.
Not the prettiest, but we can fix that later. Next came some sanding and primer.
This piece has a rather flimsy mechanism for locking the 2 pieces of the bucket together, so I used 2 part epoxy on the inside seam, and bondo on the outside, which also helps to hide the seam. I also preweathered some areas prior to the nest step - I really want this thing looking grimy.
Next came some metal finish. You can see some of the pre-weathering effects underneath this coat. I also sanded out the dent a bit with a dremel to get it looking a little better.
Actually - here's some of that pre weathering I was talking about.
Gives it a nice crusty texture.
I'll leave it here for now - next comes the base painting!