You are using an out of date browser. It may not display this or other websites correctly.
You should upgrade or use an alternative browser.
You should upgrade or use an alternative browser.
Blueprint for AT-AT Revell
- Thread starter baloo
- Start date
Scratchy
Sr Member
Hi Jay! ... And thank you hehe
Screenshot = MAJ + COMMAND (apple) + 3
... What's up with your radar dish? (I can't wait)
I'm Mac and PC, I'll have to try that keyboard command. Thank you.
I cast the parts in the order of the mailing list. Then I send out the email confirmation. I'll be casting more this afternoon.
Nice job! I'm actually doing the same exact thing for a TRON Legacy Recognizer. How exactly did you adjust for the lens distorts? I'll echo that doing this using Illustrator isn't easy, but I think it's probably the best way to go if you're cutting styrene.
Good luck! I'll be watching!!!
Good luck! I'll be watching!!!
baloo
Active Member
...
I cast the parts in the order of the mailing list. Then I send out the email confirmation. I'll be casting more this afternoon.
... :confused Jay, could you tell me where I stand on the list? In advance thank you!
Nice job! I'm actually doing the same exact thing for a TRON Legacy Recognizer. How exactly did you adjust for the lens distorts? I'll echo that doing this using Illustrator isn't easy, but I think it's probably the best way to go if you're cutting styrene.
Good luck! I'll be watching!!!
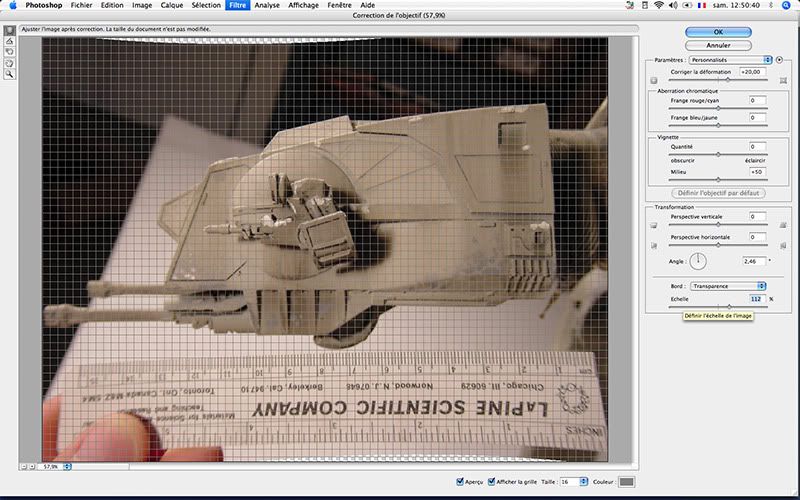
Thanks daverep. The corrections of distortions due to the lens of the camera are made on Photoshop:
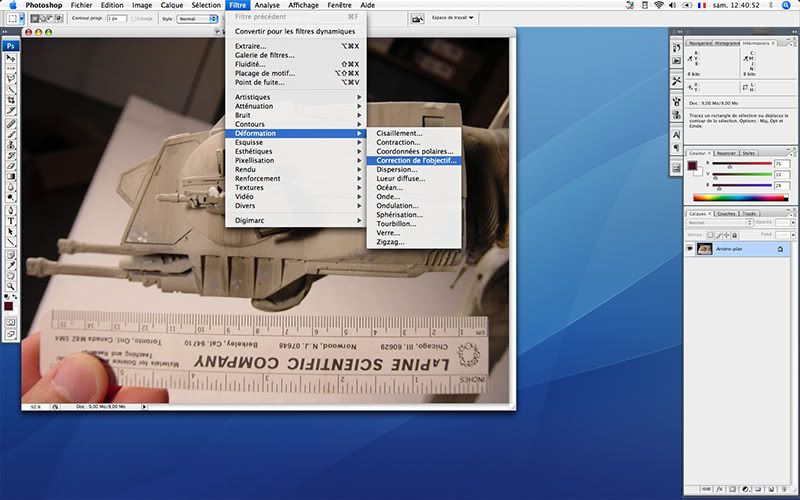
Here is the welcome window:
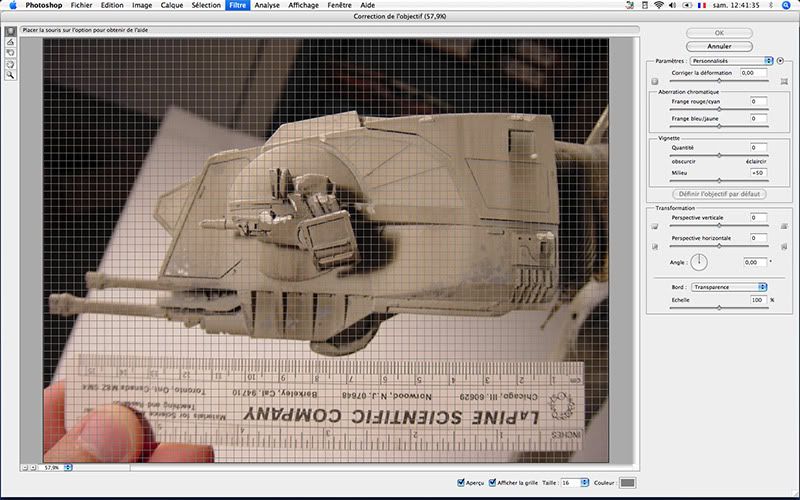
We start by straighten the image (this could have been done it before but it's just as easy to do so by this way). We select the two points that we want to put back to the horizontal (roll):

Result:
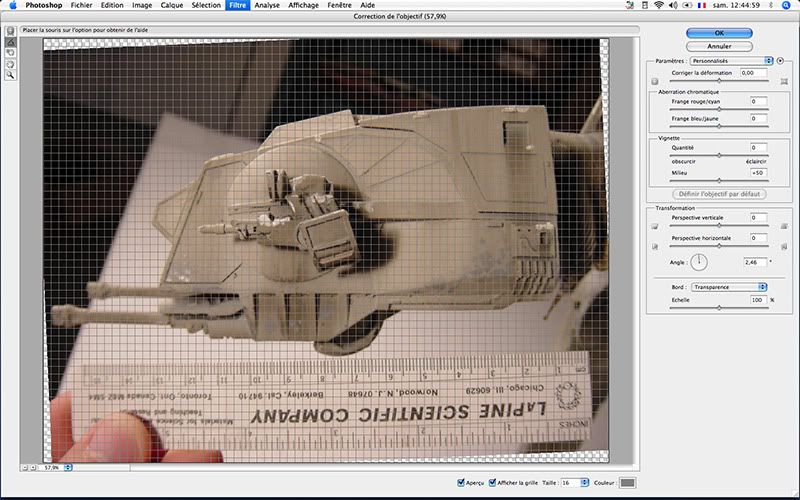
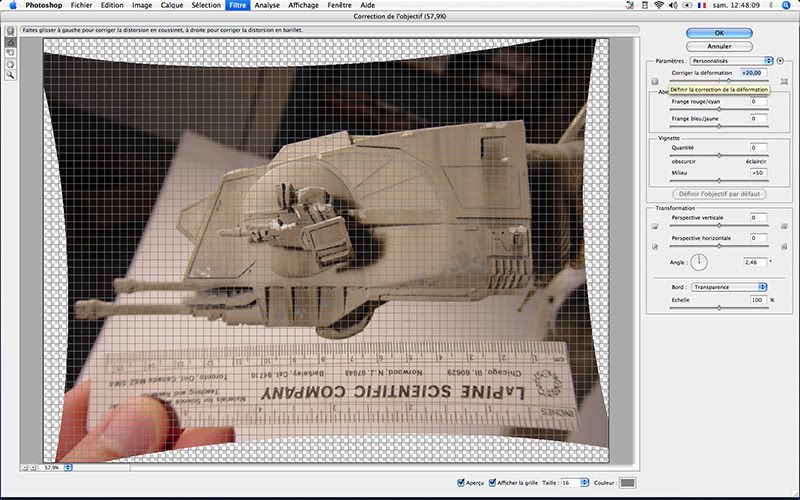
We can now look to make up the deformation due to the lens:
We can also "correct" alignment shooting both on the axis of pitch than on the one of yaw (what I did with the bottom shot), but this is not helpful here.
It remains to give the right size:
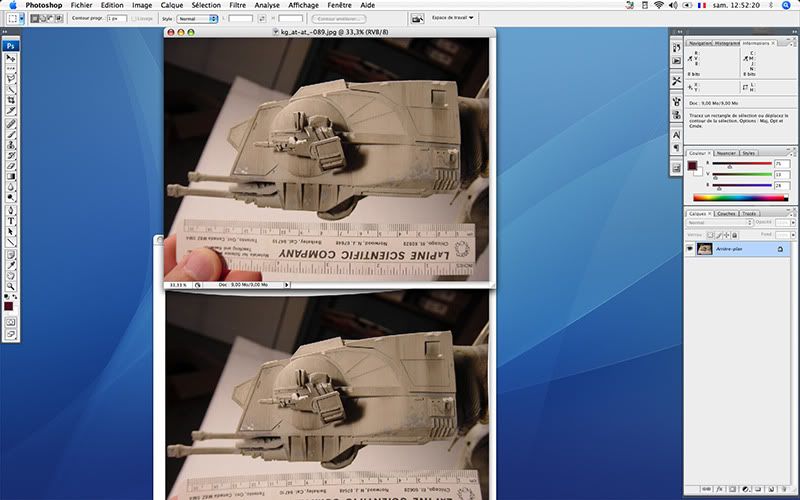
Before and after:
For lines of sight, just go to Illustrator:
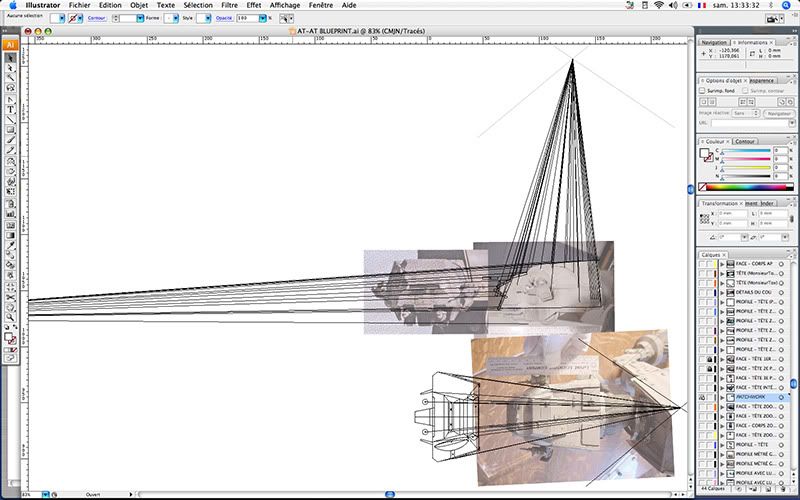
Hem ... Not easy to explain the gas plant but basically, the goal is to find the origin of the shooting (the lens) and its distance from the subject. Then we draw lines between this point and this and that point of the pic. We define a reference plane on which all the lines "just come and print the picture". Ensure that the said plane is perpendicular to the central axis of the shooting.
This aims to control whether a construction point is misplaced or not.
... Tedious, uh? :wacko
darth_daniel
Sr Member
Thanks for the cool tutoral, it´s extremely helpful. Just how do you know by how much you have to correct lens distortion?
baloo
Active Member
Thanks guys! Just happy to be helpful.
@ daverep: The headaches... That's me who got them hehe! :lol
@ darth_daniel: This is by guesswork (visual aspect, you know).")
@ daverep: The headaches... That's me who got them hehe! :lol
@ darth_daniel: This is by guesswork (visual aspect, you know).
... the curves that were supposed to be straight lines come back to their original visual aspect...
If you're using a toy as reference, like I'm having to do, and you take your own photos with a DSLR, Photoshop will read the metadata within your pic file and automatically adjust for lens distortion when you run the Lens Correction filter.
Baloo...you are a genius my friend! I'm still stunned on your focal point technique!
Dave
Baloo...you are a genius my friend! I'm still stunned on your focal point technique!
Dave
clancampbell
Sr Member
Incredible work so far!
Rich
Rich
Many thanks, guys!
@ daverep: it's very cool, that. You are under which version of Photoshop?
... Because from my side with my CS3 version and my little Coolpix S1, I still need to do it manually ...
I'm using CS5...soon to move up to CS6. I'm not sure when Adobe started including the lens presets. I'm sure anyone who's a professional photographer could chime in. I'm a video/graphics guy, so I'm a bit lost on that. But I used the Lens Correction on the photos of the die cast I have and found some big differences. It never even occurred to me to run that filter.:lol Again, many thanks for the tutorials!
thumbsup:thumbsupFlyAndFight
Active Member
Excellent work, Baloo! Thanks for sharing!
baloo
Active Member
... WIP of the day :
Here's a little update with the patches (one or two niceties that I've noticed when gluing). I pieced together a side to see if everything fits well. I have the parables holder-guns to do after but it starts well.
First, one of the blueprint's patches:

And the board of templates for cutting:

Here the PDF file in "full" version (with body/neck, cutaway and templates): AT-AT BLUEPRINT.pdf
... And still in ".ai" file but zipped : AT-AT BLUEPRINT (RPF).ai.zip
I glued the parts making up the left flank and did a dry assembly to verify. Sounds good:


Well, there is no reason to laugh and cry victory, eh ... This is just the beginning ...
... The more "delicate" in this approach is to maintain the integrity of forms because the group flank/front/rear couples/floor/ceiling is not glued.
... I let you guess why.
Here's a little update with the patches (one or two niceties that I've noticed when gluing). I pieced together a side to see if everything fits well. I have the parables holder-guns to do after but it starts well.
First, one of the blueprint's patches:
And the board of templates for cutting:
Here the PDF file in "full" version (with body/neck, cutaway and templates): AT-AT BLUEPRINT.pdf
... And still in ".ai" file but zipped : AT-AT BLUEPRINT (RPF).ai.zip
I glued the parts making up the left flank and did a dry assembly to verify. Sounds good:
Well, there is no reason to laugh and cry victory, eh ... This is just the beginning ...
... The more "delicate" in this approach is to maintain the integrity of forms because the group flank/front/rear couples/floor/ceiling is not glued.
... I let you guess why.
Attachments
Last edited:
baloo
Active Member
@ Scratchy: Hehe ... Thank you Jay! It is true that we learn all the time with those softwares. Personally I think I master approx 60%, and that's already not so bad.
... But what kind of feature are you talking about? That of using Illustrator to draw blueprints? Calculate the dimensions of cutting templates?
For the first assumption, it seems to me that you do it already, right?
As to the second, Adobe Illustrator does not yet have of artificial intelligence enough advanced (although sharing the same initials)... So you will have to use yours hehe!
@ christrom: Thank you, I appreciate! Sure you can use my blueprint; it's there for that, you know.
I follow with great interest your thread about your ERTL diorama and I'd be curious (not to say tempted!) to see your endeavor on a motorized REVELL. :love
@ daverep: "... In store next"? There are so many! ... But it's not for now, one thing at a time.
tek2graphics
Sr Member
NICE!!!, I might have missed it... but what thickness are you using for material?
Similar threads
- Replies
- 99
- Views
- 16,708
- Replies
- 67
- Views
- 26,825
- Replies
- 13
- Views
- 6,104
- Replies
- 84
- Views
- 46,235