1/72 LAAT Republic Gunship

Analyzer

Master Member
I wanted to take advantage of my new found modeling time from the whole quarantine thing and finally tackle a kit that I have been wanting to build for over a decade now since I got it

First, the scale is up for debate. Revell said 1/74 in earlier releases, but then I also seen it listed as 1/72 later. To add to the confusion, the fact that it is based on the Clone Wars cartoon series version, not the movie versions, makes it hard to really accurately measure against any movie references or numbers. So, going off the clone troopers inside, 1/72 seems perfect and it looks good with 1/72 stuff so I am happy calling it 1/72..

Next, being based on the Clone Wars cartoon series version, there are a few notable differences.

Note, there is a smaller "pocket kit" version that is based on the movie version which includes the 2 side ball gun turrets. The scale on that is supposedly around 1/172 which is way too small for me. If it was around 1/144 maybe I would pick it up. Why Revell chose to do a small one of that a large one of the cartoon version is beyond me, but that is another topic for another time.

The main difference in the cartoon one is the side door configuration which is much different
LAATi_snow.png


1-HN-SFS-Republic-Gunship-Star-Wars-1.74.jpg


The overall shape while very close, is a little different which sometimes makes it hard trying to replicate what you see in ref pics on the model so you have to make a few compromises. The Revell one feels "squished" lengthwise compared to the more elongated feel of the studio model

There are some great pics here of the studio scale model that was used to help create the digital assets. I am not sure if this was ever used in filming, or just a a reference. There are a number of differences between this and what was on screen as well


kg_republic_gunship-019-1.jpg


Since I forgot to get a starting picture, I will borrow this one

2-HN-SFS-Republic-Gunship-Star-Wars-1.74.jpg


As you can see, it is actually a pretty good representation of the Clone Wars one. Unfortunately that means a lot of chopping to get to the Attack of The Clones version

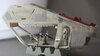
You have to square off the top and bottom corners of the side door as well as cut out the the other smaller side doorway in front of it

In addition, the top of the big side door frame needs to be more angled in the front. I originally skipped that part as I did not have enough ref when starting and missed that. It might be a little too late now to fix since I glued some things in, but I am very tempted to try fixing it as I cannot "unsee" it now

IMG_2660.JPG


Of course that new door means having to build some structure for it. I also replaced the interior cabin door to the cockpit area with something a little more detailed

I could find no reference material on this beyond scouring for screenshots so I kind of winged most of it going for the overall look instead of accurate details

IMG_2661 (2).JPG


You also have to open up the slats on the door as well as fill in the cutaway. I used the plastic from the internal cabin door that I had cut out to graft on since it was the same thickness plastic. I still have to clean it up and sand the edge flush, but this shows what was involved

IMG_2671 (2).JPG


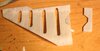
Then of course there is the overhead rail/piping structure. This was even harder to find exact details for

SWII_6855.jpg

SWII_6787.jpg


My solution for whatever those cooler/heater? looking parts are

Used a thin strip or the lined pattern with a thin U channel strip in the middle to make it
IMG_2868 (2).JPG


glue to a paper thin sheet of styrene

IMG_2865.JPG


cut them out and glue two of them together with two rod supports sandwiched in between

IMG_2880 (2).JPG


IMG_2882 (2).JPG


IMG_2883 (2).JPG


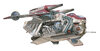
This is where I am currently at. The 1/72 Clone Troopers are 3-D printed by computergeek

The Yoda is a micromachines figure but he seems good enough size wise

IMG_2900 (2).JPG
IMG_2901 (2).JPG


I still have to figure out how to replicate the side bubble turrets. I have a clear round plastic packaging for "squinkies" or some similar toy that I had saved from my daughter's toys when she was younger. They seem to be around the correct size, but I had to order some polishing compounds as I have to sand away some internal supports they had so it would snap close

I also have to figure out the door arm mechanisms. If anyone can shed some more light on what they look like I would love to see any references you have. I have had a hard time wrapping my head around what they look like and could not find any really good shots of them
 

Attachments

  • IMG_2658 (2).JPG
    IMG_2658 (2).JPG
    646.1 KB · Views: 158
  • IMG_2899 (2).JPG
    IMG_2899 (2).JPG
    894.6 KB · Views: 1,117
Hot dam! I have one of these in the stash I've been saving to do exactly this. Its going to be awesome watching what you do.

I've looked at the door mechanism problem too and it's going to be a toughie. I suspect it's one of those CG asset cheats that is nearly impossible to replicate on a physical model. I resigned myself to the idea that my build would need to have the doors locked open, but that's also how it looks in every shot in the movie, so no big loss. Personally, I'm not looking for playability in my models. Love those trooper figures. I'm close to pulling the trigger on a resin printer to do stuff like that.

I gave up on making them function. I was going to try soldering brass and stuff, but honestly, I'll never display them closed anyway and as you said they were never closed in the movies

The studio model does have working one I think, or at least they look like they do

kg_republic_gunship-013.jpg

kg_republic_gunship-008.jpg

kg_republic_gunship-024.jpg


The problem is they are a bit different from what I have been able to make out of the CGI assets. And also that shape/length of the Revell kit doors is a lot different as well making it harder to figure it out

SWII_6730 (2).jpg

SWII_6758 (2).jpg

SWII_6761 (2).jpg

SWII_6724 (2).jpg


And I am not sure where I found this so I can give credit, but this shows the spindle kind of structure

Laati-NEGVV.jpg
 

Attachments

  • Clone Gunship.jpg
    Clone Gunship.jpg
    127.5 KB · Views: 171
If the doors are locked open, I'd go with some kind of brass or metal support rods (square) and then CA some styrene strips and bits on top to make them look like arms and (non-functional) hinges. Maybe anchor the rods into cargo chamber roof by making it one piece that loops down through the spindles, sort of a U-shape, and the bends to attach to each door. It would be a lot of tricky bending, but that's about the strongest option I can imagine. The weak points would be where the metal rods attach to the doors. Those doors are such big and unwieldy shapes that they're going to be fragile no matter what you do.
 
The LAAT lives! Awesome work here per usual. Mine's still in the stash, one day I'll get to it. I'll be following this thread closely!

The studio mock-up is a bit different from the CG assets, particularly in the missile launcher area. I thought I read somewhere that they meant for the doors to act as "air brakes" and flare out if needed on the studio model. I don't think it was used for filming at all, just reference for the CG artists. I think that explains some of the hinge weirdness.
 
If the doors are locked open, I'd go with some kind of brass or metal support rods (square) and then CA some styrene strips and bits on top to make them look like arms and (non-functional) hinges. Maybe anchor the rods into cargo chamber roof by making it one piece that loops down through the spindles, sort of a U-shape, and the bends to attach to each door. It would be a lot of tricky bending, but that's about the strongest option I can imagine. The weak points would be where the metal rods attach to the doors. Those doors are such big and unwieldy shapes that they're going to be fragile no matter what you do.

That is probably a good route to go

The LAAT lives! Awesome work here per usual. Mine's still in the stash, one day I'll get to it. I'll be following this thread closely!

The studio mock-up is a bit different from the CG assets, particularly in the missile launcher area. I thought I read somewhere that they meant for the doors to act as "air brakes" and flare out if needed on the studio model. I don't think it was used for filming at all, just reference for the CG artists. I think that explains some of the hinge weirdness.

yes, it has been sitting there beckoning me forever. I figured now would be a great time to start going to town and doing all the work in the secret hope that whenever I seem to bite the bullet and try scratch building, converting, or totally overhauling a model, somebody will release a new kit of it in better quality.

It happened with my old MPC Star destroyer. I had gotten about 50% of the way there, scatch building gunt turrts and hangars,adding tons of greeblie like detailing and when Zvedza released theirs and then Bandai released one that is close in size to the old MPC but thousands of times better

It happened with my old MPC Eagle Transporter. I got around 90% done, then they announced the new 1/72 tooling which blows the old one away and is a proper 1/72

Hopefully as I get near done with this, Bandai will announce one :lol:

as far as using the doors as a braking system /steering of sorts kind of makes a bit of sense when I look at them especially the way they are posed

Really awesome!

thanks for looking!
 
So, as far as the side pods this is what I am using. It requires grinding away those connectors. Of course that means needing to sand and eventually polish again. I am hoping in the process that clears up a lot of the distortion in the bubbles themselves. I have a back-up plan if this fails, but I am hoping it works since the backup plan is a slightly larger bubble that is just a bit too out of scale compared to these
IMG_2910 (2).JPG


here you can see that part that needs to be removed better

IMG_2913 (2).JPG


As for the doors, I think I have figured out a solution, and it actually allows me to move and even close the doors properly. I just have to redo the angle a bit on the one part and make a few tweaks, but here is the 1.0 version. I am considering this a trial run mock-up so nothing is glued in place yet. The hinges/arms do move, but I have to fix the angle of the one arm in the 2.0 version

For the rear arm, I used a thick styrene strip and rounded the edge, then I use some brass wire and tubing to create a "hinge pin" of sorts to allow it to move

first put the wire in the tube, and cut the tube end short

IMG_2928 (2).JPG


Then bend the wire, stick through the hole in the styrene arm

IMG_2931 (2).JPG


then add a tube on the other end and now it swings freely

IMG_2929 (2).JPG


I forgot to get detailed pictures of the front arm, but basically I cut out the zig zag like shape, copied it, cut out the copy, and glued the two together, then sanded them a bit to soften the edges, glue it to a styrene tube which fits snugly on some sprue going into the ceiling allowing the assembly to freely rotate

This is the two arms in there place (again, they are not glued and this is really just test fitting to see what I need to fix for the 2.0 version

This would basically be the doors closed positions (except for the brass rod/tube facing the other way instead)

IMG_2938 (2).JPG


IMG_2957.JPG


here is a better view of the zig zag shaped front arm. Basically, it allow it to swing past the change in height of the door frame, as well as allowing it to clear the back when the door is flared out on more of an an angle as seen in some shots

IMG_2958.JPG


IMG_2955.JPG
IMG_2943 (2).JPG


I also added the angle into the door frame to better match the studio model and movie look compared to the straight squared frame

IMG_2949.JPG

IMG_2952.JPG

IMG_2954.JPG
 
Awesome! I too have one of them in the stash. I was so shocked when I saw the "weathering" that was applied, as if someone had thrown the parts into a puddle of mud... It is in serious need of a repaint to look good. It would have been better if Revell had only painted the markings and base colours. A shame because they really had nailed the colours and skipping the dirt would have saved the builder quite some time. Your enhancements are great! I'm looking forward to seeing your progress. :)
 
Thanks. Seeing what you did with your Tie Bomber I look forward to you starting on this kit

Wow thanks. Sad story on my bomber - my molds to make a duplicate for my wife were the worst I've ever made. Must've been a bat batch of RTV, everything went wrong. I've been too busy/sad to go after that again, so I've been instead banging out fast/easy builds until my megaproject mojo comes back. You're helping with the latter though! We just finished some ESB/RotJ coloured TIEs, so maybe it's coming to be time. Hopefully the plastics store still exists when isolation is over. Meanwhile, I'll continue watching your excellent build with interest!
 
Wow thanks. Sad story on my bomber - my molds to make a duplicate for my wife were the worst I've ever made. Must've been a bat batch of RTV, everything went wrong. I've been too busy/sad to go after that again, so I've been instead banging out fast/easy builds until my megaproject mojo comes back. You're helping with the latter though! We just finished some ESB/RotJ coloured TIEs, so maybe it's coming to be time. Hopefully the plastics store still exists when isolation is over. Meanwhile, I'll continue watching your excellent build with interest!

That sucks about the mold. Fast easy builds are definitely as nice change of pace and Bandai makes that happen more often than not compared to Revell. I finished a few Bandai Ties recently myself
 
Finally got the 2.0 version of the door arms. Both sides done now


IMG_3216 (2).JPG

I used the wheel parts of these bits from the landing gear of the Bandai 1/72 Cosmo Zero. I had previously used the upper parts of them already for my Space 1999 eagle)
IMG_3213 (2).JPG


IMG_3231 (2).JPG


IMG_3240 (2).JPG


I put a bit of brass from left over photoetch sheets on the bottom to prevent the hole in the plastic from ripping and to give just a bit more support to the plastic

IMG_3241 (2).JPG


IMG_3242 (2).JPG

IMG_3217 (2).JPG


the range of motion is pretty good. this would be the farthest back position for the doors

IMG_3234 (2).JPG

IMG_3237 (2).JPG

and this is them more forward
IMG_3221.JPG


I can just about close the doors and would be able to if I had not had that brass rivet up so high on the back arm. You can see below how it blocks it from getting under the frame. No bog deal since I am not displaying them closed. i could fiddle with it more, but at his point I am moving on. If I ever do a second one, I may go for all metal parts and do some soldering and maybe small screws etc so I do not need as much plastic support, but this is good enough and I can still freely position them in various open positions

IMG_3238.JPG


IMG_3255.JPG


Also added some bits from the X-Wing landing gear for the door
IMG_3230 (2).JPG


I don't have any good ref on what is actually there so I just kind of winged something

IMG_3228 (2).JPG


Loosely installed and dryfitted for picture purposes

IMG_3251 (2).JPG


IMG_3250 (2).JPG


Next on to adding the LEDs for the interior lights
 
Some nice mechanical work there.

TazMan2000

Thanks!

I got the troop bay lit.

Still have to fiddle around with the level as it currently seems pretty bright as well as fixing light leak

These are full daylit room

IMG_3267 (2).JPG


IMG_3269 (2).JPG

IMG_3270 (2).JPG


This is a dimly lit room at night (sorry about the blurry photo, this was more of a light level test than a beauty shot)
It seems way too bright so I will try stepping down the LEDs or add some thin styrene sheet light covers to drop the overall brightness

IMG_3261 (2).JPG
 
Last edited:
Loving what you’re doing! Keep up the great work!

Thanks!

Got a bit more work done in roughing out the missile and missile launchers mechanisms. This involved lots of chopping as the Revell kit just has a flat barely detailed plate with two missile halves on it an no opening in the launch tubes

Looking at screen shots It is hard to tell exactly what it looks like in there

SWII_6759 (2).jpg


It looks like a chamber of some sort that the missiles get loaded into from a conveyor belt type assembly so I kind of winged it

I used the Red 3 engine can from the Bandai 1/72 X-Wing kit to add some detail as well as the Revell U-Wing engine can

IMG_3320 (2).JPG


IMG_3324 (2).JPG

IMG_3327 (2).JPG

IMG_3330 (2).JPG

IMG_3331 (2).JPG

IMG_3334 (2).JPG

IMG_3338 (2).JPG


Now to finish the other side and do some cleanup of edges etc...
 

Attachments

  • SWII_6759.jpg
    SWII_6759.jpg
    210.2 KB · Views: 207
Last edited:
This thread is more than 3 years old.

Your message may be considered spam for the following reasons:

  1. This thread hasn't been active in some time. A new post in this thread might not contribute constructively to this discussion after so long.
If you wish to reply despite these issues, check the box below before replying.
Be aware that malicious compliance may result in more severe penalties.
Back
Top