gteraberry
New Member
I was looking for a fun cosplay to do for comicon, and since this was my first ever cosplay, I decided to go with something simple, and chose a full weeping angel costume. It took roughly eight weeks and $200, but was completely worth it.

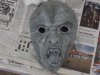
The first thing I did was the easiest, the mask. (disclaimer, I used a lot of rpf member Penwiper's tutorial to make this). I paper mache'd it so that it would fit closely to my face, and bought craft clay to sculpt the face. I haven't really sculpted before, so I got as much source material as possible from taking dozens of screenshots while watching Doctor Who.

I had to search for awhile to find the perfect shade of stone-grey, but I ended up getting a nice one from Home Depot. I think I got a quart. Getting highlights and lowlights to look perfect took awhile, but I enjoy painting, so this was one step I had fun with.
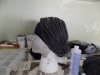
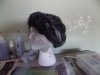
The wig was made of yarn, like penwiper, because I figured it would be a lot lighter. The cap was just leftover nylon material from the tights, sown over my foam head I bought. I went and got the thickest yarn I could find, and two bottles of fabric glue. Fabric glue, by the way, seeped through the cap and stuck to the foam head, so I had to be careful not just ripping it off and getting syrofoam stuck on the cap. The process was frustrating, getting it just the way I wanted, and I had to cut a lot of what I had already put on, because I had made it too big. Once the wig was looking decent, I glued the headband on, also made from nylon. Painting it was relatively easy, since I didn't want a lot of variations of the grey. For the painting though, I had to buy fabric mixture to mix with the paint. I was able to find it at Hobby Lobby for six dollars a bottle. I got four and that ended up being okay.

Making the arm/neck/head covering was...interesting. I bought two pairs of tights, one small for my arms, one big for my neck/head. Make sure you turn the tights inside our before you sew them, so that the seams are on the inside. The first thing I did was to sew the fingers into the feet. I also had to tuck in the fabric by my wrists, due to my thin arms. One thing I regret not doing for this step is using stronger thread. I had to sew many stitches over again because they snapped. But anyway, the fabric was stretchy enough to make it comfortable around my torso, so now the last piece to sew on was the head. The head covering was harder to make, and I'm still not completely satisfied with the job I did. Just be prepared to sew a big zipper in the back, and you'll be fine. You'll just have to mark where you need to sew while it's still on your head. I recommend getting a friend to do this, since I wasn't very good at doing it myself! (I don't have any photos of the hood, so oh well )
)


For the wings I got eight or so foamcore boards, like the ones kids use in science fairs. I drew the wing shapes I wanted on newspaper, based on all the reference photos I got, and traced them on the foam to cut out. After I got the general wing shape cut out, I cut out general feather shapes and arranged them on the foam until I was happy. Gluing them on took a big amount of hot glue, but not enough to make the wings substantially heavier. (Side note: The wings each have two sides, for a total of four sides to make. Each side was separate until I glued them to the support system.) Painting them was a long project, and I wish I had made the shades more subtle.


For the support structure, I think I could explain it better through a diagram:

Gluing the two sides of the wings together took a lot of hot glue, and I used clamps to hold the pieces together while drying. If you have any questions, I can answer them in comments, b/c I know I'm not an awesome diagramer For the straps, I just cut up my old backpack and glued it on the back piece. The only problem with that was that I had to cut the straps and make buttons. It was too hard to get them around my arms the normal way. The buttons worked perfectly though, because I could get the wings on just fine by myself in around five minutes or less.


I bought a dress form, an adjustable hoop skirt on ebay, and four yards of discount suiting at a local crafts store. I spent six or more hours a day three days in a row just getting the folds stitched in place. Luckily I borrowed Dracula on audiobook so I could have something to do This was one instance where I wanted to look different than the film weeping angels. I thought it would look better with less folds, and also be less work, so I just went ahead and did what I thought looked best. Also, I stitched a hidden pocket on the inside! I won't give much instruction on painting from now on, because the best I can say it "do some highlights and lowlights".


An easter egg I painted into my skirt was a Gallifreyan rune, reading "RUN".

Since I chose to make the dress into two separate pieces, I chose to use an old t-shirt for a base to use and stitch the folds onto it. I got to use my sewing machine for this one, so it took a lot less time than the skirt. For the wing panel in the pack, I just made a flap that is just stitched in on top and can go over the wing support structure. I also made a sash, just because, but I decided not to use it.

I got a huge response at Comicon, which was really cool. Several people, including a joker, an Elsa, and several Doctors, said they thought I was stone, so that was a good sign There were some kids that were frightened of me, so I took of my mask for a few, just to show them that I wasn't a "real" weeping angel. A few people soniced me as I went by, and there were a lot of blinkless stares. Three hundred or so people wanted to take photographs, and that might have been the best part. Everyone was really friendly and weren't shy at all. My only regret was not taking more photos

![CGSkd3kVIAA-_zW[1].jpg](https://therpf-f28a.kxcdn.com/forums/data/attachments/224/224175-174cc164a8d8b3cd5184998695ca7306.jpg "CGSkd3kVIAA-_zW[1].jpg")
![CGSkd39UQAAuOm0[1].jpg](https://therpf-f28a.kxcdn.com/forums/data/attachments/224/224176-b04e878b953b20f141e50e99695b00f3.jpg "CGSkd39UQAAuOm0[1].jpg")
The first thing I did was the easiest, the mask. (disclaimer, I used a lot of rpf member Penwiper's tutorial to make this). I paper mache'd it so that it would fit closely to my face, and bought craft clay to sculpt the face. I haven't really sculpted before, so I got as much source material as possible from taking dozens of screenshots while watching Doctor Who.
I had to search for awhile to find the perfect shade of stone-grey, but I ended up getting a nice one from Home Depot. I think I got a quart. Getting highlights and lowlights to look perfect took awhile, but I enjoy painting, so this was one step I had fun with.
The wig was made of yarn, like penwiper, because I figured it would be a lot lighter. The cap was just leftover nylon material from the tights, sown over my foam head I bought. I went and got the thickest yarn I could find, and two bottles of fabric glue. Fabric glue, by the way, seeped through the cap and stuck to the foam head, so I had to be careful not just ripping it off and getting syrofoam stuck on the cap. The process was frustrating, getting it just the way I wanted, and I had to cut a lot of what I had already put on, because I had made it too big. Once the wig was looking decent, I glued the headband on, also made from nylon. Painting it was relatively easy, since I didn't want a lot of variations of the grey. For the painting though, I had to buy fabric mixture to mix with the paint. I was able to find it at Hobby Lobby for six dollars a bottle. I got four and that ended up being okay.
Making the arm/neck/head covering was...interesting. I bought two pairs of tights, one small for my arms, one big for my neck/head. Make sure you turn the tights inside our before you sew them, so that the seams are on the inside. The first thing I did was to sew the fingers into the feet. I also had to tuck in the fabric by my wrists, due to my thin arms. One thing I regret not doing for this step is using stronger thread. I had to sew many stitches over again because they snapped. But anyway, the fabric was stretchy enough to make it comfortable around my torso, so now the last piece to sew on was the head. The head covering was harder to make, and I'm still not completely satisfied with the job I did. Just be prepared to sew a big zipper in the back, and you'll be fine. You'll just have to mark where you need to sew while it's still on your head. I recommend getting a friend to do this, since I wasn't very good at doing it myself! (I don't have any photos of the hood, so oh well
)For the wings I got eight or so foamcore boards, like the ones kids use in science fairs. I drew the wing shapes I wanted on newspaper, based on all the reference photos I got, and traced them on the foam to cut out. After I got the general wing shape cut out, I cut out general feather shapes and arranged them on the foam until I was happy. Gluing them on took a big amount of hot glue, but not enough to make the wings substantially heavier. (Side note: The wings each have two sides, for a total of four sides to make. Each side was separate until I glued them to the support system.) Painting them was a long project, and I wish I had made the shades more subtle.
For the support structure, I think I could explain it better through a diagram:
Gluing the two sides of the wings together took a lot of hot glue, and I used clamps to hold the pieces together while drying. If you have any questions, I can answer them in comments, b/c I know I'm not an awesome diagramer
For the straps, I just cut up my old backpack and glued it on the back piece. The only problem with that was that I had to cut the straps and make buttons. It was too hard to get them around my arms the normal way. The buttons worked perfectly though, because I could get the wings on just fine by myself in around five minutes or less.I bought a dress form, an adjustable hoop skirt on ebay, and four yards of discount suiting at a local crafts store. I spent six or more hours a day three days in a row just getting the folds stitched in place. Luckily I borrowed Dracula on audiobook so I could have something to do
This was one instance where I wanted to look different than the film weeping angels. I thought it would look better with less folds, and also be less work, so I just went ahead and did what I thought looked best. Also, I stitched a hidden pocket on the inside! I won't give much instruction on painting from now on, because the best I can say it "do some highlights and lowlights".An easter egg I painted into my skirt was a Gallifreyan rune, reading "RUN".
Since I chose to make the dress into two separate pieces, I chose to use an old t-shirt for a base to use and stitch the folds onto it. I got to use my sewing machine for this one, so it took a lot less time than the skirt. For the wing panel in the pack, I just made a flap that is just stitched in on top and can go over the wing support structure. I also made a sash, just because, but I decided not to use it.
I got a huge response at Comicon, which was really cool. Several people, including a joker, an Elsa, and several Doctors, said they thought I was stone, so that was a good sign
There were some kids that were frightened of me, so I took of my mask for a few, just to show them that I wasn't a "real" weeping angel. A few people soniced me as I went by, and there were a lot of blinkless stares. Three hundred or so people wanted to take photographs, and that might have been the best part. Everyone was really friendly and weren't shy at all. My only regret was not taking more photos Attachments
Last edited: