Trooper_trent,
Should I make a **SPOILERS** announcement? :lol
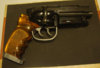
I believe the stunt pistol is shown when Leon knocks it out of Deckard's hand just before Leon gets shot. And towards the end of the film when Batty reaches through the wall and grabs the gun from Deckard it's the stunt. I think you can see the mold line along the top as Deckard is edging forward and the light flashes just before Batty crashes through the wall to take the gun. And of course when Deckard is climbing the armoire at the end and drops it to the floor, it's the stunt when it falls. But the close-up shot showing it on the floor with the water splashing on it is, I believe, the hero. Cut to close-up on Deckard's face as he realizes he can't go back for it and Batty is looking for him. I figure this shot is one of the reasons it had so much rust when seen at WorldCon. One of my favorite shots of the hero gun are in Deckard's apartment at the very end when he's trying to determine if Rachel is still alive and slowly reaches down to lift the sheets. It's the one place we clearly see the slotted screw. Which is why I prefer the slotted screw to the weaver knob. And I believe it's the hero in his holster when he and Rachel get back to his apartment and he cleans up after having being beaten up by Leon. Problem is we really only see the handle as its in the holster. But later in the scene we see the hero on the piano.
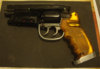
As to your question about bluing the bolt handle, to me it's what makes this particular prop so interesting. After all these years, we've finally seen the real deal thanks to Karl and we still have questions. And I'm excited to see how people interpret their own model to suit their tastes. From 'as first issued' to 'as seen at WorldCon' to 'as close to seen on screen as possible' and then there's folks making custom grips or Dave G and Rick Ross with their 'in universe' interpretations. It keeps me coming back to all the threads. And damn it, keeps me buying new versions of this gun!
I'd be curious to hear others chime in about where the hero gun appears.
Ted.
Should I make a **SPOILERS** announcement? :lol
I believe the stunt pistol is shown when Leon knocks it out of Deckard's hand just before Leon gets shot. And towards the end of the film when Batty reaches through the wall and grabs the gun from Deckard it's the stunt. I think you can see the mold line along the top as Deckard is edging forward and the light flashes just before Batty crashes through the wall to take the gun. And of course when Deckard is climbing the armoire at the end and drops it to the floor, it's the stunt when it falls. But the close-up shot showing it on the floor with the water splashing on it is, I believe, the hero. Cut to close-up on Deckard's face as he realizes he can't go back for it and Batty is looking for him. I figure this shot is one of the reasons it had so much rust when seen at WorldCon. One of my favorite shots of the hero gun are in Deckard's apartment at the very end when he's trying to determine if Rachel is still alive and slowly reaches down to lift the sheets. It's the one place we clearly see the slotted screw. Which is why I prefer the slotted screw to the weaver knob. And I believe it's the hero in his holster when he and Rachel get back to his apartment and he cleans up after having being beaten up by Leon. Problem is we really only see the handle as its in the holster. But later in the scene we see the hero on the piano.
As to your question about bluing the bolt handle, to me it's what makes this particular prop so interesting. After all these years, we've finally seen the real deal thanks to Karl and we still have questions. And I'm excited to see how people interpret their own model to suit their tastes. From 'as first issued' to 'as seen at WorldCon' to 'as close to seen on screen as possible' and then there's folks making custom grips or Dave G and Rick Ross with their 'in universe' interpretations. It keeps me coming back to all the threads. And damn it, keeps me buying new versions of this gun!
I'd be curious to hear others chime in about where the hero gun appears.
Ted.


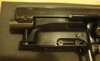
") It is easy to get the spring position slightly off, but it is important so that the hand engages with the ejector ratchet correctly.
It is easy to get the spring position slightly off, but it is important so that the hand engages with the ejector ratchet correctly.