Genonono
New Member
Hello, all. This is my first attempt at cosplay. I'll be posting pictures of the process I went through to get where I am now. I had roughly 2 months to get it done by Comic Con 2013, starting when I was inspired by the upcoming game Batman: Arkham Origins' first screenshots and the awesome trailer.
I had to learn things along the way, as well as balance time between work, school, and life in general. So consequently there were many setbacks that I'll go over. I burned more money, time, and effort than I should have. I'm happy with the result though, and I'll more than likely do the whole thing all over now that I have the knowledge from experience on how to do it better.
So let's get this started!
Here is the trailer for the game:
And here are a couple of screenshots:
View attachment 210196
View attachment 210197
The trailer version and the screenshots a little different so I decided to use the trailer version as the main reference.
---------------------


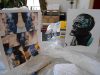
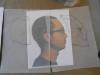
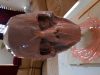
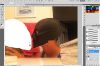
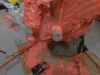
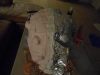
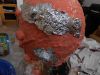
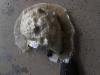
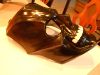
I began by printing front view and side view pictures of myself on cardstock paper, cleaning up the pictures in Photoshop, and tracing out sketches to get a better idea/grasp of the design and how it would work on my head. The nose was a bit of a problem but that was fixed by adding space in the front lower half of the mask.

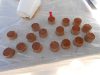
Non-hardening modeling clay from Walmart.

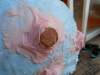
Setting up before I begin sculpting on the styrofoam head.


It was idiotic of me to buy a multi-colored clay pack from Walmart rather than a pack of same-color clay from my local art store. It's hard to tell how smooth or well-made the sculpt is if it's not one uniform color.

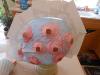
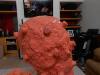
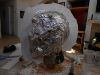
I needed some sort of stand for the sculpt so I stuck a wooden stick in the styrofoam head and placed it in a pot in the backyard. Improvisation at it's best.


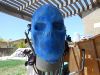
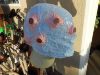
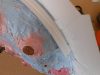
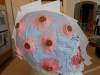
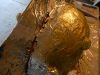
Here's the first layer of silicone caulk mixed with blue acrylic paint after I covered the clay sculpture with petroleum jelly. It seemed fine at first....

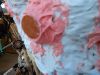
The darker red silicone is the second layer, with red acrylic paint and liquid glycerin. That stuff was hard to work with. The third layer is the pink coat, which was silicone caulk mixed with baking powder. That was much easier to use.


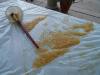
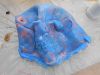
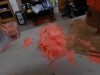
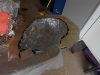
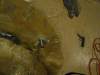
I made a big mess coating the register keys with fiberglass. I added too much fiberglass hardener and accidentally tipped the cup over. It started fizzing in the sunlight and I freaked out and ran inside, watching behind the window as it smoked up.
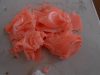
As for the keys, I spread petroleum jelly on the plastic table cloth before placing the coated register keys on it so it wouldn't stick to the plastic.


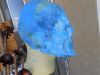
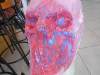
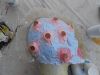
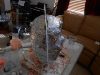
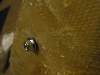
The blue coat is the fourth layer, I believe. Following some videos of how to make a mold out of silicone caulking, I made the register keys like this since fiberglass sticks to fiberglass and the support shell over the silicone will be fiberglass. At this point, however, the silicone mold was moving around off the sculpt. Coating the sculpt with petroleum jelly was a bad idea since silicone wouldn't stick to it anyway. Oh well....


Here's the bristol paper mohawk as the divider to make my two piece support shell mother mold thing. I had trouble keeping the mohawk up so I added some paper stands on the base of the mohawk as well as string to hold it together.

I didn't run into any problems making the fiberglass support shell, but.......

....getting it to work was a different story. The register keys still pulled off some silicone caulk and on the other half of the support shell, some keys wouldn't come off.

I peeled the mold off my sculpt and threw it away. It wasn't a complete waste of time because at least I learned something: Never do this method ever again. It might be a lot cheaper but you get what you pay for. Perhaps I'm just not skilled enough to do this method well but I personally wouldn't recommend it. You have to do very thin layers at a time or else the silicone caulk won't cure. And it smells. And it's ugly. There were just too many variables and such.
I decided that instead of giving up and crying in the corner over this failed attempt, I looked to the more stable yet expensive route: Smooth-On products.


Oh yeah, and here are some damages from letting the fiberglass resin drip onto the styrofoam. This image is me trying to use ReoFlex 30 Urethane Rubber. I have no idea what I was thinking. I didn't know how to use it but it was a Smooth-On product at my local Blick store so I grabbed it and used it. Such a fail.
-----------
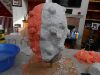
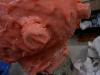
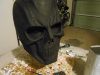
I went back to the art store, bought a bunch of non-hardening BLACK clay and sculpted away. This time I did the right measurements (the previous sculpt was waaaay too small). Unfortunately I forgot to take pictures.

Took selfies and did some work in Photoshop to make sure the final product will fit on my head. The side view was the most accurate but the front pictures were never consistent so I couldn't rely on that. I just made measurements and made educated guesses when sculpting.

Homemade styrofoam head stand.


First layer of Rebound 25 Brush On rubber, without the Thi-Vex rubber hardener. This stuff is awesome, especially since it doesn't need to be in a thin layer in order for it to cure.

Second layer with Thi-Vex. Filled in the eyes to get a simpler mold on the outside.

Okay now here I tried making some register keys out of the rebound 25 so I got some small paint containers I already had, filled it with the silicone, and stuck it on the mold. BUT I thought of something even better after:


Instead of making pure silicone register keys, I stuck some wooden pieces and other paint containers onto the mold and coated it with more silicone. This saved me a little bit of silicone (because every ounce counts!). Well, there's that and there's the fact that I couldn't pull the paint containers off the mold anyway.


Look at all that wasted silicone.


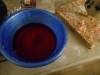
I used red food coloring mixed in water for the second layer of the second half of the shell just so I can determine which layer is which. This whole thing was a failure for a couple reasons:
- The plaster bandage sucked because it was fragile and didn't fully cure even after a whole day.
- I couldn't pull it off the mold since I placed the register keys wrong.
*** A WORD OF ADVICE FROM THE UNFORTUNATE ***
When placing register keys on the mold, make sure they face the same way. If you do what I did and place register keys on the opposite ends of the helmet, it'll be like pulling a support shell upwards from a T-shaped sculpt and mold (in other words, you can't because the register keys act as a lock).
It might sound like common sense not to do that but I got so caught up and excited since it was going so well so far that I just didn't think things through all the way. I had to cut off a couple keys from the back of the helmet before trying again at making the support shell.

Now before I began making the fiberglass support shell I noticed that some of the register keys were shaped like a V (where the base is smaller than the top, thus creating the similar problem I had earlier about that T-shape which prevents pulling off the support shell). To fix this issue.....

....I covered the entire mold with aluminum foil to simplify the whole thing. The V-shape now became more of a cylinder shape with parallel sides. It worked wonders.


Yep. The first half pulled off easy. I was so happy :')

I covered the fin of the first half of the shell with more aluminum foil so the second half won't stick to the first. And like the first, the fiberglass will stick to the foil.


Nuts, bolts, and rubber washers to hold both halves of the support shell together.


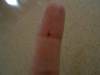
Minor injury, fixed by wearing gloves this time around. D'oy.


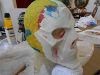
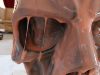
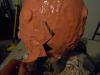
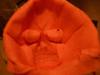
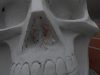
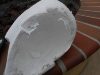
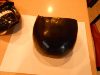
As promised, the silicone retained all detail from the sculpt. Even fingerprints and other imperfections that will later be fixed from sanding, priming, etc. The zigzag cut in the back was used instead of a straight cut.

The clay sculpt still intact with the only damage being from making the cut in the back.


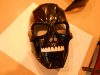
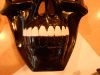
Slush casted 3 layers in. Wet sanded down from 400->800->1000->2000 grit, primed, and spray painted 3 layers. The teeth here is just the primer before I added the silver chrome paint on it. In the last picture I super glued some elastic strap to the inside top of both halves of the mask instead of a metal hinge. I tried the hinge, it didn't work. The elastic was much better. I also added two more elastic straps, one on each side of the inside sides (against the temple area of my head).
I had to learn things along the way, as well as balance time between work, school, and life in general. So consequently there were many setbacks that I'll go over. I burned more money, time, and effort than I should have. I'm happy with the result though, and I'll more than likely do the whole thing all over now that I have the knowledge from experience on how to do it better.
So let's get this started!
Here is the trailer for the game:
And here are a couple of screenshots:
View attachment 210196
View attachment 210197
The trailer version and the screenshots a little different so I decided to use the trailer version as the main reference.
---------------------
I began by printing front view and side view pictures of myself on cardstock paper, cleaning up the pictures in Photoshop, and tracing out sketches to get a better idea/grasp of the design and how it would work on my head. The nose was a bit of a problem but that was fixed by adding space in the front lower half of the mask.
Non-hardening modeling clay from Walmart.
Setting up before I begin sculpting on the styrofoam head.
It was idiotic of me to buy a multi-colored clay pack from Walmart rather than a pack of same-color clay from my local art store. It's hard to tell how smooth or well-made the sculpt is if it's not one uniform color.
I needed some sort of stand for the sculpt so I stuck a wooden stick in the styrofoam head and placed it in a pot in the backyard. Improvisation at it's best.
Here's the first layer of silicone caulk mixed with blue acrylic paint after I covered the clay sculpture with petroleum jelly. It seemed fine at first....
The darker red silicone is the second layer, with red acrylic paint and liquid glycerin. That stuff was hard to work with. The third layer is the pink coat, which was silicone caulk mixed with baking powder. That was much easier to use.
I made a big mess coating the register keys with fiberglass. I added too much fiberglass hardener and accidentally tipped the cup over. It started fizzing in the sunlight and I freaked out and ran inside, watching behind the window as it smoked up.
As for the keys, I spread petroleum jelly on the plastic table cloth before placing the coated register keys on it so it wouldn't stick to the plastic.
The blue coat is the fourth layer, I believe. Following some videos of how to make a mold out of silicone caulking, I made the register keys like this since fiberglass sticks to fiberglass and the support shell over the silicone will be fiberglass. At this point, however, the silicone mold was moving around off the sculpt. Coating the sculpt with petroleum jelly was a bad idea since silicone wouldn't stick to it anyway. Oh well....
Here's the bristol paper mohawk as the divider to make my two piece support shell mother mold thing. I had trouble keeping the mohawk up so I added some paper stands on the base of the mohawk as well as string to hold it together.
I didn't run into any problems making the fiberglass support shell, but.......
....getting it to work was a different story. The register keys still pulled off some silicone caulk and on the other half of the support shell, some keys wouldn't come off.
I peeled the mold off my sculpt and threw it away. It wasn't a complete waste of time because at least I learned something: Never do this method ever again. It might be a lot cheaper but you get what you pay for. Perhaps I'm just not skilled enough to do this method well but I personally wouldn't recommend it. You have to do very thin layers at a time or else the silicone caulk won't cure. And it smells. And it's ugly. There were just too many variables and such.
I decided that instead of giving up and crying in the corner over this failed attempt, I looked to the more stable yet expensive route: Smooth-On products.
Oh yeah, and here are some damages from letting the fiberglass resin drip onto the styrofoam. This image is me trying to use ReoFlex 30 Urethane Rubber. I have no idea what I was thinking. I didn't know how to use it but it was a Smooth-On product at my local Blick store so I grabbed it and used it. Such a fail.
-----------
I went back to the art store, bought a bunch of non-hardening BLACK clay and sculpted away. This time I did the right measurements (the previous sculpt was waaaay too small). Unfortunately I forgot to take pictures.
Took selfies and did some work in Photoshop to make sure the final product will fit on my head. The side view was the most accurate but the front pictures were never consistent so I couldn't rely on that. I just made measurements and made educated guesses when sculpting.
Homemade styrofoam head stand.
First layer of Rebound 25 Brush On rubber, without the Thi-Vex rubber hardener. This stuff is awesome, especially since it doesn't need to be in a thin layer in order for it to cure.
Second layer with Thi-Vex. Filled in the eyes to get a simpler mold on the outside.
Okay now here I tried making some register keys out of the rebound 25 so I got some small paint containers I already had, filled it with the silicone, and stuck it on the mold. BUT I thought of something even better after:
Instead of making pure silicone register keys, I stuck some wooden pieces and other paint containers onto the mold and coated it with more silicone. This saved me a little bit of silicone (because every ounce counts!). Well, there's that and there's the fact that I couldn't pull the paint containers off the mold anyway.
Look at all that wasted silicone.
I used red food coloring mixed in water for the second layer of the second half of the shell just so I can determine which layer is which. This whole thing was a failure for a couple reasons:
- The plaster bandage sucked because it was fragile and didn't fully cure even after a whole day.
- I couldn't pull it off the mold since I placed the register keys wrong.
*** A WORD OF ADVICE FROM THE UNFORTUNATE ***
When placing register keys on the mold, make sure they face the same way. If you do what I did and place register keys on the opposite ends of the helmet, it'll be like pulling a support shell upwards from a T-shaped sculpt and mold (in other words, you can't because the register keys act as a lock).
It might sound like common sense not to do that but I got so caught up and excited since it was going so well so far that I just didn't think things through all the way. I had to cut off a couple keys from the back of the helmet before trying again at making the support shell.
Now before I began making the fiberglass support shell I noticed that some of the register keys were shaped like a V (where the base is smaller than the top, thus creating the similar problem I had earlier about that T-shape which prevents pulling off the support shell). To fix this issue.....
....I covered the entire mold with aluminum foil to simplify the whole thing. The V-shape now became more of a cylinder shape with parallel sides. It worked wonders.
Yep. The first half pulled off easy. I was so happy :')
I covered the fin of the first half of the shell with more aluminum foil so the second half won't stick to the first. And like the first, the fiberglass will stick to the foil.
Nuts, bolts, and rubber washers to hold both halves of the support shell together.
Minor injury, fixed by wearing gloves this time around. D'oy.
As promised, the silicone retained all detail from the sculpt. Even fingerprints and other imperfections that will later be fixed from sanding, priming, etc. The zigzag cut in the back was used instead of a straight cut.
The clay sculpt still intact with the only damage being from making the cut in the back.
Slush casted 3 layers in. Wet sanded down from 400->800->1000->2000 grit, primed, and spray painted 3 layers. The teeth here is just the primer before I added the silver chrome paint on it. In the last picture I super glued some elastic strap to the inside top of both halves of the mask instead of a metal hinge. I tried the hinge, it didn't work. The elastic was much better. I also added two more elastic straps, one on each side of the inside sides (against the temple area of my head).
Attachments
-
 Sq3eS8Fh.jpg89.6 KB · Views: 116
 -
 Sq3eS8Fh.jpg89.6 KB · Views: 106
 -
 SmWZKrch.jpg71 KB · Views: 113
 -
 SmWZKrch.jpg71 KB · Views: 105
 -
 SmWZKrch.jpg71 KB · Views: 115
 -
 Sq3eS8Fh.jpg89.6 KB · Views: 109
 -
 IZs7gOxh.jpg95.5 KB · Views: 116
 -
 IZs7gOxh.jpg95.5 KB · Views: 124
 -
 OYQyTDSh.jpg62.4 KB · Views: 121
 -
 OYQyTDSh.jpg62.4 KB · Views: 119
 -
 OYQyTDSh.jpg62.4 KB · Views: 111
 -
 HS93hhah.jpg60.5 KB · Views: 119
 -
 HS93hhah.jpg60.5 KB · Views: 130
 -
 HS93hhah.jpg60.5 KB · Views: 115
 -
 IZs7gOxh.jpg95.5 KB · Views: 123
 -
 Jt4Oizmh.jpg78.4 KB · Views: 108
 -
 cKjC173h.jpg108.6 KB · Views: 115
 -
 Jt4Oizmh.jpg78.4 KB · Views: 107
 -
 cKjC173h.jpg108.6 KB · Views: 123
 -
 cKjC173h.jpg108.6 KB · Views: 130
 -
 Q82FZv6h.jpg94.6 KB · Views: 111
 -
 Q82FZv6h.jpg94.6 KB · Views: 114
 -
 Q82FZv6h.jpg94.6 KB · Views: 123
 -
 MW7fRj3h.jpg82.9 KB · Views: 126
 -
 MW7fRj3h.jpg82.9 KB · Views: 118
 -
 MW7fRj3h.jpg82.9 KB · Views: 117
 -
 0H33VXoh.jpg80.8 KB · Views: 109
 -
 0H33VXoh.jpg80.8 KB · Views: 115
 -
 0H33VXoh.jpg80.8 KB · Views: 115
 -
 IBPbW5ih.jpg93.2 KB · Views: 126
 -
 6hOOd4Mh.jpg80.4 KB · Views: 121
 -
 IBPbW5ih.jpg93.2 KB · Views: 117
 -
 hE5EhMKh.jpg51.3 KB · Views: 117
 -
 IBPbW5ih.jpg93.2 KB · Views: 115
 -
 hE5EhMKh.jpg51.3 KB · Views: 105
 -
 DxCRPPth.jpg66.5 KB · Views: 106
 -
 6hOOd4Mh.jpg80.4 KB · Views: 127
 -
 wl6TcAvh.jpg71.6 KB · Views: 119
 -
 I143mAkh.jpg73.7 KB · Views: 128
 -
 Jt4Oizmh.jpg78.4 KB · Views: 109
 -
 I143mAkh.jpg73.7 KB · Views: 125
 -
 wl6TcAvh.jpg71.6 KB · Views: 121
 -
 I143mAkh.jpg73.7 KB · Views: 115
 -
 wl6TcAvh.jpg71.6 KB · Views: 114
 -
 6hOOd4Mh.jpg80.4 KB · Views: 115
 -
 UOcNEJfh.jpg67.1 KB · Views: 116
 -
 pt0EaIHh.jpg55 KB · Views: 95
 -
 TBdXILnh.jpg76 KB · Views: 108
 -
 pt0EaIHh.jpg55 KB · Views: 106
 -
 TBdXILnh.jpg76 KB · Views: 95
 -
 DisOHgXh.jpg79.3 KB · Views: 112
 -
 pt0EaIHh.jpg55 KB · Views: 113
 -
 UOcNEJfh.jpg67.1 KB · Views: 110
 -
 RP371Uth.jpg69.2 KB · Views: 110
 -
 hE5EhMKh.jpg51.3 KB · Views: 103
 -
 DxCRPPth.jpg66.5 KB · Views: 118
 -
 RP371Uth.jpg69.2 KB · Views: 112
 -
 DxCRPPth.jpg66.5 KB · Views: 107
 -
 RP371Uth.jpg69.2 KB · Views: 106
 -
 UOcNEJfh.jpg67.1 KB · Views: 96
 -
 tumblr_lkn6yspqU91qir7tyo1_250.gif423.2 KB · Views: 99
 -
tumblr_lkn6yspqU91qir7tyo1_250.gif423.2 KB · Views: 103
-
tumblr_lkn6yspqU91qir7tyo1_250.gif423.2 KB · Views: 100
-
 LXUvktSh.jpg74.8 KB · Views: 118
 -
 LXUvktSh.jpg74.8 KB · Views: 109
 -
 TBdXILnh.jpg76 KB · Views: 99
 -
 DisOHgXh.jpg79.3 KB · Views: 105
 -
 LXUvktSh.jpg74.8 KB · Views: 107
 -
 DisOHgXh.jpg79.3 KB · Views: 97
 -
 QAy3Kqdh.jpg53 KB · Views: 95
 -
 o8ROkulh.jpg70.6 KB · Views: 133
 -
 oLpFzUsh.jpg67.5 KB · Views: 104
 -
 yBZinTsh.jpg93.2 KB · Views: 102
 -
 ZbC697Xh.jpg76.4 KB · Views: 110
 -
 ifQN6ach.jpg53.4 KB · Views: 115
 -
 er29cxsh.jpg54.2 KB · Views: 108
 -
 mO3G3dMh.jpg51.6 KB · Views: 97
 -
 rbuO22fh.jpg54.9 KB · Views: 103
 -
 4qO29eph.jpg68.3 KB · Views: 106
 -
 ne9Y5rBh.jpg66 KB · Views: 103
 -
 42ohxVqh.jpg62.5 KB · Views: 109
 -
 X5Sp9rlh.jpg53.1 KB · Views: 114
 -
 T37u5wfh.jpg62 KB · Views: 97
 -
 UBwBmuNh.jpg97.2 KB · Views: 103
 -
 J5hInw1h.jpg58.7 KB · Views: 104
 -
 wP1ZvE8h.jpg68.9 KB · Views: 126
 -
 2aYrIO1h.jpg112 KB · Views: 112
 -
 DjvXzrdh.jpg98.1 KB · Views: 106
 -
 fHGeWs4h.jpg91.1 KB · Views: 103
 -
 Ts2IuIwh.jpg102.8 KB · Views: 105
 -
 LRXIkD9h.jpg104.7 KB · Views: 106
 -
 kSRkoQch.jpg101.6 KB · Views: 115
 -
 mnKprMzh.jpg62.7 KB · Views: 100
 -
 IBbVghHh.jpg58.2 KB · Views: 97
 -
 CE37HwQh.jpg40.7 KB · Views: 113
 -
 xOhXuykh.jpg51.9 KB · Views: 100
 -
 0yVO25Kh.jpg65 KB · Views: 103
 -
 2bcSKwHh.jpg40.9 KB · Views: 112
 -
 kncEqqRh.jpg35.7 KB · Views: 94
 -
 NAdSSBph.jpg68.1 KB · Views: 98
 -
 ONbLi3vh.jpg41.1 KB · Views: 104
 -
 98hcYikh.jpg61.5 KB · Views: 121
 -
 6ePoUJdh.jpg74.3 KB · Views: 110
 -
 2IUj3Grh.jpg55.7 KB · Views: 108
 -
 0obMS7Nh.jpg78.3 KB · Views: 107
 -
 YW5zfdih.jpg60.9 KB · Views: 99
 -
 xtca32Fh.jpg71.8 KB · Views: 108
 -
 g0eKScAh.jpg68.2 KB · Views: 103
Last edited by a moderator:


