Batman TDK suit - EVA, fabric and PVC (pepakura and freehand)

regisaugusto

Active Member
***UPDATE***

FINISHED COSTUME SOME POSTS BELOW!!! :D

JFCustom released a version of cowl file. It is referenced below, much more easy to cut. Check the pics and see for yourself!!! :D


****************************************************************

I used these following files, heavily modified by freehand work
Obs.: I gathered all references I could about the modellers and unfolders):

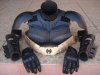
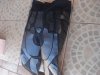
- Chest by PichetPaithoon and Ruze789
untitled2.jpg

-Torso by PichetPaithoon
untitled4.jpg untitled6.jpg

- Legs and cod unfolded by LINK2194, file modified by me (regisaugusto) in order to simplify
Legs 02.jpg

- Neck by PichetPaithoon

untitled 8.jpg
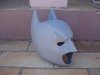
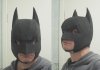
- Cowl, by Ruze789, foam conversion by EyeofSauron
Batcowl.jpg

Additional freehand templates (you can use freely; please, make reference to me).
Unfortunately, I lost the templates for the forearm and rib plates, which are totally freehand as well
Ab pieces Abs pieces new 100 percent - divide in two print 95 percent on MPE.jpg Belt Belt print 95 percent.jpg

Shoulder bells are PVC, also freehand.

Hope you like it. I'll post the build process for every part in the following.
 

Attachments

  • DSC07451.JPG
    DSC07451.JPG
    2.6 MB · Views: 2,279
  • DSC07436.JPG
    DSC07436.JPG
    2.5 MB · Views: 1,037
  • DSC07434.JPG
    DSC07434.JPG
    2.8 MB · Views: 1,145
  • DSC07430.JPG
    DSC07430.JPG
    244.4 KB · Views: 1,561
  • DSC07830.JPG
    DSC07830.JPG
    2.5 MB · Views: 951
  • DSC08981.JPG
    DSC08981.JPG
    841.7 KB · Views: 1,148
  • DSC08992.JPG
    DSC08992.JPG
    554.5 KB · Views: 824
Last edited:
Making of chest and clothes

In order to form a base for the chest piece, I used the file above. However, all details added (including bat symbol) were freehand. I used a piece of tulle, glued with pva, to give the aspect of fishnet. The PVA glue, after dry over black EVA, gives a nice graphite color; this part I didn't paint when finishing. The detail in the chest was made using a dremel.

View attachment Build pack chest.jpg

Meanwhile... I have no sewing skills, so I went to a local dressmaker (very skilled, by the way) and asked her to make a tight set of jacket and pant from a black fabric (which I don't remember the name :( ). I also asked her to sew tulle all over, and add zippers in the sleeves and pant, in order to make it easy to dress.

Build pack clothes.jpg

Sleeve detail. Believe me, this makes all the difference when dressing.

DSC06702.JPG
 
Looking great so far! You have a lot of nice detail in there, good job :)
I personally like to see thicker panels for the armor plates, as I'm using 1/4" in my build, but that's just personal preference to a point. Keep it up


Sent from my iPhone using Tapatalk
 
Making of torso

Torso file has some problems, in my opinion. I had to adapt the collar area, shoulder (too high) and fill that area circled in red in the pic, which was empty in the pep file. That piece which seems a T-bone was too large, and I made one freehand as well. I also adapted the torso to close with velcro by the front side, adding more velcros to attach the chest over it.

untitled4.jpg View attachment Build pack torso.jpg

Making of Abs/ribs

For these parts I've used freehand templates. I've made a "underlayer", and glued the pieces over that part. I did use 2 mm EVA foam. For the armor plate parts, I did use the same EVA foam covered with PVA and painted with plain black, which gave a leathery aspect.

Build pack abs and ribs.jpg

Making of forearm gauntlet

Another piece totally freehand. Below, in the pic which has the template, the fins are inverted. I have to redraw and redo. After ready, I've made fins with cardboard.
They have velcro.

Build pack forearm.jpg DSC074182.jpg

Making of shoulder bells

The pieces which I am really proud of. They were made with 150 mm knee joint PCV pipes. I did try other methods before using the pvc itself: heating EVA and use the PVC as a press (horrible result...) and mold with fiberglass (too much work).
I did add details with 2 mm PVA.

View attachment Build pack shoulders.jpg

Making of belt

Worn with velcro on the side.

Build pack belt.jpg

And finally the neck piece

DSC07419.JPG
 
oh man! i think it came out great

Thank you! I enjoyed this build so much

Looking great so far! You have a lot of nice detail in there, good job :)
I personally like to see thicker panels for the armor plates, as I'm using 1/4" in my build, but that's just personal preference to a point. Keep it up


Sent from my iPhone using Tapatalk

Thanks man! I was between 5mm EVA and 2mm EVA. I did decide to use 2mm for the armor "underlayer", as I posted above, and make the armor pieces with 2mm EVA, glued over the underlayer.
 
In recent months, I was so overwhelmed at work that I just could not devote enough time to the cowl. I've been working on it very slowly, one step at a time. Used a Pepakura file from Ruze789, foam conversion by EyeofSauron (referred above on first post). Built out of cardboard, and fiberglassed soon after.

Now I'm struggling with molds. I intend to make casts in fiber (silicone mold) and latex (plaster mold). I did make some attempts with plaster; However, due to my inexperience, I was not exactly well succeed, lol. I'll cast in latex because urethane rubber is quite expensive where I live.

DSC06072.JPGBuilding stage
DSC06148.JPGDSC06145.JPG Resin and Fiberglass stage
DSC06175.JPGBondoing and sanding
BUild pack cowl 01.jpgPrimed
 
Last edited:
Would you mind telling me what kind of gloves those are? Like the brand name, or maybe even a link if you found them online? Great work so far.

Hello there!!! Thank you!!!

Well, these are X-11 motocross gloves. I did buy in a local shop, have no idea if they sell this brand online. Probably yes.
 
So, here is the finished costume. Actually, almost... I glued cape's velcro wrongly... Neck piece ripped off, and I have to rebuild some minor parts as well.
But I'm very satisfied with the result! Thanks for watching! :D

P.S. The cowl is made from Polyurethane resin, and it's rigid. That's not the EVA foam Version from the first post.


Build pack 10.jpg
 
Last edited:
So, here is the finished costume. Actually, almost... I glued cape's velcro wrongly... Neck piece ripped off, and I have to rebuild some minor parts as well.
But I'm very satisfied with the result! Thanks for watching! :D

P.S. The cowl is made from Polyurethane resin, and it's rigid. That's not the EVA foam Version from the first post.


View attachment 335921

Man that's a great looking cowl, but... if its rigid, how do you managed to get in??? Did you cut a little bit more?
 
Man that's a great looking cowl, but... if its rigid, how do you managed to get in??? Did you cut a little bit more?

Hi there! Although I have a struggle each time I wear (always scratch my ears), It's not totally rigid... It is made of polyurethane resin applied patiently layer over layer. So, it has a limited malleability. Top of the head is a little bit thicker than the rest; it bends a little at the sides, which allow me to put. There is a cut under the chin, so I can wear it. It is joined with a little piece of black electric tape (easily disposable and don't add volume as velcro). Hope the pics below clarify the question. :)

Build pack 05.jpgDSC09150.JPG
 
Last edited:

Your message may be considered spam for the following reasons:

If you wish to reply despite these issues, check the box below before replying.
Be aware that malicious compliance may result in more severe penalties.
Back
Top