Apollo A7L Moon Suit

I have been wanting to take a shot at doing the fittings on my own, thanks for the reference shot there are definitely a few small details to add to a model to make them more accurate!

aprilstorm Fantastic that you are looking to make a suit, from a production viewpoint any "texture" would be on your end vs the model. I run a Form3 printer and an Ultimaker 3 for the FDM side, and even when I do parts on the resin machine I always give them a scuff with some 320grit once I am done removing support nubs. I would suggest one your prints using a sharp exacto blade to cut the touchpoints from the supports off, and then sandpaper as above to give your filler primer something to stick to.

Duplicolor makes their metalcast paints, which is a metallic base and then red/blue etc top coats. Short of machining these out of aluminum and then anodizing them, IMHO that is the closest/best bang for the buck. I took that approach on my connectors and was really happy with how they turned out.

PXL_20220724_181306154.jpg


PXL_20220724_181330779.jpg


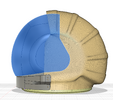
The bodies of these connectors are FDM printed @ 0.1mm and the layer fines are fine enough they pass for tool marks. I only used my resin machine for the small bits. Boy these are starting to show some wear, time for some paint touchup I think.

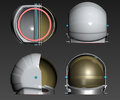
Welcome to the A7L builder's club!
 
Looks great. Its my first such build so Im bound to make some mistakes. I printed your helmet out too, but have you shared the file for the front part? Im ok to model it but I just wondered since you looked like you had already done it.

I also found some of the files you shared, like the wrist seals had a few errors in the files causing problems with my slicer, I fixed them in mesh mixer, Happy to give them back to you if you wanted them.

thanks again

April
 
Oh, the files you are talking about are Ken's (very talented) work. He started this thread. I have contributed some work myself, which you can find here: export - Google Drive

IMHO at this point, I should just make a github for all these files as it's difficult for someone new to track them all down.

"Front part" = visor? You'd need to model not the part itself, but a buck for vacuum forming a clear part from sheet plastic (pteg?).
 
Actually I'd describe it as the chin? It's the part that is metal on the real suit that probably clamps down on the neck ring IRL but stops the visor going too far forward and helps with creating the right amount of fabric to cover it.

I haven't vacformed the visor yet, but I just printed a solid one I was going to paint gold for display purposes only
oh seen! and yeah for sure. I have a vacuum forming machine now, and will be doing an xEMU suit visor assembly. I've been wanting a bubble helmet for and LEVA visor for my A7L I may have to get that on the go.
 
I have a vacforming machine, but its not deep enough for either the visor or the bubble helmet. To be honest I think the bubble helmet will be a challenge with any vacformer. Im guessing you would need to make a puck that come appart in parts or you will never be able to get it out once its pulled.

I have had good success 3D printing pucks in ABS plastic for use with PETG, put enough talc on them and they wont stick but you have to let them cool down between pulls or they will deform. The bubble helmet looks to be almost a blowform to be honest. I was thinking I could make it in two parts easy enough and most folk would be ok with that but I would love to see how Ryan Nagata does it, its truely a skill
 
The only other perhaps easier way would be to eventually use ultra clear resin on an DLP printer big enough. I print my lenses for astromech driods in it and its surprisingly clear if you treat it properly to stop from yellowing, I also add a tiny amount of blue dye to the resin. But non of the econmically available printers are yet big enough to do the whole helmet in one part yet.
 
The only other perhaps easier way would be to eventually use ultra clear resin on an DLP printer big enough. I print my lenses for astromech driods in it and its surprisingly clear if you treat it properly to stop from yellowing, I also add a tiny amount of blue dye to the resin. But non of the econmically available printers are yet big enough to do the whole helmet in one part yet.
astromech droid you say? I just got onto the r2 builder's club, my 6yo son and I are gonna build an R2
 
I believe you are right in the blow moulding.

I have an 18x24 vacuum table I just made, needed it for another project but made sure it would be big enough for xEMU visors.
 
Yeah I just finished a 75% scale r2D2, based on Mr Bradely Files with some modifications, lots of fun. I made mine smaller so it can fit in my car and I can lift it.

Im after the silver part in this photo, was that file ever shared, I can model it to fit no problem, just didnt want to waist my time if its already been shared
 

Attachments

  • LEVA-WIP_10-27.jpg
    LEVA-WIP_10-27.jpg
    271 KB · Views: 108
Anyway I made this, for the time being it should work since its covered in fabric anyway
 

Attachments

  • Screenshot 2022-07-26 135823.png
    Screenshot 2022-07-26 135823.png
    1.6 MB · Views: 94
  • A7L_Front.stl
    1.1 MB · Views: 138
My local science centre has an A7L on display as part of an Apollo exhibit, going to try and swing by tomorrow after work to grab reference photos. Anyone looking for particular areas of interest?

I know I want to try and grab some shots of the rachet device on the suit side helmet ring.
 
Went to see the suit, although the info plaque beside it proclaimed it to be "Neil Armstrong's suit", it's serial 060 and was Fred Haise's primary suit as Apollo 11 backup crew, and his backup suit for Apollo 13. Will get photos up tomorrow as there is some interesting stuff for sure.
 
So Im not 100% the visor is the right shape, it looks fine down but isnt symetrical so hits the top of your head when you pull it up. So I will probably remodel this part with something better. But in principal it comes together
 

Attachments

  • P_20220727_102305.jpg
    P_20220727_102305.jpg
    286.7 KB · Views: 123
I redesigned the visor, as I need to make a buck for vacforming and wasnt happy with how the other one fitted in the helmet. I think this fits a bit better. I will do a test print before reshaping into a printable buck which I will share on here.
 

Attachments

  • Screenshot 2022-08-02 192340.png
    Screenshot 2022-08-02 192340.png
    612.3 KB · Views: 82
  • Screenshot 2022-08-02 192237.png
    Screenshot 2022-08-02 192237.png
    1.4 MB · Views: 73
For those who've used the patterns from Ken and Zach; how did you scale the pattern to be fitting, but still loose enough to fit batting/internal structure? Also, how big roughly would the patterns come out on their own?
 
IMHO at this point, I should just make a github for all these files as it's difficult for someone new to track them all down.
did you ever end up making a page? I've just been starting my A7L build and navigating all these pages and forums has been a major headache, I can't tell you how helpful it'd be to have a single location for this stuff.
 
did you ever end up making a page? I've just been starting my A7L build and navigating all these pages and forums has been a major headache, I can't tell you how helpful it'd be to have a single location for this stuff.
no, i do need to get on that
 

Your message may be considered spam for the following reasons:

If you wish to reply despite these issues, check the box below before replying.
Be aware that malicious compliance may result in more severe penalties.
Back
Top