Any tutorials on X-wing helmet interiors & exteriors?

wannab

Sr Member
Now that I have a kit, I'd like to finish it off inside and out. I have found a couple threads about assembling and a bit of exterior painting. I would like to see any and all builds tutorials etc. you'd care to post. I haven't yet found any regarding the interior, so I guess what I need the most are some links to tutorials for finishing the interior.

Really any links to blogs or threads about any aspect of these helmets would be appreciated. Thanks in advance!


Doug
 
Here's a pic of a screen used I took at C1.

HelmetInt.jpg
 
Are you looking to authentically replicate the real props, make an idealized version for display or is your focus on making it wearable?

For the exterior, let me suggest that you use decals and vinyl tape as much as possible. The original helmets had lots of that on them and much easier to apply than to paint. You can find the tape it in better stores that sell plastic models.

Ear cups can be yellow/tan or black. I don't know where the original ear cups came from, but they are oblong and big enough to fit your ears into.
The mics seen in ANH were not actually part of the helmet. A Racal RA-150 "Amplivox Minilite" head set was worn under the helmet. The head set is the same as the Rebel techs are wearing in the control room during the battle. In ESB and ROTJ, you could not see any mic tip -- only the boom that it could have been attached to.
In the past, people have bought ear cups and replica mic tips/head sets from Richies Armor. Ear cups for pilot helmets can be found on eBay, but authentic Racal head sets are more expensive.

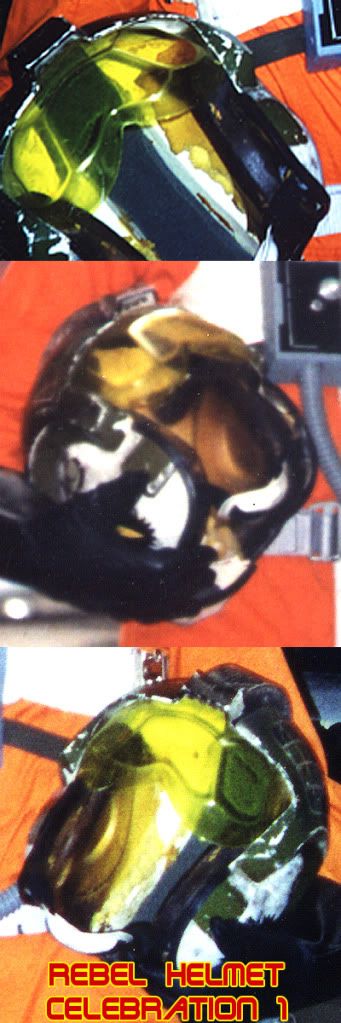
I have heard that the authentic helmets were padded with pieces of yellow foam cut in a star-shaped ("petal", "maple leaf") pattern, in the same manner as Stormtrooper helmets were.
However, if you are wearing the helmet for some time (for trooping) then yellow foam can get soggy with sweat and can get smelly.
What I did for my costuming helmet was to cut ear cups and pads for the top and back of the head from foam and then coat them with some yellow/tan flexible faux leather I found. It looks a bit like the padding in the APH-6 helmet (which was cast to base the movie helmets on) and it also has the colour like yellow foam.

If you are interested in how other people have finished their costuming helmets (interior and exterior), then you could also check out Rebel Legion's Pilot forum, especially the threads X Wing helmet interior padding and Show us your HELMET !!!!, but there are many posts to wade through.

If you are looking for an idealized interior, then there is a reference: Riddell's "Scaled Rebel Pilot Helmet". There is a picture here
 
Last edited:
It is a very nice kit and assembles fairly easily.
I do have some suggestions to improve the accuracy of the helmet. This modification will not make it accurate, mind you, only improve what you have IMO.
The kit mohawk is too tall. It places too much emphasis on the mohawk and detracts from the overall look of the helmet. The helmet is small and the opening of the helmet is narrow. To mask these issues, I suggest some modifications.
First, connect both halves of the helmet together, including the front edge of the mohawk. The front opening is narrow. To make it wider, you will need to pinch the mohawk together in the center of the helmet in the back. This will cause the mohawk to be narrower for a portion in the back of the helmet. The covering strip will overlap the narrow portion slightly but it is not noticeable.
Next, slice the folds of the front of the mohawk, at least 2 inches. Trim down the vertical sides along the cut in order to lower the profile of the front of the mohawk. Bend the top flaps of the mohawk down to the newly trimmed sides and glue. Sand a rounded profile on the fold. Check the fit of the mohawk covering strip to make sure you can’t see the modification. (Note: You may need to use some white putty or bondo to conceal the new seam)
Next, trim down the front resin mohawk piece. It is nicely formed and can be easily trimmed with a box cutter. The lower edge should line up with the opening edge of the helmet. (note: You should also bondo in the two tall slots in favor of cutting out the accurate 3 short slots). Next try to round the front the edges of the piece since it looks to me like the originals were vacuum formed not resin.
Those are just my suggestions not gospel. Have fun, it is a great kit.
 
Last edited:
Thanks guys!

Division6,
Man those pics are harsh! I can't quite make out what is going on there.

Darth Lars,
I think I'm leaning toward idealistic rather than screen accurate for the interior, but I'm still not sure yet. It will be for display (mostly), but I am sure the boys will be using it in some of their home videos - lol.
I have access to vinyl and vinyl cutting (part of my business), so I plan on making stencils instead of decals and hand painting where required for the appropriate look. I can recreate the graphics, but I need the proper measurements. Anyone have proper dimensions for the helmet graphics they can share?

Tictoc,
I believe BF addressed some of the issues you bring up. If I understood him correctly, he has changed the molds and is able to get better detail as well. I was planning on altering the mohawk cap as I always thought it looked to large and angled incorrectly. This post is going to be very helpful -- gracias! I imagine I may be pming you at some point, if you don't mind, to pick your brain a bit.

Are there any leads as to the proper trim (close to accurate) for the bottom edge of the helmet?

I suppose I ought to get over to those links provided as I may be asking what is already answered there, but just in case please feel free to post any other links and info. Thanks!


Doug
 
Funny - I didn't even remember asking that question over on the Rebel Legion boards. Seeing the thread now I know why, I never got my answer. Is it true they had the same foam star in them as the TKs?
 
I'd love to see what you come up with for decals. DL Design decals look beautiful but are too large for a BF helmet. I was looking into making waterslide type decals but I have been stalling. I have been stalling on the whole project while waiting for the weather to dry up.

The best trim to use, although not accurate, is the black auto doortrim form Autozone or similar. You can heat and bend and it has adhesive.

Hope you do a build thread.
 
Just another suggestion....

Since the original APH helmets had large ear pads, I vacuum formed my own rather that using the standard ear protection muff out there at the home improvement stores.

Most hearing protection padding is about 3" x 4" and the real APH pads were closer to 5 x 6 (mine are only 4 x 5).

I think it looks closer to the original look, plus you can hear. Just fyi.

These photos also have my finished (modified) mohawk piece...
 
Interesting idea, and nice lid!

Does anyone have a sewing pattern for ear cups that match the original size and shape? If so, I may be able to get the wife to make me a couple.


Side note:
I haven't gotten to assembling my kit yet -- been working on R2 lately (exciting paint discovery going on). I have this kit, a war machine helm, boba fett helm, RS trooper lid, SL vader, TM ANH and TM ESB vader helmets to finish not to mention of course R2 and an incoming 2001 helmet. I will tackle a few of these this summer but not all. I have to take advantage of the brief warm weather we get here to do any of the painting work. I have to put some of these down the list and pick which few I think I can finish to my high standard in such a short window of time. Oh woe is me! LOL.

Not sure if the x-wing lid will make the list this summer, but I need to gather as much info (recon) as I can, so I can finish it nicely without having to rush. So please post any other info you feel would be helpful or that I might be missing. Thanks guys! :thumbsup


Doug
 
This thread is more than 12 years old.

Your message may be considered spam for the following reasons:

  1. This thread hasn't been active in some time. A new post in this thread might not contribute constructively to this discussion after so long.
If you wish to reply despite these issues, check the box below before replying.
Be aware that malicious compliance may result in more severe penalties.
Back
Top