batbaa
New Member

After building my Batman Dark Knight suit from scratch (Wellington Batman if you are on facebook), I have been doing a lot of children's hospital visits, parades and fundraising etc. My daughters boyfriend asked me to help him build an Ant-Man suit so that he can join me on some of my collection events. I warned him that I am a project thief and then proceeded to steal the project from him and I have bene doing it pretty much all myself

We started a facebook page for the project (Wellington Ant-Man) if you want to see more step by step photos, but here is the process so far:

We started with a cheap kids costume mask

Moulded it in silicone and brushed in some epoxy resin

We wrapped Hamish's head in cling wrap and then layered it in masking tape

We then marked the mask position on the tape helmet

Removed the tape helmet, then positioned the epoxy mask duplicate on the front and covered the rest with thickened epoxy resin

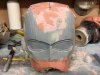
I then cut kitchen sponge and laid it over the hardened helmet

I then soaked the sponges in resin and wrapped it in cling film to keep it smooth and in place

Because it was a kids mask it was too narrow, so I split it in two vertical places and then repositioned them with a gap and resined it together again.

This is the result and now it actually fits

The mask was a little short in the mouth area, so I split off the lower portion, which will be added back in later

I have extended the beak area and started using bondo to fill up the upper area

Sculpting in the shape with bondo

More filling and sanding

More work and the gaps have been cut in to the strips over the top of the head.