You are using an out of date browser. It may not display this or other websites correctly.
You should upgrade or use an alternative browser.
You should upgrade or use an alternative browser.
Another Robocop Build
- Thread starter askernas
- Start date
So here's an update on my Robocop build.
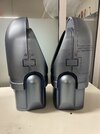
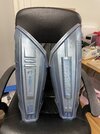
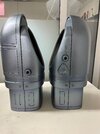
Here's the left gauntlet, assembled and painted. This one is only painted with plasti-dip, but there are some things I would like to change. Next time, I will coat this with flexible resin before painting to get it really smooth.
It is a little bit difficult to grip the Auto-9. It is not comfortable, but doable.
If I do some alterations to the model, I think I can make this work a lot better.


I know... left hand.. but it is easier to take a pic with the right hand.. Plus, I haven't finalized the right gauntlet yet =)
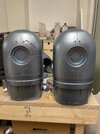
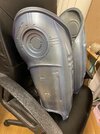
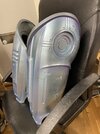
The left shoulder is now smooth and prepped for painting:

I thought I'd take you on a quick journey on how to do this with the right shoulder.
First, start off with the raw print:

Then, spend about an hour sanding it with coarse sand paper (120 grit), so it looks like this:

Then, into the paint and lightly coat with UV resin, at least two layers. I apply them thin with a paint brush and cure inbetween with my 200W UV light. Wear UV protective glasses!
This makes the shoulder look like this:

Finally sand this down with slightly less coarse sanding paper, and rinse it off, and you are left with this:
A shoulder ready for priming!
Total time: 4 hours

Here's the left gauntlet, assembled and painted. This one is only painted with plasti-dip, but there are some things I would like to change. Next time, I will coat this with flexible resin before painting to get it really smooth.
It is a little bit difficult to grip the Auto-9. It is not comfortable, but doable.
If I do some alterations to the model, I think I can make this work a lot better.
I know... left hand.. but it is easier to take a pic with the right hand.. Plus, I haven't finalized the right gauntlet yet =)
The left shoulder is now smooth and prepped for painting:
I thought I'd take you on a quick journey on how to do this with the right shoulder.
First, start off with the raw print:
Then, spend about an hour sanding it with coarse sand paper (120 grit), so it looks like this:
Then, into the paint and lightly coat with UV resin, at least two layers. I apply them thin with a paint brush and cure inbetween with my 200W UV light. Wear UV protective glasses!
This makes the shoulder look like this:
Finally sand this down with slightly less coarse sanding paper, and rinse it off, and you are left with this:
A shoulder ready for priming!
Total time: 4 hours
Last edited:
joberg
Legendary Member
Don`t forget to switch handsYes.. it’s definitely mesured in sessions resulting in exercise pains..

pchrisbosh1
Well-Known Member
Very cool. Love how practical your making the gloves. Great work man! Look forward to seeing your suit finished.
Long time no updates.
Life has a way of getting in the way of prop building, and when I finally have time to do some stuff, I have no time to sit down and write about it =)
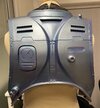
In short: all parts needed for Robo are printed. Everything that should be metal has been coated with UV-resin and sanded and with the exception of one foot and the hydraulics, base paint has been put on everything.
I will still need to do some touch-ups here and there, but the bulk of the rattle can is taken care of.


This is not all of the parts painted either. The main thing was that I ook my old helmet and repainted with the new rattle can I found to make sure everything matches.
Once the paint had cured over night, I started doing detail work on the neck piece and helmet. I think it came out pretty well.
Old paintjob:

New paintjob:


I still haven't clearcoated anything yet.
I will do the shading on all metal parts once the final touch-ups are done, and then hopefully do clear coating next weekend.
The plan is to lay on clear coat to the point where I can wet sand with high grit and then polish the pieces.
Since ComicCon is now only 3 weeks away, we'll see how far I'll get with those plans. I have a job to take care of as well, so hopefully I can at least get out on the floor with a costume that is painted, shaded and clear coated.
There is also the matter of finishing up the torso and back in EVA foam... and add a new zipper in my undersuit... and make a sort of balaclava that shows enough of my face and I can attach the neck and chin pieces to. Harness is starting to get done, so I'm not too worried about it falling off me at least =)
A lot of work still, but It's starting to be exciting!
Life has a way of getting in the way of prop building, and when I finally have time to do some stuff, I have no time to sit down and write about it =)
In short: all parts needed for Robo are printed. Everything that should be metal has been coated with UV-resin and sanded and with the exception of one foot and the hydraulics, base paint has been put on everything.
I will still need to do some touch-ups here and there, but the bulk of the rattle can is taken care of.
This is not all of the parts painted either. The main thing was that I ook my old helmet and repainted with the new rattle can I found to make sure everything matches.
Once the paint had cured over night, I started doing detail work on the neck piece and helmet. I think it came out pretty well.
Old paintjob:
New paintjob:
I still haven't clearcoated anything yet.
I will do the shading on all metal parts once the final touch-ups are done, and then hopefully do clear coating next weekend.
The plan is to lay on clear coat to the point where I can wet sand with high grit and then polish the pieces.
Since ComicCon is now only 3 weeks away, we'll see how far I'll get with those plans. I have a job to take care of as well, so hopefully I can at least get out on the floor with a costume that is painted, shaded and clear coated.
There is also the matter of finishing up the torso and back in EVA foam... and add a new zipper in my undersuit... and make a sort of balaclava that shows enough of my face and I can attach the neck and chin pieces to. Harness is starting to get done, so I'm not too worried about it falling off me at least =)
A lot of work still, but It's starting to be exciting!
Thank you. Coming from you this means a lot =)Great update and the paint job is A+
Thank you. =)The fit on that helmet... WOW.
Whole thing is awesome.
Three weeks to ComicCon..
Thank you. I love your Blade Runner costume =)Really loving this build!
More airbrush detailing.
ComicCon Stockholm is closing in quick and I'm just churning out parts at the moment.
I sanded and painted the last "metal" pieces and did detailing on the back of the calves and the feet.¨¨

There is some minor damage to the paint job on one of the calves as I dropped it into the ground right after spraying it, but At the moment, I really have no time to go back and fix it. It will be something that will need to be done after ComicCon. 2.5 weeks left and I still got a full time job and acting classes twice per week in the evenings...
So... busy busy busy.
There are a few smaller short cuts that will need to be made at this point to get ready in time. One of those is that I will most likely only have time to clear coat them and not wet sand and polish, unfortunately.
That will be something I'll have to do after ComicCon, but at least it seems like I will have a full costume by then... hopefully.


I am really excited to see the final product. Thursday will be spent airbrushing the thighs and probably the front of the calves. After that, I'm guessing two more sessions of airbrushing, then all focus will be on finishing the last parts, which is all abs and back, done in EVA foam as outlined before. Got some more Plasti-Dip and flexible clear coat coming as well.
ComicCon Stockholm is closing in quick and I'm just churning out parts at the moment.
I sanded and painted the last "metal" pieces and did detailing on the back of the calves and the feet.¨¨
There is some minor damage to the paint job on one of the calves as I dropped it into the ground right after spraying it, but At the moment, I really have no time to go back and fix it. It will be something that will need to be done after ComicCon. 2.5 weeks left and I still got a full time job and acting classes twice per week in the evenings...
So... busy busy busy.
There are a few smaller short cuts that will need to be made at this point to get ready in time. One of those is that I will most likely only have time to clear coat them and not wet sand and polish, unfortunately.
That will be something I'll have to do after ComicCon, but at least it seems like I will have a full costume by then... hopefully.
I am really excited to see the final product. Thursday will be spent airbrushing the thighs and probably the front of the calves. After that, I'm guessing two more sessions of airbrushing, then all focus will be on finishing the last parts, which is all abs and back, done in EVA foam as outlined before. Got some more Plasti-Dip and flexible clear coat coming as well.
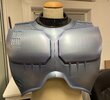
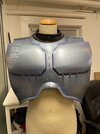
So.. another big post. Essentially what has happened since, is that I've been working on the EVA foam torso.
The base part is done, and all that remains off the soft parts is the shorts and the lower neck that I need to remake.
I still need to hit this with a head gun and paint with Plasti-Dip glossy in order to completely finish it, but shorts first.
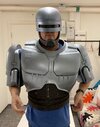
Here's a quick testpic from the front and back:

Yes, I know it is worn a bit wonky, bit I had no one to help me, so just had to do a quick pic to get an idea where I am heading. This is not a costume I'll be able to put on myself.

The middle of the back is a zipper that I sewed on to a 2 inch wide nylon strap. The nylon strap is then contact cemented on to the EVA foam. The foam is thick enough that I am very confident this will hold up nicely.
Apart from the shorts, I will also need to add the foam in the upper back, that sticks out in the arm holes.
But, more things to do:
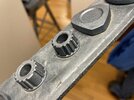
I was never really happy with the font of the leg plate, as it was an outline. From what I've seen screenshot wise, it should be a full engraved type.
Original on model:

Now, I never made this part look nice and sanded... because this is the screen shot:

... and this is the plate I made and printed on my resin printer:

A little bit of sanding and epoxied in plate and it looks a LOT better:

I just love using the resin printer to print off small greeblies:

Finally, I've hit all the remaining pieces with the airbrush to bring out some details. I may revisit them and possible tone it down on some parts, we'll see. Here are the pics anyway:


There are still some minor plates that need to be added to the legs. I'll cut those out of 1mm styrene, paint and then glue in place.
I've done tests of attaching the thighs to the harness and it seems to be working fine for the moment. The legs are not that heavy and don't need much to be held in place at the moment.
The paint job is only the highlighting so far. I will need to go over these with some darker colours to go into all the small nooks and all that. It will really help in bringing out the full detail and create more depth to the costume.
A lot more details are still to be done. One more weekend to get it all done and then hopefully ComicCon on November 5th. We'll see...
Until next update..
//Micke
The base part is done, and all that remains off the soft parts is the shorts and the lower neck that I need to remake.
I still need to hit this with a head gun and paint with Plasti-Dip glossy in order to completely finish it, but shorts first.
Here's a quick testpic from the front and back:
Yes, I know it is worn a bit wonky, bit I had no one to help me, so just had to do a quick pic to get an idea where I am heading. This is not a costume I'll be able to put on myself.
The middle of the back is a zipper that I sewed on to a 2 inch wide nylon strap. The nylon strap is then contact cemented on to the EVA foam. The foam is thick enough that I am very confident this will hold up nicely.
Apart from the shorts, I will also need to add the foam in the upper back, that sticks out in the arm holes.
But, more things to do:
I was never really happy with the font of the leg plate, as it was an outline. From what I've seen screenshot wise, it should be a full engraved type.
Original on model:
Now, I never made this part look nice and sanded... because this is the screen shot:
... and this is the plate I made and printed on my resin printer:
A little bit of sanding and epoxied in plate and it looks a LOT better:
I just love using the resin printer to print off small greeblies:
Finally, I've hit all the remaining pieces with the airbrush to bring out some details. I may revisit them and possible tone it down on some parts, we'll see. Here are the pics anyway:
There are still some minor plates that need to be added to the legs. I'll cut those out of 1mm styrene, paint and then glue in place.
I've done tests of attaching the thighs to the harness and it seems to be working fine for the moment. The legs are not that heavy and don't need much to be held in place at the moment.
The paint job is only the highlighting so far. I will need to go over these with some darker colours to go into all the small nooks and all that. It will really help in bringing out the full detail and create more depth to the costume.
A lot more details are still to be done. One more weekend to get it all done and then hopefully ComicCon on November 5th. We'll see...
Until next update..
//Micke
Attachments
-
 IMG_3101.jpg4.3 MB · Views: 211
 -
 Biceps front.jpg3.2 MB · Views: 190
 -
 Biceps side.jpg3.8 MB · Views: 223
 -
 Legs right.jpg3.9 MB · Views: 234
 -
 Legs left.jpg3.6 MB · Views: 167
 -
 Legs front.jpg4.1 MB · Views: 196
 -
 Back airbrushed.jpg2.3 MB · Views: 212
 -
 Front airbrushed.jpg2.1 MB · Views: 217
 -
 IMG_3135.jpg3 MB · Views: 262
 -
 Robo back.jpg1.2 MB · Views: 211
 -
 Robo Front.jpg1.4 MB · Views: 192
 -
 IMG_3111.jpg4.5 MB · Views: 196
 -
 IMG_3103.jpg4.7 MB · Views: 202
 -
 IMG_3102.jpg3.6 MB · Views: 223
 -
 Biceps back.jpg3.5 MB · Views: 157
Similar threads
- Replies
- 3
- Views
- 295
- Replies
- 0
- Views
- 334