Another JJprise build log

Odysseus

New Member
Hello all. This will be the first time I’ve attempted a build log. I will be delving into new territories here as far as my experience goes, and am hoping to get some tips on what I am trying to here, as well as constructive criticism. I am a rank amateur when it comes to electronics, so I am hoping to get some questions answered as well. Thanks in advance for any help.

As the subject line states, I will be building the 1/500 Revell JJprise. I’ve seen some really nice builds of this model here, most notably by HughB and PJT Models. This will be my “learning project” for the 1/350 refit. I plan to have the following features for this model:
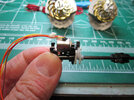
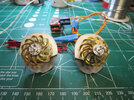
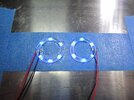
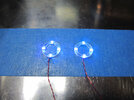
  • Counter rotating fan blades in the Bussards
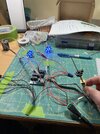
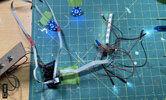
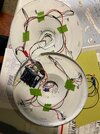
  • Full lighting, using the TrekModeler JJprise board
  • ParaGrafix details to be added
  • 4-color iridescent “refit” style paint job, using the Orbital Drydock masks
The Bussards are my first order of business, and I’ve just worked out how that mechanism will go together (post on that to follow soon). I am currently working out how to mount it in the engine.

First question: Has anyone worked with the Trek Modeler boards, and can you recommend a power supply for them? I've reached out a few times, but haven't heard back.

Thanks for looking.

Ben
 
Following for sure, I have this same kit but as of yet, it's sitting unbuilt. The only thing I know for sure is that I will be using the Aztec Dummy paint masks for the Aztec pattern this model usually receives.

Looking forward to your build, especially the lighting, this thing looks amazing light and is pre-drilled (if memory serves) which should really help out.
 
I found a couple of cheapo RC helicopters and took the gearboxes out to repurpose them for my Bussard spinners. This seemed to do the trick, so far. I added the Paragrafix fan blades. The entire assembly was hooked up to a 6V micro motor. It looks like the desired effect was achieved.

BTW, Trek Modeler did get back to me on a power supply, which should be incoming soon.

Next thing to sort out is completing the assembly along with the Bussard lights and dome. I will be doing this in a way that will tone down the lights quite a bit so that they will appear more like they did in the 2009 movie.
 

Attachments

  • IMG_3945.JPG
    IMG_3945.JPG
    3.7 MB · Views: 128
  • IMG_3947.JPG
    IMG_3947.JPG
    1.7 MB · Views: 124
  • IMG_4068.JPG
    IMG_4068.JPG
    2.4 MB · Views: 122
  • IMG_4065.MOV
    22.1 MB
If I could be so forward, if you want to better control the speed of the effect and reduce the noise, look at using stepper motors. I can post more info if you'd like and a video of the effect I got. I don't want to post more then this one picture without your approval....:)
 

Attachments

  • Prototype Counter-Rotating assy with 8mm Stepper Motor 72dpi.jpg
    Prototype Counter-Rotating assy with 8mm Stepper Motor 72dpi.jpg
    169 KB · Views: 108
Thanks so much. Please post to your heart’s content. I created this thread mostly for my own learning. Looking forward to more.
 
Here is the effect using stepper motors controlled by an Arduino and a pair of A4988 stepper motor controllers. At first I drove the motors with two A4988 but found it far simpler to use just one and wire the motors in series. I'm embarrassed to admit, I did this work 8 years ago along with the lighting in the Bussard housing then stopped for some reason, I must have been distracted, "squirrel!!!!"....:whistle: :unsure: :lol:
I hope this gives you some ideas.:)


Attachments

  • Bussard assy01 72dpi.jpg
    Bussard assy01 72dpi.jpg
    207.3 KB · Views: 146
  • LEDs for Bussard back.jpg
    LEDs for Bussard back.jpg
    346.7 KB · Views: 126
  • Bussard assy005.jpg
    Bussard assy005.jpg
    110.9 KB · Views: 137
  • Forward LEDs01 72dpi.jpg
    Forward LEDs01 72dpi.jpg
    192.7 KB · Views: 132
  • Forward LEDs and bearing 72dpi.jpg
    Forward LEDs and bearing 72dpi.jpg
    174.6 KB · Views: 141
  • Bare-Metal foil on my JJ-Prise Bussard Lens.jpg
    Bare-Metal foil on my JJ-Prise Bussard Lens.jpg
    143.7 KB · Views: 134
I know just a little about Arduino. I know several modelers use it for their projects. I have thought I should just jump in with both feet, as it seems to take a lot of guesswork out of the lighting process. I look forward to seeing how your finished product looks.

What type of LED's did you mount to the dome?
I don't write code, what I do is look for scatches that do something close to what I need and modify it for my project, so far it's worked very well for me. The LEDs are 0603 series, I will also be mounting a Neopixel in the top dome of the clear "Bussard cover", not sure it's name.:unsure:
 
Very sorry for the delay in entries. I got sidetracked onto another project, plus I have a son trying to get his Eagle Scout project done. Plus, none of the stores in my not-so-little town sells hobby electronic hardware, so that all had to be researched and ordered.

It took me some time, but I finally got my head around how the Trek Modeler board is supposed to be wired. Even got the nacelle motors to run off of it. I'll continue by building the nacelle mechanism into its final form and installing that, as well as beginning the process of wiring the ship. Tips and suggestions very much welcome.

Thinking ahead on paint, I am wondering if any of you out there has used the iridescent paint, then used a satin or other finish on top. If so, did this block out the shimmering effect? The only reason I am considering this is for protection of decals.
 

Attachments

  • IMG_4245.JPG
    IMG_4245.JPG
    1.6 MB · Views: 105
  • IMG_E4248.JPG
    IMG_E4248.JPG
    532.3 KB · Views: 101
It's probably difficult to see on my video. The inside fan is smaller that the other and pointing another direction. I am using the Paragrafix set. If I had more knowledge of the 3D printer I would consider new blades. These are a bit chunky, at least the larger fans are.
 
Life's been eventful since I last posted. A death in the family, new job, and my son's Eagle Scout project are the main things that have gone on, but wanted to let you know that this is back under way. I've been working a lot with the Trekmodeler board and figuring that out. Once I got my head around how to wire everything, it was a bit simpler than I had feared. This is my first complex lighting job, though and there's a lot to think about.

I am thinking of having the stationary lighting on a separate circuit, now that I'm more comfortable with wiring in parallel. I will also integrate fiber optics in some places, especially the flashers along the rear of the nacelle pylons.

More updates soon. Stay tuned.
 
I wired the strobes in the saucer...a couple of times, actually. This was pretty much an exercise in getting confident with wiring and the circuit board. It was a jumbled mess the first time out, but I've managed to clean it up quite a bit. Enough to be able to close the saucer pieces anyway. I am using 1.8 mm LED's. They seem to be pretty big and bright for this scale, at least the double strobes. I am thinking hard on whether I should keep them as is, or carefully remove them and use fiber optics instead. They may detract from the spotlight effects I'll attempt later on. Thoughts anyone?

In the meantime, I am going back to the nacelles and begin the serious work on those. They will be the most challenging with the motors.
 

Attachments

  • image0.jpeg
    image0.jpeg
    559.5 KB · Views: 72
  • Video.mov
    2.8 MB
Ugghhh!! Disappointments with the Bussards abound this evening! I've never used the Tamiya smoke before. It seems to spray on a bit grainy. I probably should have done the inside of the domes instead of the outside. Not a huge deal. I think a little Future will smooth them back out.

The main thing was getting the whole motorized rotation system together. I had it going well...right up until it was time to test fit with the domes. They fit, but are too wide to rotate! They get snagged on the inside of the dome. A few options I see:
  1. Order a new photoetch set from Paragrafix and see if I can bend them a bit smaller. This doesn't seem likely because of the ring that frames the fan pretty much limits the size.
  2. Find a way to trim down the fan blade. This would be a very difficult and tedious operation.
  3. Accept defeat and just let them be stationary. Chalk it up to inexperience.
Door #3 is the likely solution. I've put in a lot of time to figure this out, but would like to move on and get to the rest of the model. The might effects from the Trek Modeler light board produces a pretty decent effect by itself. I'll mull over it for a couple of days. As always, I appreciate any suggestions.
 

Attachments

  • IMG_4613.JPG
    IMG_4613.JPG
    1,002.2 KB · Views: 74
  • IMG_4614.MOV
    15.5 MB
  • IMG_4612.JPG
    IMG_4612.JPG
    1.3 MB · Views: 69

Your message may be considered spam for the following reasons:

If you wish to reply despite these issues, check the box below before replying.
Be aware that malicious compliance may result in more severe penalties.
Back
Top