Home Made AN-H- 15 Flight Helmet.
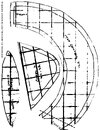
Real AN-H-15 to Endor conversion at bottom.
Please read everything before starting.
Always have as much reference pictures as possible for locations and sizing to your helmet.
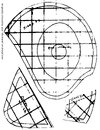
The pattern I have was traced off a Large.
Parts list.
1 yard minimum ( more is better, just in case ) fabric, out of a light weight cotton in a military tan / khaki
Lots of matching tread
Matching Bias tape ( or cut strips from the fabric you are using as I did )
Black foam sheet 1/4" would be ideal, same size as ear openings on pattern x 2 ( available at OSH )
Black rubber coated nylon ( like for rain coats ) to cover foam with 1/2" allowance
Leather, enough for sides, cheek flaps and chin strap. ( and optional other strapping for actual AN-H-15 )
Thin Suede, enough for sweat band and chin strap cover.
Buckle for chin strap. ( a thin belt can be used instead for the chin strap )
Snaps, depending on the style and detail 8 to 12. ( Preferably dark brown or black ( or can be painted before adding )
(Optional) Grey foam for openings in ear cups. ( RotJ Screen accurate )
( Optional ) leather dyes to match real helmets.
Basic AN-H-15
Cut out pieces as follows.
1/4 " seem allowance is on pattern.
Do not remove ear opening at this point, but mark area.
Sides x 2
Top x 2
Cheek Pieces x 4
Front Sweat band x 1
Starting at the front, sew each side to the corresponding top piece, than the center.
Real helmets also run bias over the seams on the inside, so this is optional.
I placed the tuck and role part in the center as to not waste fabric since I only had a small piece I found, but this changes the shape a bit so it doesn't fit quite right.
Next run 1/4" bias tape around the edge, this can be made from strips of the material to match.
Next with the cheek pieces wrong side out sew edges but leaving the top edge open.
Turn right side out, than go over edges at Approx 1/8".
Fold top edges in than place over bottom corner of helmet and sew.
Next the sweat band piece this can be done one of three ways.
1. place piece over a piece of suede and sew edges.
2. use adhesive interfacing.
3. spray adhesive.
Once attached, trim to match.
Place inside helmet fabric side out at front edge with only a 1/8" overlap so most of it is sticking out and sew.
Next Cut out 1/4" foam to the shape of the ear opening and remove center hole in foam.
Spray with Adhesive than press onto Nylon fabric on nylon side ( rubber on back side )
After glued trim leaving 1/4" to 1/2" edge from foam and cut out center hole.
Run bias around edge.
Place ear piece on side of helmet with the seam at the bottom and sew, repeat on other side.
At this point you can, if you wish cut an opening in the helmet behind the ear pieces. (this is optional )
If you are feeling real enterprising you could sculpt up the ear piece and make a mold to cast rubber copies or make vac tools for them.
I didn't have the time to do this since I was in a hurry to get this done for an event.
If you go this route than cut the openings, run bias tape on the edge and glue on cup from the inside.
Depending on the version of helmet you are doing the leather on the sides will very.
The Jedi Version has longer leather strips with 4 snaps each and the leather is colored to match the fabric.
Other versions have brown or black and have 3 or 4 snaps depending on the maker.
This will have to be measured and the angles matched to the edges of the helmet and ear piece.
Cut leather.
The real helmets have the snaps ( bottom part ) on the leather than it is sewn on, which may be difficult with to do.
What I did was attach the leather than ran the snaps through both, using a soldering iron to make the holes since I don't have a leather punch.
Don't use a drill, it will grab the fabric and mess up your project. ( trust me )
There is also a snap ( bottom part ) under the left ear, back the fabric with a small piece of leather or suede for this.
Chin strap.
I had a thin enough leather belt that I used for this, but you could make one from scratch by cutting a strip of leather 1/2" to 3/4" wide.
place a snap ( bottom part ) on a small piece than sew it to the lower right cheek.
Attach the buckle and leather piece on the lower left cheek.
Place a snap (upper part ) on the end of a leather strip and than cut to length for strap ( snap to helmet than place on head, figure out length than add an inch or so )
Cut and add holes.
Cut a piece of suede wide enough to wrap around chin strap with enough edge to sew and long enough to fit from side to side when buckled on place.
Wrong side out, sew edge than turn right side out and slip over strap.
( Optional tack to strap )
( Optional ) there are 3 straps on the back, two with snaps but these will not be seen on an Endor conversion since they are coverd by the hard shell.
")