You are using an out of date browser. It may not display this or other websites correctly.
You should upgrade or use an alternative browser.
You should upgrade or use an alternative browser.
skiffy
Sr Member
Indeed Chuffy 70. A lot of my kit is old but good.
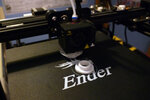
I've knocked up some 3d models of what I call the 'exterior furniture', specifically the bits and bobs that are on the back of the APC. These have been printing tonight and have just finished. A little bit of clean-up and they'll be fine. I would use my resin printer but that's in the shed, and it's minus 3 degrees here today.

..and here they are just started.


..and here they are done and ready for a quick fill/sand/paint.

I've knocked up some 3d models of what I call the 'exterior furniture', specifically the bits and bobs that are on the back of the APC. These have been printing tonight and have just finished. A little bit of clean-up and they'll be fine. I would use my resin printer but that's in the shed, and it's minus 3 degrees here today.
..and here they are just started.
..and here they are done and ready for a quick fill/sand/paint.

joberg
Legendary Member
Are those "furniture pieces" in resin? It's looking good, btw!!Indeed Chuffy 70. A lot of my kit is old but good.
I've knocked up some 3d models of what I call the 'exterior furniture', specifically the bits and bobs that are on the back of the APC. These have been printing tonight and have just finished. A little bit of clean-up and they'll be fine. I would use my resin printer but that's in the shed, and it's minus 3 degrees here today.
View attachment 1415247
..and here they are just started.
View attachment 1415248
View attachment 1415249
..and here they are done and ready for a quick fill/sand/paint.
View attachment 1415250
skiffy
Sr Member
Chuffy 70 - Hudson looks way more functional than a hot water bottle. ") I still have to model the pieces in 3d and prep them for slicing so it probably doesn't speed up the process dramatically but it is more convenient, yes.
I still have to model the pieces in 3d and prep them for slicing so it probably doesn't speed up the process dramatically but it is more convenient, yes.
Joberg - Thanks! It's much too cold here to fire up the resin printer (it's in an unheated shed since it's noisy and smelly). These are done in white filament at 0.15mm layer height. They look deceptively smooth because of the semi-translucent nature of the white. They'll still need a little sanding.
I still have to model the pieces in 3d and prep them for slicing so it probably doesn't speed up the process dramatically but it is more convenient, yes.Joberg - Thanks! It's much too cold here to fire up the resin printer (it's in an unheated shed since it's noisy and smelly). These are done in white filament at 0.15mm layer height. They look deceptively smooth because of the semi-translucent nature of the white. They'll still need a little sanding.
skiffy
Sr Member
Another small update. Greeblies for the back of the APC have a coat of primer to show up the layers for filling/sanding and have been attached temporarily to the structure. Because my APC isn't exactly the same shape as the model or the full size prop, I've used my judgment on placement (the filmed versions had differences anyway).


I had a heart stopping moment when I wondered if the turret would clear these new elements but it's fine.. Phew.

I'll probably print resin versions in future but these look ok!
I had a heart stopping moment when I wondered if the turret would clear these new elements but it's fine.. Phew.
I'll probably print resin versions in future but these look ok!
skiffy
Sr Member
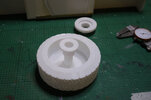
Sorry for the double post. I was thinking about how to solve a tricky problem with my APC wheels and inspiration struck!
I 3d printed my APC wheels with an axle in the middle. I thought I'd worry about how to connect them to the chassis later. I don't want there to be a bolt or anything inside the shell connecting through to the wheel.

So, I just worked out that I can 3d print a 2 part bearing that is glued to the outside of the shell. There's an inner sleeve (coloured red here) that is glued to the wheel.

..and there's an outer sleeve (the blue bit) that goes around that, that's glued to the chassis.

The outer goes on the wheel first (not glued) then the inner traps it in place and is glued to the wheel axle. Then the blue outer is glued onto the chassis to allow the wheel to spin.

It makes sense in my head, so we'll see how it works when I print all this stuff out.
I 3d printed my APC wheels with an axle in the middle. I thought I'd worry about how to connect them to the chassis later. I don't want there to be a bolt or anything inside the shell connecting through to the wheel.
So, I just worked out that I can 3d print a 2 part bearing that is glued to the outside of the shell. There's an inner sleeve (coloured red here) that is glued to the wheel.
..and there's an outer sleeve (the blue bit) that goes around that, that's glued to the chassis.
The outer goes on the wheel first (not glued) then the inner traps it in place and is glued to the wheel axle. Then the blue outer is glued onto the chassis to allow the wheel to spin.
It makes sense in my head, so we'll see how it works when I print all this stuff out.
skiffy
Sr Member
These took an hour to print with low infill - I'm just testing fit at the moment.

..and there we are with a wheel for reference.

The 2 bearings fit together OK but the tolerance is low.

The inner bearing - the one that glues to the wheel, is a little snug. Some of that is the 'Elephant's foot' effect you get with the first layer overprint (better adhesion) but it could do with a little more slack.

So I've adjusted the print file and I'm printing another. Hopefully that'll be better.
..and there we are with a wheel for reference.
The 2 bearings fit together OK but the tolerance is low.
The inner bearing - the one that glues to the wheel, is a little snug. Some of that is the 'Elephant's foot' effect you get with the first layer overprint (better adhesion) but it could do with a little more slack.
So I've adjusted the print file and I'm printing another. Hopefully that'll be better.
Attachments
skiffy
Sr Member
Well, I’m happy to report that we have a rolling chassis. I do like to add everything back in from time to time - makes me feel that I’m making progress. The only thing missing is the driver’s dashboard. That’s having it’s LED lighting finalised.
The wheels are pushed on temporarily at this point and I’m testing that they’re all reaching the ground properly.


I decided to mount the spinning assembly to the chassis so I can continue to work on the wheels and wheel-wells. I can put the wheels on whenever I like, which is nice.

I realised that I’d missed a bit in the pics - the front turret! So here’s a shot of that in place too. I’ve some cleaning up and finishing to do on a lot of the plate-joins which is very evident here (and the windscreen and headlights of course) but I’ll get to that.

The wheels are pushed on temporarily at this point and I’m testing that they’re all reaching the ground properly.
I decided to mount the spinning assembly to the chassis so I can continue to work on the wheels and wheel-wells. I can put the wheels on whenever I like, which is nice.
I realised that I’d missed a bit in the pics - the front turret! So here’s a shot of that in place too. I’ve some cleaning up and finishing to do on a lot of the plate-joins which is very evident here (and the windscreen and headlights of course) but I’ll get to that.
skiffy
Sr Member
Thanks indeed Joberg. Yes, that's why I do a state-of-the-nation build every now and then.
On the down-side it clearly shows me how much I've still got to do, including the stuff that's still pretty scary, like the seat safety bars.
I bought some inkjet-printable water-slide paper this week. That's for Gorman's screens. I'll be doing screengrabs from the movie, aligning them in Photoshop and printing them out. We'll see how that goes. I'm certainly learning a lot of new processes.
Yes, that's why I do a state-of-the-nation build every now and then.On the down-side it clearly shows me how much I've still got to do, including the stuff that's still pretty scary, like the seat safety bars.
I bought some inkjet-printable water-slide paper this week. That's for Gorman's screens. I'll be doing screengrabs from the movie, aligning them in Photoshop and printing them out. We'll see how that goes. I'm certainly learning a lot of new processes.
skiffy
Sr Member
A small update today. I'm working on whatever these things are that are decorating the ceiling of Gorman's console. We get a good look at them when they're re-used in the Medical lab in Hadley's Hope.

I've modelled up an estimation of one (they'll be pretty small) and I'll resin print them later.

I've modelled up an estimation of one (they'll be pretty small) and I'll resin print them later.
skiffy
Sr Member
Yes, indeed. I did think about that right at the start and increased the overall height proportionally to give a little more head room inside.It's going to be tight quarters in there
I brought the resin printer in from the workshop to the studio (which has heating). After it had acclimatised I ran off some of the Gyro gun sight pieces. Here they are getting a UV bath.
They're a little under-scaled (about 8mm wide) and far too flimsy to print properly so I'll up the thickness of the support bars, I reckon that'll do it. Sorry for the fuzzy image, I don't have a macro lens.
skiffy
Sr Member
I had better results with the second batch of prints. Still some issues though. I forgot to add support to some of the pieces so those prints failed. Printing perpendicular to the bed will often fail because from one layer to another there's a sudden shift in mass which breaks off from the supports instead of lifting clean.

So, I'm printing those pieces again on a slant to alleviate the strain and build up the mass incrementally. This is all fundemental resin printing 101 - stuff that I have learned but got out of the habit.

Because there was no support, the top tanks drooped underneath - you can see that in the lighter piece alongside the darker filament printed/primed ones. It's a little smaller too so I've scaled the resin one to 105%. Also the exhaust piece snapped when I was prising it off the plate - another good reason to add support. The gyro sight pieces printed great though.

Here's a tub of exterior greeblies in both resin and filament - some useable, some not.

..and here's the current print in progress on the printing bench.

On these small prints you can tell if they're printing properly if you hear a little pop when the plate lifts the print for the next layer. So far, all pops.
So, I'm printing those pieces again on a slant to alleviate the strain and build up the mass incrementally. This is all fundemental resin printing 101 - stuff that I have learned but got out of the habit.
Because there was no support, the top tanks drooped underneath - you can see that in the lighter piece alongside the darker filament printed/primed ones. It's a little smaller too so I've scaled the resin one to 105%. Also the exhaust piece snapped when I was prising it off the plate - another good reason to add support. The gyro sight pieces printed great though.
Here's a tub of exterior greeblies in both resin and filament - some useable, some not.
..and here's the current print in progress on the printing bench.
On these small prints you can tell if they're printing properly if you hear a little pop when the plate lifts the print for the next layer. So far, all pops.
Similar threads
- Replies
- 19
- Views
- 1,288
- Replies
- 24
- Views
- 1,937
- Replies
- 10
- Views
- 743