Alien (1979) Nostromo Crew, Attempt 2

Sew Long, Farewell...

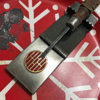
Earlier I had ordered some pink piping online. I think I got two yards, which should be more than enough to do my shirt and jacket. I sat down a couple days ago, and applied the first bit of it to one of my shirt pocket flaps. That was just under six inches of hand-sewing, and it took me an hour. I feel like I'm a hair's breadth away from rage-buying a sewing machine at Walmart. I am pretty pleased with my results, however. But, man, it is tedious. Hurts my neck, too.

This length of piping was simply sewn under the edge of the pocket flap, but I would like to be able to open up the collars and sew the piping inside them, all nice and professional like. Especially on the jacket.

That piping looks awesome! I am actually attempting a crew shirt myself and I have no idea where to even begin for the piping. Is that terribly hard to find online?
 
That piping looks awesome! I am actually attempting a crew shirt myself and I have no idea where to even begin for the piping. Is that terribly hard to find online?

Hard to find? No, not at all. I just searched eBay for pink cotton piping, and picked one that looked close. I just don't like to go to the fabric store. Looking real close at screen caps and promo stills from the film, the real stuff seems to be a tad darker than mine, maybe a little thicker, with a noticeable weave / texture to it, almost like a modern round shoelace. They may have been synthetic, I don't know.
 

Attachments

  • Kane's Jacket 3.jpg
    Kane's Jacket 3.jpg
    11 KB · Views: 189
  • 50773239_10156787929631605_2425489480841428992_o 2.jpg
    50773239_10156787929631605_2425489480841428992_o 2.jpg
    87.9 KB · Views: 176
Minor update:

Received my silver wings from Magnoli. Bit the bullet and got some purple dye and the dye fixative from Rit, plus a pair of PF Flyers (all via Amazon). Also bought online some white leather strip for the shoe D-rings, and some cord for the lacing panels (which turned out to be too thick). No new construction, dying, painting or sewing to show yet.
 
Trying to hurry and add some improvements to my Kane components before an event on Saturday. Shown below: adding piping to the other chest pocket on my years-old, close enough (then) shirt. And the award for sloppiest backstitch goes to...
 

Attachments

  • IMG_4826a.jpg
    IMG_4826a.jpg
    218.6 KB · Views: 167
Man, I Need a Belt and a Smoke...

Spent an hour or so finishing the piping on my second chest pocket, which I had started last night.

After completing that, I set to work doing a quickie mod on my belt buckle. I sanded the paint off the front, marked an approximate position to drill a hole, and then went to work with my trusty old Dremel. Having made a small holle just north of center, I put the post of my spare rank pin through it, and applied some JB Weld to hold it in place. The end results won't be perfectly accurate, but I lack a way to fabricate the white 'windows' & tiny wing decal on the real buckles. Additionally, the buckle itself isn't 100% accurate, but this beats the previous one I had. For a slight improvement in accuracy, I may mask off the rank badge and spray paint the buckle silver at a later date.

Extremely sophisticated curing-in-the-ideal-position-jig shown below.
 

Attachments

  • IMG_4827b.jpg
    IMG_4827b.jpg
    238.2 KB · Views: 181
Sew Be It

Woof, that was a lot of sewing. Took the plunge and sewed the piping around the collar. Got a bit sloppier than my previous work, but it's done. Also checked on my belt buckle, and it looks like that's ready to go as well. Also took in the waistband on my pants in the manliest way possible – with rivets! Which also worked surprisingly well, though it was a pain to do. Not much to show there, so no pics of that.
 

Attachments

  • IMG_4830a.jpg
    IMG_4830a.jpg
    218.9 KB · Views: 189
Thank you both!

I got my 11.5 (Men's) PF Flyers a few days ago, returned them, got a (Men's) 12 (US) pair today, and I think I'm gonna return them for some larger ones... again. Getting real cautious about walking around all day in too small shoes.
 
Hey, a tiny progress update!

Computer was out of commission a week to two ago, so I filled some time by applying some of the D-rings using my marine-grade vinyl. Upon comparison with a screencap, I feel that the thicker, plastic D-rings and leather straps would have been more accurate, but that's life.

I plan to trim the straps once they're all on.
 

Attachments

  • IMG_5394b.jpg
    IMG_5394b.jpg
    219.9 KB · Views: 172
Tiny progress update!

I was sewing something else earlier today, and since I had my olive drab thread in the machine, I had a go at adding piping to my jacket collar. It was difficult and tedious, and took a long time, and the results aren't quite as nice as I'd like, but perfection is the enemy of completion, to quote Adam Savage.

For a little more detail: This is the same piping I used for my uniform shirt. I've come to think it's too pale and too skinny, but at least it all matches. I cut the collar open with my seam ripper (carefully!), then removed the Velcro inside. I had cut out the hood much earlier. I pinned my piping in place, and sewed it to the exterior / 'down' side of the collar, then pinned the interior / upward-facing surface to the other side and sewed it together / closed. Then I ran a second line of stitches closer to the edge, to try to keep the edge from coming undone. Nowhere near sure that was the best way to do it, but it is completed and reasonably sturdy.
 

Attachments

  • IMG_5789a.jpg
    IMG_5789a.jpg
    157.3 KB · Views: 136
Tiny progress update!

I was sewing something else earlier today, and since I had my olive drab thread in the machine, I had a go at adding piping to my jacket collar. It was difficult and tedious, and took a long time, and the results aren't quite as nice as I'd like, but perfection is the enemy of completion, to quote Adam Savage.

For a little more detail: This is the same piping I used for my uniform shirt. I've come to think it's too pale and too skinny, but at least it all matches. I cut the collar open with my seam ripper (carefully!), then removed the Velcro inside. I had cut out the hood much earlier. I pinned my piping in place, and sewed it to the exterior / 'down' side of the collar, then pinned the interior / upward-facing surface to the other side and sewed it together / closed. Then I ran a second line of stitches closer to the edge, to try to keep the edge from coming undone. Nowhere near sure that was the best way to do it, but it is completed and reasonably sturdy.
That looks great. That's how i did it on mine.
 
Thanks!

Since I was in an optimistic and constructive mood, I switched to a different thread color and took in the sides of my uniform shirt. No pics, since it's nothing really obvious, but it's a better fit now. Yay.
 
This thread is more than 4 years old.

Your message may be considered spam for the following reasons:

  1. This thread hasn't been active in some time. A new post in this thread might not contribute constructively to this discussion after so long.
If you wish to reply despite these issues, check the box below before replying.
Be aware that malicious compliance may result in more severe penalties.
Back
Top