Noeland
Master Member
A few years ago I got a package deal of 6 or 7 resin blasters from a fellow in Japan on the big E.
Two of them were shipped "done" but came to be all busted up. Mostly with the trigger guards busted off of them. I've been reworking two of them to use in our fan film, and wanted to share the progress of one with the boards.
This is going to have a two tone black, glossy and flat, with shined out aluminum pieces and a barrel.
The other blaster isn't anywhere near done yet, but when it is, I'll post it.
This blaster, which I'm calling "Black and Silver" came to me with the original triggers (which had broken off) no guard, the bolt handle was missing and had just been filled in with brown putty, and the LEd package looked like this:

Initially, we used this and another blaster that lacked triggers as holster guns, because they could fit into normal hip holsters for the cops.
Now, I gutted all of the LEDS, and stared working to dremel and sand, and sort of rework the gun to be one of the more custom looking guns we will need.


I started to chop up some raw aluminum (flat and tube) from home depot to make a trigger guard, triggers, bolt hand, ejection port cover, etc. and found that I have enjoyed doing this more than any other part of the build.

I did the bending with regular tool and my work bench, nothing special there, but after a lot of shaping with the dremel and sanding, they look like this.

I actually cut 4 triggers like so:


Then used metal epoxy to glue them together, and then started to dremel and shape them.


Until I was happy with the results.
Tonight I started to paint the guns, and after the first round of painting (I need to do more sanding now to fix a couple rough spots the primer didn't show me)
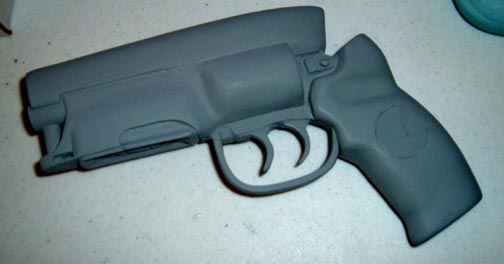
The gun is at this stage now.


With a flash:


I removed the checkering from the grip, sanded it smooth, and will finsih it with high gloss clear, I'm using Ultra Black to finish a few areas as well.
I don't think it's coming along too badly.
Feel free to post pictures of some of the other blasters being worked on right now.. I love seeing them. :thumbsup
Thanks,
Njc-------------------------------
Two of them were shipped "done" but came to be all busted up. Mostly with the trigger guards busted off of them. I've been reworking two of them to use in our fan film, and wanted to share the progress of one with the boards.
This is going to have a two tone black, glossy and flat, with shined out aluminum pieces and a barrel.
The other blaster isn't anywhere near done yet, but when it is, I'll post it.
This blaster, which I'm calling "Black and Silver" came to me with the original triggers (which had broken off) no guard, the bolt handle was missing and had just been filled in with brown putty, and the LEd package looked like this:

Initially, we used this and another blaster that lacked triggers as holster guns, because they could fit into normal hip holsters for the cops.
Now, I gutted all of the LEDS, and stared working to dremel and sand, and sort of rework the gun to be one of the more custom looking guns we will need.


I started to chop up some raw aluminum (flat and tube) from home depot to make a trigger guard, triggers, bolt hand, ejection port cover, etc. and found that I have enjoyed doing this more than any other part of the build.

I did the bending with regular tool and my work bench, nothing special there, but after a lot of shaping with the dremel and sanding, they look like this.

I actually cut 4 triggers like so:


Then used metal epoxy to glue them together, and then started to dremel and shape them.


Until I was happy with the results.
Tonight I started to paint the guns, and after the first round of painting (I need to do more sanding now to fix a couple rough spots the primer didn't show me)
The gun is at this stage now.


With a flash:


I removed the checkering from the grip, sanded it smooth, and will finsih it with high gloss clear, I'm using Ultra Black to finish a few areas as well.
I don't think it's coming along too badly.
Feel free to post pictures of some of the other blasters being worked on right now.. I love seeing them. :thumbsup
Thanks,
Njc-------------------------------


