5 ft. ANH “Wooden” Falcon

Searun,
Great progress on the build. The aluminium and brass is beautiful and will bring a truly unique look to this project. I think it will give the model a more retro/ Steampunk look.

And don’t dare be tempted to put paint on that metal. It’s stunning as is.

well done, Sir.
 
Here is an update.
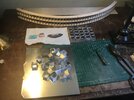
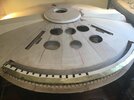
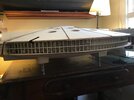
Since I have deviated from the true 5 ft. Studio Scale ANH Falcon with my retractable landing gear and aluminum armor plans, etc. I added an engine exhaust grill to the lighting box access per the Bandai 1/72 scale model. Then, liking that, started in on the nozzles. The pictures show 1/2 of the 54 nozzles temporarily installed to show why.
The pictures also show the start of a removable, curved rear engine deck. Laminated 1/8 inch model aircraft “light” plywood. I experimented with super glue to set the first layer curve instead of epoxy resin and fiberglass. Do not do this. While I wore a respirator knowing this was going to be more liquid than normal, I set off all the fire alarms in my small appartment. Running out to the storage area in a major city, to get a ladder, is not recommended with a respirator on while the wife is screaming. “Breaking Bad” comes to mind.

Nozzle fabrication was relatively straight forward. But, it gave me a good lesson learned on measurement before mass producing.
Needed to make a wood nozzle mock-up with rectangular plates sized correctly fore and aft plus consider .032 aluminum thickness and bend radius. Mock-up fit perfectly. Made a template by walking it around and drilling small holes (literally pin holes) were at the corners of the surface area shapes to get the bending lines scribed accurately on the .032 inch plate Material. Cut to the holes. Duck bill pliers used to make bends. Last joint super glued after tweaking the two trapezoid sides. One gets good at this after a while once implementing a proper mass production plan. The one step at a time process for all works very well provided you have each step figured out. Got a little bit into the production mode before I recognized that aft end of the nozzle (it is wider than the exhaust) measurement did not consider the set back of nozzles from the grill on a smaller radius. Had to make a new smaller length wood nozzle and template to reduce the error of nozzle spacing on the curve. After some lost time all is well. A good lesson learned and not the first one on this build.
 

Attachments

  • 6241072F-B7C5-498B-AADC-5ACC74F1E634.jpeg
    6241072F-B7C5-498B-AADC-5ACC74F1E634.jpeg
    1.9 MB · Views: 231
  • BE2AE92D-35D8-4BA0-AF09-074A733FDEE9.jpeg
    BE2AE92D-35D8-4BA0-AF09-074A733FDEE9.jpeg
    1.6 MB · Views: 229
  • 95DFD936-127A-4119-AB0E-48EAEA6E05D9.jpeg
    95DFD936-127A-4119-AB0E-48EAEA6E05D9.jpeg
    1.6 MB · Views: 228
Last edited:
Searun: welcome to the ``this sounds like a good idea moment`` of your model making life:p:p:p Ah, the stories I could tell concerning those ``moments of Wisdom``. Aside from your fire-alarm adventure, the whole construction seems very sturdy! Looking good from where I stand(y)
 
Searun: welcome to the ``this sounds like a good idea moment`` of your model making life:p:p:p Ah, the stories I could tell concerning those ``moments of Wisdom``. Aside from your fire-alarm adventure, the whole construction seems very sturdy! Looking good from where I stand(y)
Thanks joberg. Passing on little stories could be a sign of old age reminiscing. Ovever building is an unfortunate trait in my model building. I will be carefully that the Falcon does not become too chunky looking.
 
Beautiful fabrication. The rear end looks very Ralph McQuarrie'ish at the moment. I like it!

The story of the superglue is a classic! Very funny.

Thanks for sharing
 
Thanks joberg. Passing on little stories could be a sign of old age reminiscing. Ovever building is an unfortunate trait in my model building. I will be carefully that the Falcon does not become too chunky looking.
Reminding of my adventure of spraying a model in my bathtub: turn on the shower and all the spray paint particles would be attracted statically to the falling water. It worked well (no smell and no over spray on the wall of the bathroom...but now, my bathtub was coated with the gray color I just had sprayed on the model:eek::eek::rolleyes::rolleyes:
 
I have been known to clean cymbals in the bathtub, but never paint (I did paint a bathtub to get ready for sale however).

I don't think there's enough internet capacity to go into the various, uh, shenanigans I've been up to over the last 50+ years.

I will just put this here: As a toddler, I removed the bed-bars from my bed a carefully stuffed them out my bedroom window. Known Christmas-light eater (the big old ones that screwed in), and may also have created a snow storm in my bedroom with a giant (Styrofoam ball) stuffed rabbit as big as I was at the time.
Alright...you win:p(y)
 
Surfing around, procrastinating yet another day, ran across this build. Adding my props for great work so far...with lots more to come. Though, was following up on some earlier posts and just had to ask this logic question. If finish is left as aluminum and brass, what would you do to the plastic model parts/other assorted greeblies to make them blend in?
 
Thanks for the feedback Couchdivot.

Yes this is just the beginning. I do plan to have it painted by someone who knows how to do Falcon weathering. Regarding the brass, it is what I use on my wooden ship models not only for fittings, but structural shapes and parts that need to be strong and do not scale up to be too thick like some wood members and plastic. The added strength of soldered joints is a plus. As for the .032 aluminum armor, it goes back to my aircraft days. Actually, styrene armor thickness used by the expert studio scale builders on this site, is about the same thickness. That material requires similar labor for patterns & templates plus the same nibbler use for notches. Cutting thin aluminum only takes good shears. I am really bad with plastic & styrene construction. It is a different skill set that I do not have. Metal armor should offer some weathering affects after painting and can give a little different look to flak damage.

Kit parts and greeblies are a future decision point. That all being said, leaving it polished up like a P51, flying in Sun Fish mode with army air corps insignia, red engine flaps and invasion stripes needs to be done before true Falcon painting.
Searun...just to be clear, LOVED the idea of the raw, POLISHED aluminum version...factory fresh (maybe a bit of use streaking...just a lit oiling). Thought, any surface greeblies, assuming they'd be plastic, would have a totally different finish or color. I could forgive different colors in the cutout/recessed areas...but the surface details would just seem out of place. Flat panels, no other raised details, sleek and shiny...assume!
 
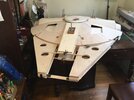
Here is a quick update shot of my wooden Falcon on its back. Please excuse the rough construction & hieroglyphic notes on the s basic skin. But, this picture shows some things that may be interesting at this stage.
Retracting landing gear “elevator“ plugs show an important addition. A plate has been placed over the epoxy imbedded nut below. Like the thrust block on top, when the beast is sitting on its gear, the load is reversed. This small modification prevents the possibility of the drive nut driving out if the glue fails.
Engine pits have been cut out with larger sub-skin levels temporarily placed below deck at approximate depth waiting on the puzzle of eventual Greeblies way down the road.
Removable mandibles have been rigged with bolt type pins.
The removable jaw box top and bottom are a work in progress. It shows the perimeter chamfer & disc wall alignment with the horizontal mouth sections at the “disc cut back” recess ( 45 diameter). Using previous foam mock-ups, various jigs, levels, checking edge distance, adding wall thickness to construction material measurements in this area is mandatory to preserve the proper toe-in and toe out. Being a little off on measurement on a big model just does not work. Attention to the this web‘s advice from those who have built this model and provided drawings is truelly appreciated having gotten this far. Measurement accuracy of the professionals on basic structure validated.
 

Attachments

  • 132EBE3C-EBC2-4967-AB79-D97BCA688369.jpeg
    132EBE3C-EBC2-4967-AB79-D97BCA688369.jpeg
    1.7 MB · Views: 182
Well, well, well...there's a familiar friend(y) Keep those great updates coming Sir:cool:
Thanks Jobert. Sometimes it is slow going. Constantly referencing, re-reading threads, calculating thicknesses. Much more of that than building. Starting to see it can happen. Appreciation of the design provides focus. It is good I am retired.
 
Man, this build is simply inspirational! And by that I mean it inspires me to get these other models I have to finish done so I can get back to my cutaway Falcon. XD
 

Your message may be considered spam for the following reasons:

If you wish to reply despite these issues, check the box below before replying.
Be aware that malicious compliance may result in more severe penalties.
Back
Top