rustysprattdesigns
Well-Known Member
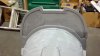
Hello RPF members. I'd like to share a project with you all that I've wanted to do for some time now. The Forward unto Dawn Master Chief helmet. The amazing model was created by a good friend of mine, Jacob Morin. He's also a fellow member of Stony Props. The print was done by another buddy and member, Walter Marlin. It started out in several pieces, eleven to be exact.
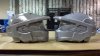
I did a coat of resin to help smooth out the print lines, before adding smooth cast 320 inside for added strength and to help seal the seams further. I then started smoothing things out and adding detail lines where they were required. Here the are on the lower cheek and side areas. You can see from the right vs. left side pics.


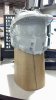
Continued filling and sanding...

I also added the center recess that wasn't there on the original print.

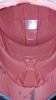
Yet more sanding, filling, and adding more detail lines above the brim and around the ears.


Started smoothing out under the brim and adding the detail pieces. I made paper templates, transferred them to thin plastic sheet, then super glued them in place.

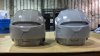
After filling and sanding the small gaps around the edges, this is what it looked like after primer.

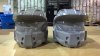
Here are the temple details before one last round of spot filler.

I ended up cutting out the recesses on the temple areas because the inserts wouldn't sit back as far as I would like.

Here's everything finally finished up and ready for molding.


Continued on next post...
I did a coat of resin to help smooth out the print lines, before adding smooth cast 320 inside for added strength and to help seal the seams further. I then started smoothing things out and adding detail lines where they were required. Here the are on the lower cheek and side areas. You can see from the right vs. left side pics.
Continued filling and sanding...
I also added the center recess that wasn't there on the original print.
Yet more sanding, filling, and adding more detail lines above the brim and around the ears.
Started smoothing out under the brim and adding the detail pieces. I made paper templates, transferred them to thin plastic sheet, then super glued them in place.
After filling and sanding the small gaps around the edges, this is what it looked like after primer.
Here are the temple details before one last round of spot filler.
I ended up cutting out the recesses on the temple areas because the inserts wouldn't sit back as far as I would like.
Here's everything finally finished up and ready for molding.
Continued on next post...
Attachments
-
 IMG_20140326_150133_834.jpg33.3 KB · Views: 190
 -
 IMG_20140402_152716_214.jpg51.7 KB · Views: 208
 -
 IMG_20140410_165149_217.jpg68 KB · Views: 247
 -
 IMG_20140420_212930_827.jpg33.6 KB · Views: 215
 -
 IMG_20140421_125143_145.jpg61.5 KB · Views: 361
 -
 IMG_20140421_125202_037.jpg64.9 KB · Views: 220
 -
 IMG_20140421_125220_105.jpg64.5 KB · Views: 308
Last edited:


