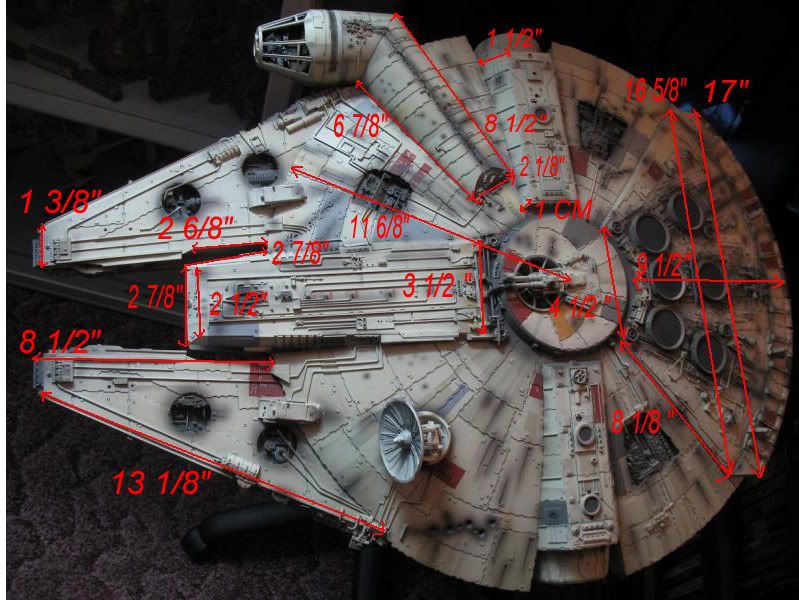
32" Falcon My First Scratch Build

jawsmodels

Sr Member
Gday everyone. Im attempting my first scratch build ever. Ive never cut a piece of plastic, except off a sprew, ever. A while back now when I stumbled on Moe, Ketzers & others Falcons I dreamt of being able to do it. I have been watching & studying everyones builds for the last few years & have decided its time to give it a go. I have had a set of base plans blown up to 1:1 32" scale that I got from The Millennium Falcon Builders Club at studioscale.com. The plans are Josh Maruksa's, so thanks Josh. I picked up a 2.4x1.2 sheet of 1.5mm styren yesterday. I have a few kits of many I will need for this build & the want to do it & do it right. I have noticed in the plans the rear of the sphere, engine area looks to have an indent the same as the forward part of the sphere at the front of the Falcon. Is this the same as the front? I noticed on other builds that they just cut a full sphere shape at the rear. Is it actually indented as the front is & the rear engine plate sits over the top? Is it a repeated pattern I think Im trying to ask? If so thats what I think I will do.
 
Last edited:
Hi there, this is what I did for mine, its a full circle and I think the indent you mention happens when you add the curved skin over the ribbing. This top skin is a larger diameter than the basic shape, and overhangs about a quarter of an inch...check refs though. It should be the same at the back too, and then the engine deck is a bigger diameter again.
Falcon1.jpg

Skinshrunk1.jpg

I'm not saying that this is THE way though, it's just the way I did it..

Good luck with the build.:wacko

Phil
 
Thanks Phil I appreciate your reply. Ive got your whole build on file mate. I love what your doing. It was the final straw for me watching you progress. I only noticed this indent today & am going through refferences to see if Im right or not. It looks like the rear end of the sphere is the same as the front between the mandibles. I would have had the base drawn out today if i hadn't been caught by this detail. Im hopeing one of the big guns can set me straight... Im using 1.5mm Styrene like you did as looks very sturdy. Did you use the same to cover the dome or a thinner sheet? Cheers mate.
 
Just checked the ref pics at studioscale.com & it looks like its the armour plating. The base plan Im using is supposed to be drawn without the plating so thats thrown me off?
 
Last edited:
Damn,i thought for a sec i posted those pic's here that i posted over at RI for you.
I'm looking at that large slightly raised section at the back on the top side.Was that a removeable access section to the inards on the original Falcon by any chance?
 
I used the 1.5mm because it's same thickness as the Tamiya M16 multigun chassis that goes on the inner mandible. There's a good pic of that area at sudioscale I think, and you can see the edges of the styrene and the chassis to compare the thickness.
I used 0.75mm for the curved skin, and I have it on good authority the the plating is 0.75mm as well. If you've got a good pic of the waistband it should show the skin and plating so you can see they're about the same thickness. The plating on the mandibles is thinner though, 0.5mm.

Phil
 
Thanks Phil & Phil Im very greatful for your assistance. Tk you were right about the plateing. I went over it all night & then became apparently clear I was over looking a simple fact 'the over hang' DUH! Im not a great mathematician & simple things like that can really screw me up when Im trying to cover all my bases. Thanks again & Im going to listen closer when somethings pointed out. I will draw up my upper & lower bases today & hopefully make a good start. Cheers. Ive attached the plans Im using.
 
This should be a great ride man going to follow this!!!:thumbsup
Seems like you have nice plans there, they should help you get
started in the right direction!!

Phil do you have your build up here....is it finished?

Regards,
Michael
 
Last edited:
Great project. Are Josh Maruksa's plans the best plans out there? I was tinkering with the idea of tackling this project . I also checked out the plans on the falcon builder group by a "JW". Anyone use those blueprints? They seem pretty nice too. It has all the dimensions on it also.
This is one of those projects you want to make sure you have the correct dimensions before going too far.

ZK
 
Thanks 3-d builder your work is something to aspire to. This will definately be a learning experience.
Zombie Killer these are supposed to be very accurate plans as the measurements came off the MR Falcon that was laser scanned for accuracy. So they should be very accurate. I posted them as jpegs at 1:1 size. I can post PDF's if you want?
Can anyone 'please' tell me which of the Entex Porsche parts are used on the 32" other than the transmission. I can get them but need to know which ones. I know these parts are used, just wondering if there was any others?
 
Last edited:
Update. Went & picked up some tools I'll need to do this. Rulers, Knife with spare blades & a Electronic Vernier Caliper to help me with mathematical dislexia:wacko. I also realised that the JM plans are good but leave alot of guess work for us unmathematically minded builder. So I am now using the JW plans also from studioscale.com. In doing so I have realised that JW's plans are larger than Josh's. I might be reading it wrong but JW's inner sphere which would be the patty in the burger is 12" & Josh's is 11.2". Thats nearly an inch larger just for the inner sphere. I gotta say theres some real brain burn going on right now. tk what did you use as the measurement for the inner shere on your first base shape? I think Im going to stick with Josh's & go the 11.2"
 
Last edited:
Hi Michael, my build is here :-

http://www.therpf.com/showthread.php?t=48473

Not finished though..

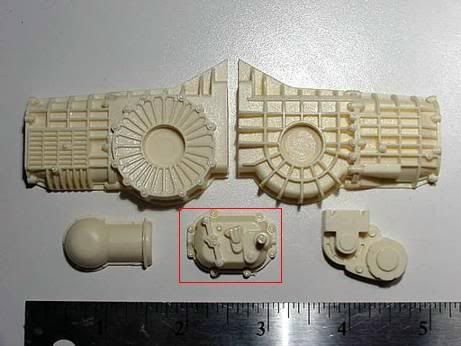
As far as I know,these are the parts needed from the entex..

Entex2.jpg


As for the inner circle, I'm confused myself... I've measured the drawing I made and it is 23 and 2/16ths inches diameter, or 587mm (seems a strange size now, and can't remember how exactly I came up with it). I think I've done a Homer Simpson, and old info has been pushed out to make room for new stuff..:lol Anyway, I've measured the model as it is now, and the inner circle is 23 and 1/2 inches dia. This must be because I've added the ribs and skin for the curvature making the distance longer.

I was told that the overall finished width of the dish..inc curvature.., should be 24 and 1/4 inches wide. From that I decided (after checking kit parts for the waist detail) that around 11mm's over hang all round inc plating, needs to be taken into account to arrive at the inner circle size.

I'm also reliably informed that the overall finished length of the ship inc F1 parts on the mandibles at the front, is 32 and 1/2 inches long.

I think to sort this you need to draw it out first onto card, make a few card ribs, and card skinning. Tape it roughly together so you can see it in three dimensions. I made card templates for most of this first to check how it worked before wasteing plastic.

This is by no means a definate way to do it, I've just tried to work backwards from finished sizes I was very kindly sent, to hopefully get somewhere close.

I hope this hasn't confused you even more..

Phil
 
Good on you dude for jumping in and giving it a go!. Life's toooo short to just sit and wonder what if!. With all the help you'll find here I'm sure your Falcon will just rock my friend, looking forward to this build for sure!.
Stu:)
 
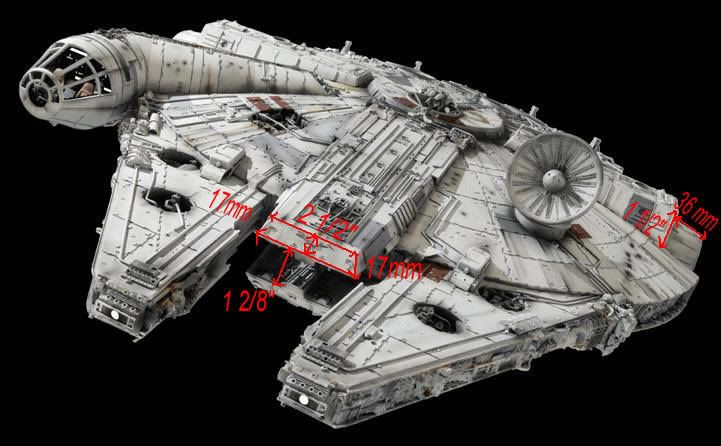
These are the pics I've been working from, I haven't posted these before because of reasons I've mentioned. However, after emailing GF to check he's ok for me to post 'em..here you go..

Without these pics, I don't think I would've ever got this project off the ground. These measurements are taken from Gerardo's MR, so as close to the real deal as you can get.. I can't thank him enough for his help with this. (y)thumbsup


Untitled-1.jpg


Untitled-2.jpg


Untitled-3.jpg


Untitled-4.jpg


Untitled-5.jpg


Untitled-6.jpg


falcon_size_1.jpg


falcon_size_2.jpg


Hope this helps

Cheers

Phil
 
Last edited:
Good luck with this project, the 32" is one of my fav, not because I love this ship but because that was my first SS model.
Another 32" to follow, your in good hands with Phil ! Keep us posted :)
 
Wow thats awsome buddy for your help. Mr Tox cheers. Phil I can't thank you enough & thank you Gerado, your pics are very greatfully appreciated. I will have shapes in my next post. Thankyou also to everyone else for the inspireing kind words they are extremely motivateing.
 
Last edited:
Those are great pics Phil. Thanks .....i do have to laugh at how some numbers are standard and some are metric. And the 6/8" thing is pretty hillarious:eek
 
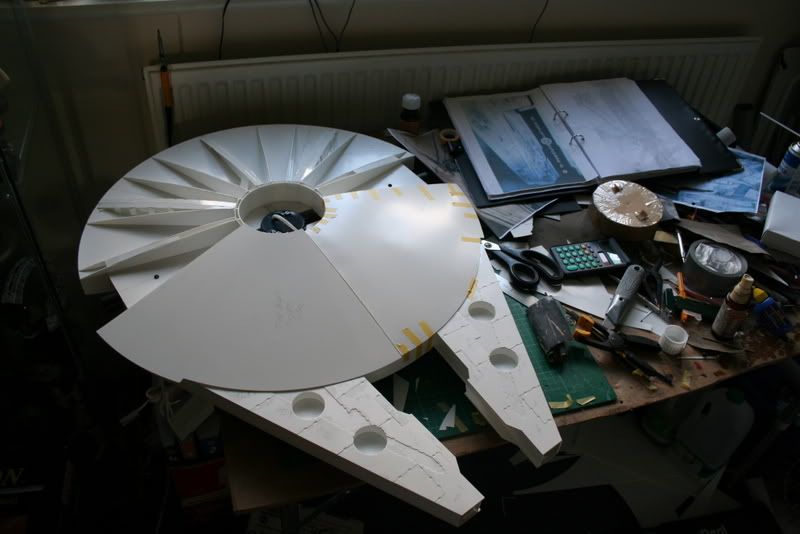
Update. So this morning I cut out my printed Base Plans as whole shapes. I'll lay my parts out on these later. By photo. 1)Cut Base Plans 2)Bought paper to trace plans & make mock ups before cutting my styren(thanks Phil) 3)Traced outline onto paper 4)Made circle maker out of piece of wood with nail hammered into one end & a whole drilled at half the distance I wanted my circle to be. Shoved pencil in hole & whalar, circle maker! 5)Drew my 'perfect' circle! 6)Checked the measurements(spoton!:cool) 7)Sharpened the lines up & checked the measurements 8)Inner Base ready for cutting & transfering to styrene for cutting 9)Do I cut these add on edges off & follow the line through or cut as is?
I just want to say thanks again for everyones support. Ive got a handle on things now. The JW plans are quite incorrect & the JM plans are pretty much spot on. Thank the gods.
 
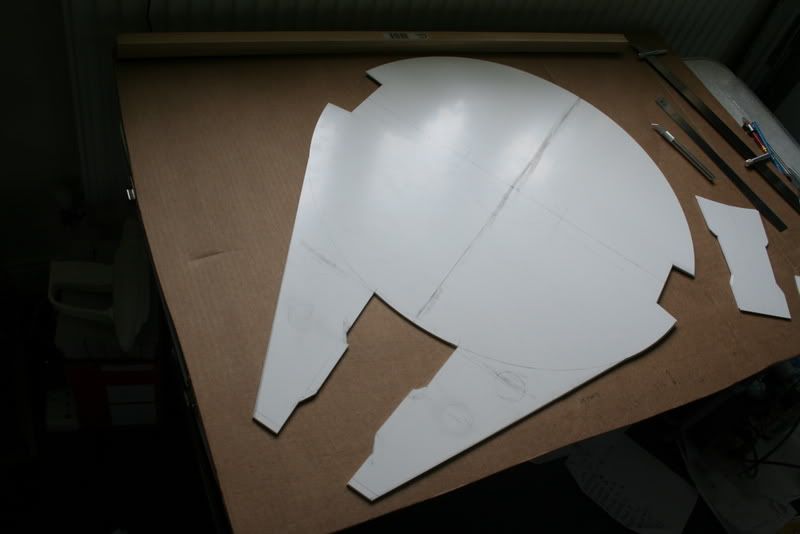
Okly dokly, was a big day for me today & am glad its now just about over after this post. In order of pictures posted. 1)Base shape cut out & ready for traceing 2)Base shape traced onto 1.5mm Styrene sheet 3) Traced, looks ok! 4) Cut! Damn that was stressful...:eek 5)Base shape removed from first cut:sick 6)The first cut! Freakn stressful process that was... 7)Damn hard work. What have I got myself in for. Thanks to a member telling me about the cut, bend & snap method for Styrene I only just got through that. Thats definately it for today. thanks
 
Last edited:
Back
Top