You are using an out of date browser. It may not display this or other websites correctly.
You should upgrade or use an alternative browser.
You should upgrade or use an alternative browser.
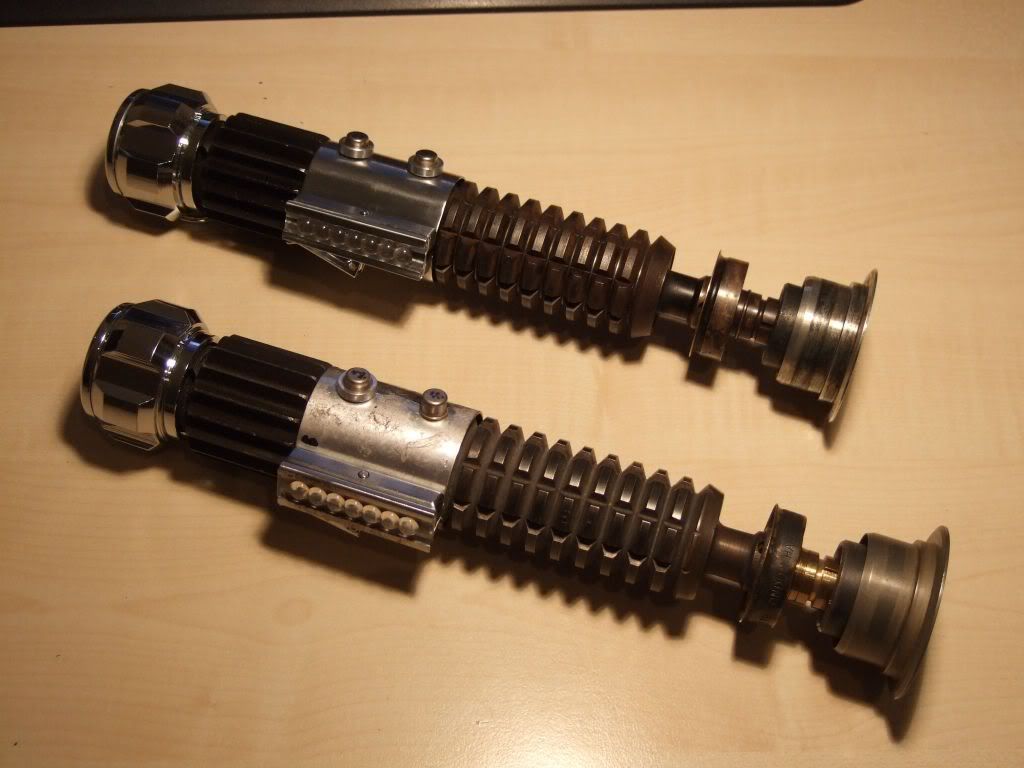
2 New Obi-Wan A New Hope LightSabers I've been working on!
- Thread starter James Kenobi 1138
- Start date
Wonderful!!!!
Is there some kind of template that you use for the correct positioning of the screw / wire holes? I´m in the prozess of adding these details to my own sabers and don´t want to mess up my clamp(s) :unsure
In addition to that...are there any better pics of the tunisia version?
What details (besides of the dark grenade neck, two transistor washers and missing endcap) have to be paid attention to?
Many thanks in advance!
Markus
What would be the best solution to remove it from the chrome?
If you've tried soap and water I'd try Goo Gone or Goof Off, one of those cleaners used to take stickers off products or take crayon marks off walls. They are mild and won't hurt the chrome.
I'll get on the bean and get that Handwheel tutorial done, and probably one for drilling the clamp as well.
...
I'll get on the bean and get that Handwheel tutorial done, and probably one for drilling the clamp as well.
That´d be great! Thanks in advance
")
What about the tunisia saber differences?
I remember a comparsion pic with comments such as "rotated booster, missing cap, 2nd washer" etc.... but no detailed information such as whether the screws and wires were on the clamp or not etc.
By looking at kurtyboys tunisia saber, the brass screws and wire are NOT present, correct?!
Markus
Last edited:
Yes, the Tunsia version did not have the screws or wires. They would be clearly visible in the Tunsia photo and it supports the theory that they are repairs made either during London filming or after. The clamp looks either 'factory new', or the whole clamp is covered in metal tape. Probably most likely it's just a regular unmodified Graflex clamp.
Tarkin
Well-Known Member
Hey James,
Do you have a side by side comparison photos of the Tunisia version and the other version like the one on the Death Star that he carries before the duel between him and Vader?? Thanks! Oh, also do you know what the letter or wording on the wind vane on the actual Obi-Wan screen used prop said based on any of the picture or info you have?? Thanks!
Do you have a side by side comparison photos of the Tunisia version and the other version like the one on the Death Star that he carries before the duel between him and Vader?? Thanks! Oh, also do you know what the letter or wording on the wind vane on the actual Obi-Wan screen used prop said based on any of the picture or info you have?? Thanks!
Last edited:
Looking good !
Beautiful!
Ditto!
Sym-Cha
Master Member
Very nice overall weathering, Markus.
Thanks James. (Google : GOO GONE)
Aha . . . so if I leave my cubes as is on the real handwheel,
then prop wise it would be the Tunesia Version, right?
Hi Tarkin, most pictures I have of windvanes of real grenades
do not seem to have lettering. Don't know about the screen-
used prop though.
My Park's replica however has : 'Powder Co. Ltd. London Hale's
Patent' written around on the windvane :confused
-Chaim
Smiling Demon
Sr Member
Great looking sabers. But something that has always bugged me about weathered sabers like these and that is the power cell always looks new! The saber looks like it has been to hell and thrown down for 50 years but the power cell is all shiny!
I know that it is a power cell and gets changed out but it still bugs me!!:lol
I know that it is a power cell and gets changed out but it still bugs me!!:lol
Okay, I went tonight and took all the photos for the Handwheel Tutorial. Give me a few days to get the tutorial set up and I'll get it posted here.
This is the method I've been using to drill the hole for the D-ring in the plastic cubes in an AS Handwheel.
These vintage AS Handwheels are not easy to come by and usually not very cheap, so drilling them correctly the first time is essential to not totally ruining your Handwheel.
STEP 1: Make sure you know which 'side' is which.
The Handwheel is 3 pieces, the top and bottom caps that are metal, and the cubes that are plastic. When you separate the cubes you'll see that there is a solid flange on one end and a 2-piece flange on the other that fit into the top cap.
The cubes also have a variation, a 'longer side' and a 'shorter side'. Depending on if you're going for the Tunsia version of the saber or the Chronicles version of the saber determines which direction you have the cubes.
STEP 2: The hole is drilled OFF CENTER, make sure you know which side is which when you go to drill.

STEP 3: You need a drill-press to do this correctly, and a milling table attachment.
If you don't have a drill-press, find someone who does and will let you borrow it. The milling table attachment is cheap, I got mine from Harbor Freight Tools for about $30 on sale. It is a vice that has X axis, Y Axis and swivel and will fit in your drill-press table mount. You use crank handles to dial in the needed adjustments like the table on a milling machine.
STEP 4: Use a center punch to mark the spot to be drilled.
Once you determine exactly the spot where you're going to drill, use a center punch to make a divot in the plastic to 'hold' the drill bit when you start drilling. This will keep the drill bit from 'wondering' on the sloped, chromed surface. The hole is not only off-center, but it's not in the center top-to-bottom either. Make the mark closer to the base, farther from the outside of the cube. If you don't, your drill bit will be too close to the outside of the cube and ruin the cube.

STEP 5: Start drilling with a smaller drill bit then you need.
For the first pass, use a small drill bit just to make a 'pilot hole' for the correct size bit you'll use in the second pass.
STEP 6: Start lining up for the vertical pass.
With your cubes in the vice of the milling table and your small drill bit chucked-up in the drill press, use the handles on the milling table to get the cubes up to the drill bit but off to the side.
You need to check to see if when the drill bit enters the top of the cube that it is going to come out at the same place on the bottom of the cubes. If the alignment is off your cube will be ruined.

From the side you can adjust the milling table to get the drill bit just where you want it at the top of the cube.

Then pull the drill press down and check the alignment and adjust the cubes as needed. The drill bit should enter and exit the cube at the same location vertically.

The milling table has set-screws that you can tighten to 'set' a direction. So when you are happy with the vertical tighten down that axis set-screws to set that axis alignment.
STEP 7: Set for the Horizontal drilling location.
Now that you know the vertical position is correct, use the milling table handles to dial the cubes into a position where you can set the position horizontal on the cube to drill.
Your drill bit should be at the mark you made with the center punch.

Swing the drill-press handle down and check that the drill bit is perpendicular to the cubes and in the correct horizontal position.

STEP 8: Roll the cubes back and start drilling.
You've center-punched a start divot, checked the vertical and horizontal, and moved the cubes into position. Start drilling.


CRITICAL NOTE:
The small drill bit is very short.
Don't try to drill all the way through the cube. Just get a starter hole.
Because the drill bit is short it's very close to the drill-press chuck and if you drill too far down the chuck can rub on the other cube next to the one you're drilling and damage it.
Check your clearances as you drill, watch the drill-press chuck as it moves down into position so you don't damage the upper most cube.
When you move to the correct diameter drill bit for your D-ring, it's longer and you can chuck it so that you will be able to drill all the way through with no problems.
These vintage AS Handwheels are not easy to come by and usually not very cheap, so drilling them correctly the first time is essential to not totally ruining your Handwheel.
STEP 1: Make sure you know which 'side' is which.
The Handwheel is 3 pieces, the top and bottom caps that are metal, and the cubes that are plastic. When you separate the cubes you'll see that there is a solid flange on one end and a 2-piece flange on the other that fit into the top cap.
The cubes also have a variation, a 'longer side' and a 'shorter side'. Depending on if you're going for the Tunsia version of the saber or the Chronicles version of the saber determines which direction you have the cubes.
STEP 2: The hole is drilled OFF CENTER, make sure you know which side is which when you go to drill.
STEP 3: You need a drill-press to do this correctly, and a milling table attachment.
If you don't have a drill-press, find someone who does and will let you borrow it. The milling table attachment is cheap, I got mine from Harbor Freight Tools for about $30 on sale. It is a vice that has X axis, Y Axis and swivel and will fit in your drill-press table mount. You use crank handles to dial in the needed adjustments like the table on a milling machine.
STEP 4: Use a center punch to mark the spot to be drilled.
Once you determine exactly the spot where you're going to drill, use a center punch to make a divot in the plastic to 'hold' the drill bit when you start drilling. This will keep the drill bit from 'wondering' on the sloped, chromed surface. The hole is not only off-center, but it's not in the center top-to-bottom either. Make the mark closer to the base, farther from the outside of the cube. If you don't, your drill bit will be too close to the outside of the cube and ruin the cube.
STEP 5: Start drilling with a smaller drill bit then you need.
For the first pass, use a small drill bit just to make a 'pilot hole' for the correct size bit you'll use in the second pass.
STEP 6: Start lining up for the vertical pass.
With your cubes in the vice of the milling table and your small drill bit chucked-up in the drill press, use the handles on the milling table to get the cubes up to the drill bit but off to the side.
You need to check to see if when the drill bit enters the top of the cube that it is going to come out at the same place on the bottom of the cubes. If the alignment is off your cube will be ruined.
From the side you can adjust the milling table to get the drill bit just where you want it at the top of the cube.
Then pull the drill press down and check the alignment and adjust the cubes as needed. The drill bit should enter and exit the cube at the same location vertically.
The milling table has set-screws that you can tighten to 'set' a direction. So when you are happy with the vertical tighten down that axis set-screws to set that axis alignment.
STEP 7: Set for the Horizontal drilling location.
Now that you know the vertical position is correct, use the milling table handles to dial the cubes into a position where you can set the position horizontal on the cube to drill.
Your drill bit should be at the mark you made with the center punch.
Swing the drill-press handle down and check that the drill bit is perpendicular to the cubes and in the correct horizontal position.
STEP 8: Roll the cubes back and start drilling.
You've center-punched a start divot, checked the vertical and horizontal, and moved the cubes into position. Start drilling.
CRITICAL NOTE:
The small drill bit is very short.
Don't try to drill all the way through the cube. Just get a starter hole.
Because the drill bit is short it's very close to the drill-press chuck and if you drill too far down the chuck can rub on the other cube next to the one you're drilling and damage it.
Check your clearances as you drill, watch the drill-press chuck as it moves down into position so you don't damage the upper most cube.
When you move to the correct diameter drill bit for your D-ring, it's longer and you can chuck it so that you will be able to drill all the way through with no problems.
The cubes are solid, perfect for drilling.
Similar threads
- Replies
- 37
- Views
- 2,665
- Replies
- 79
- Views
- 2,874
- Replies
- 23
- Views
- 894
- Replies
- 0
- Views
- 307
- Replies
- 14
- Views
- 1,825