1st DL44 Build Thread! Share your first DL44 build here!

Looks great clean. I want to do a ROTJ version at some point, and keep in on the cleaner side. I feel like I’m kinda hooked now. So I may end up making ANH, Empire and ROTJ versions haha
If I ever have extra money just lying around, I've always thought it would be fun to have a clean version of the V2 hilt.
 
Not the first DL-44 to pass through my hands, but just finished assembly this week. I decided to do something different. It feels a bit lazy, I know, and it's definitely not something everyone would want...but while I was painting it, I ended up deciding NOT to do any weathering or distressing. I just liked how it looked clean so much that I thought it might be fun to keep it clean. At least for a while.

edit: I didn't notice until I posted it...something about the lighting in these pictures actually makes the paint look a little worn in spots...I guess it just WANTS me to distress it. I looks clean in person.
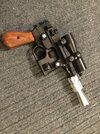
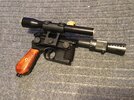
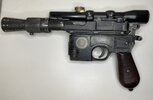
Very nice blaster. I like the clean look.
These objects came new from the manufacturer at some point, right? I finished my Greedo blaster recently and haven’t weathered it yet. I’m very much enjoying the unused sheen of the different blacks and textures of plastic and metal.
 
Nice build- turned out great! I’m about to tackle a steel FM of my own. This is my first DL 44 and i had a couple of quick questions if you dont mind:

what length did cut the barrel to?
how did you decide where to drill /tap the holes for the scope mount?
any tips on drilling / tapping the holes? (Don’t want to make any rookie mistakes)

Thanks!
 
Thanks! That’s awesome, you’ll love it, it’s a great kit and fun process. If you’re getting field marshals full steel kit, then all of that will come pre-drilled and cut. You’ll only have to worry about that if you’re doing a denix mod.
 
Here are my FieldMarshal denix builds….
 

Attachments

  • 4A9149E9-7858-4678-9CE2-E9D9748315D7.jpeg
    4A9149E9-7858-4678-9CE2-E9D9748315D7.jpeg
    1.7 MB · Views: 68
  • BA096C9C-EFAE-4386-994B-522B7FE60CA9.jpeg
    BA096C9C-EFAE-4386-994B-522B7FE60CA9.jpeg
    2.5 MB · Views: 72
Here’s my First DL-44 build. Not hyper accurate per-say. I am also a fan of the Adam Savage method of making something that gets a clear message across but is also just a lot of fun. I really enjoyed the Solo movie, and am of course a huge original trilogy fan so my build was kind of geared to be somewhere in between both time frames. Next upgrade will be wood grips and a new bolt. I’d love to hear y’all’s thoughts.

Fantastic build Jonflake88!
 

Attachments

  • 47499B1B-6FAA-4808-8B32-7481403280E0.jpeg
    47499B1B-6FAA-4808-8B32-7481403280E0.jpeg
    1.3 MB · Views: 72
  • AF85224C-DEFE-400D-A332-0827DEE74907.jpeg
    AF85224C-DEFE-400D-A332-0827DEE74907.jpeg
    1.1 MB · Views: 73
  • B7AC8F66-6624-42A5-974F-38282FCA7E13.jpeg
    B7AC8F66-6624-42A5-974F-38282FCA7E13.jpeg
    1.3 MB · Views: 80
  • 0D1436DB-0863-4638-AC52-E108AB8768D3.jpeg
    0D1436DB-0863-4638-AC52-E108AB8768D3.jpeg
    1.9 MB · Views: 80
Just a question out of curiosity. What do you guys use to blue the metal parts? Same stuff as for real guns?
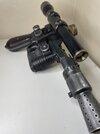
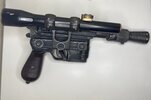
I also used Birchwood Casey Super Blue for all of the steel parts. I then clear coated with a matte or crystal enamel.

I really screwed it up the first time so make sure you stick to the process of cleaning the parts with acetone, bluing, and then coating in oil (I used a standard vegetable oil), and letting it sit for at least 24 hours. You might want to blue it a second time if you want a deeper finish but I found one coat was good enough for what I was going for, generally.
 
Some wonderful replicas everyone is recreating here! Beautiful work by all indeed. Here is my Stembridge and GK blaster I recently finished up to add to this great thread that’s starting to take a life of its own. These are denix based with my own designed parts. Always fun to see others enjoying these blaster builds..
9A13C3F3-7B88-4EC9-A661-DD2DFFAB0C81.jpeg
C8061B93-A953-4D6A-B809-3C588E3E988B.png
 
Here’s my First DL-44 build. Not hyper accurate per-say. I am also a fan of the Adam Savage method of making something that gets a clear message across but is also just a lot of fun. I really enjoyed the Solo movie, and am of course a huge original trilogy fan so my build was kind of geared to be somewhere in between both time frames. Next upgrade will be wood grips and a new bolt. I’d love to hear y’all’s thoughts.

Fantastic build Jonflake88!
Think your build is great! It has a really nice feel to it, and your weathering looks great. I think you struck a nice middle ground between the two looks. When you grab the wooden grips, scottjua has a great video about weathering on his patreon, I definitely recommend checking it out.
 
Some wonderful replicas everyone is recreating here! Beautiful work by all indeed. Here is my Stembridge and GK blaster I recently finished up to add to this great thread that’s starting to take a life of its own. These are denix based with my own designed parts. Always fun to see others enjoying these blaster builds..View attachment 1517623View attachment 1517622
These are great! Im loving what my original build thread is turning into, like you said its taking an awesome life of its own! I want to build a stembridge at some point, have a few other blasters to knock off my list first though. I love the story behind the GK though. Are those how the grips are on the stembridge? I haven'd done any research on it, I really like the look of them though.
 
Jonflake88 Ya the grips on the Stembridge where checkered opposed to straight lines. Here a video that will definitely help speed up the research on the Stembridge if interested. Might be helpful in your quest. I also have video on that GK pictured as well. It’s a build thats both film accurate as well as LucasFilm archives accurate. (The scope rings is basically what it boils down to). It’s on the same YouTube page. Here the Stembridge..

 
Last edited:
Think your build is great! It has a really nice feel to it, and your weathering looks great. I think you struck a nice middle ground between the two looks. When you grab the wooden grips, scottjua has a great video about weathering on his patreon, I definitely recommend checking it out.
ill give that video a look! Thank you!
 
This is technically my second DL-44 build. The first one isn't really worth posting. This is a steel Blaster Factory DL-44. I was going for the live fire DL-44 version used during the dinner scene on Cloud City. I really couldn't find much but a couple shots. I used the promotional shots of Harrison Ford pointing his blaster at his head and some other close up shots. The live fire DL-44 I noticed has the cut on the light port. The opposite non scope side of the blaster I literally couldn't find any images so I did minimal weathering. Dusting, subtle scratches and chipping on the paint. Before painting this thing I removed all machining marks and cold blued the steel. Then I painted black over the bluing. The rear sight, hammer, and housing I did a patina on it, hit it with 0000 steel wool then sealed it. The trigger looked good blued so I left it. I did micro scratches and impact chipping throughout the blaster. Tried to keep it minimal. I dusted all cracks and areas I thought it might collect. Especially the micro scuffs, chips and scratches it makes them pop.
The grips come with hair thin grooves in them so I made them slightly wider and rounded off the edges. After that I stained them and added a slight patina to the brass grip screw inserts.
The flash hider I sanded and weathered with aluminum black. I blended and softened the weathering with steel wool.
The scope I primed, used a stone texturing paint, then used a black top coat. I clear coated it with tamiya clear. After that I dulled it with steel wool. I used a needle to add a bunch of tiny little scuffs and scratches that I later filled with pastel dust. I painted in the lettering on the rear reticle. The scope port and rear scope foot I used alclad ii polished brass + some pastel to try to match the color of a real one. After doing an overall dusting with pastel dust it made the details pop much better. The scope mount I tried to match some of what I could see in the firing scene.
The scope mount screws I couldn't tell if they were painted or not. They almost look unpainted in the images I could find so I did a patina on them and left them unpainted. I cast the greeblies myself directly from a 1977 Revell visible V8 kit. I weathered the Phillips screw heads on the greeblie side of the blaster. Im pretty happy about the build. Excited to build another, hopefully learn more and improve on the next.
20240124_210106.jpg
20240129_114803.jpg
20240129_214847.jpg
20240130_001339.jpg
20240130_001412.jpg
 

Attachments

  • 20240129_114813.jpg
    20240129_114813.jpg
    4 MB · Views: 6

Your message may be considered spam for the following reasons:

If you wish to reply despite these issues, check the box below before replying.
Be aware that malicious compliance may result in more severe penalties.
Back
Top