1st DL44 Build Thread! Share your first DL44 build here!

Jonflake88

Active Member
RPF PREMIUM MEMBER
THREAD UPDATE:

Originally started this thread as my first DL44 build log, but now that its finished, I figure this is a good place for others to share their first DL44 builds! My build log is still below, but feel free to share your build with the community and ask questions if you like.
________________________________________________________________________________________________________________________________


While not my first ever build, this is my first ever build thread. Let me start by saying how much I enjoy this community, the skill, talent, attention to detail, willingness to help others and love for Star Wars is so motivating and I’m grateful to be a part of it.

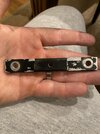
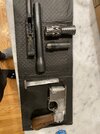
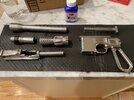
I was lucky enough to get a war machine (blaster factory) full steel DL44 replica for Christmas. This is a prop I’ve wanted since I was a kid, and will be a centerpiece of my collection. My goal is to make an accurate ANH Hero blaster. I take the Adam Savage approach to my props, the experience is most important to me, but I would like to get as many of the details as I can within reason.

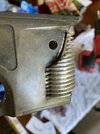
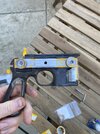
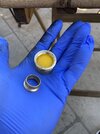
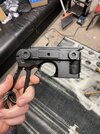
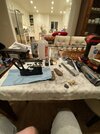
scottjua has been kind enough to answer my many questions (credit to him for many of these steps) and now begun the build has. After learning assembly of the kit, first step was sanding and prepping the steel parts for bluing. I used birchwood and casey super blue for the upper. Black paint (either archive x enamel or flat black rattle, undecided, opinions on this welcome) with scottjua stencil to come tomorrow. If anyone has any questions, by no means am I an expert, but I’m happy to try and answer!
 

Attachments

  • 08FFA217-3AA5-4B2E-81ED-A4D67799DD75.jpeg
    08FFA217-3AA5-4B2E-81ED-A4D67799DD75.jpeg
    1.7 MB · Views: 257
  • 812A1172-DE5E-4D62-86D4-56BDE9071196.jpeg
    812A1172-DE5E-4D62-86D4-56BDE9071196.jpeg
    2.9 MB · Views: 244
Last edited:
Welcome to the world of checking your notifications!

Seriously, excited to see your work - you did a great blueing job on those parts. I see you're planning on painting your lower frame, YES!
 
Looking forward to following your progress.

I wish FM had his steel DL44 when I built mine but I ultimately went with a Todd’s kit based off a Denix. I initially documented this blaster build (my first as well) on one of the FB groups but I later summarized everything here on the RPF: Solo’s ANH Blaster (Todd’s DL44 full kit)
Thanks! just checked out your build thread. You did a great job. Certainly better at documenting than me That kit looks like it took some serious work. I’m very lucky with FM kit that so much of it is perfect already. I really like the heat blue look on the flash hider, I may do something similar. At least some subtle scorching. I really want to find that balance between reference photos and what feels “in universe”
 
Welcome to the world of checking your notifications!

Seriously, excited to see your work - you did a great blueing job on those parts. I see you're planning on painting your lower frame, YES!
Thanks. I’m really enjoying it so far. I decided to give the upper another pass of blue just to have a little subtle difference in color between upper and flash hider.
 
Thanks! just checked out your build thread. You did a great job. Certainly better at documenting than me That kit looks like it took some serious work. I’m very lucky with FM kit that so much of it is perfect already. I really like the heat blue look on the flash hider, I may do something similar. At least some subtle scorching. I really want to find that balance between reference photos and what feels “in universe”
Thanks and glad you recognized the effort. :) It was fun, but had its challenges. Luckily I knew what I was getting myself into but damn than Denix needs A LOT of work to make it respectable....lol. If you can believe it, I’ve improved my documenting skills since then. I have a thermal detonator build completed and have a Bandai Falcon and a FM E11 build logs in process. Check it out when you get a chance.

As for the heat blue, that was actually quite fun. A simple propane torch, tongs and some gloves and go at it.
I need to start remembering to take photos before and after steps. I always sit down and get to work and forget to document where I started haha. I did the Bandai falcon during the first California lock down. Thinking about going back and doing the paint job again actually so I will definitely check that out. I just did a TD kit as well, though I think my battery was dud so Im waiting on a new one before rewiring. I just ordered the Kylo Ren KR sabers hilt, unweathered so I can do it myself. So if I don't heat blue the flash hider, ill definitely be doing it with the quillons there.
 
I need to start remembering to take photos before and after steps. I always sit down and get to work and forget to document where I started haha. I did the Bandai falcon during the first California lock down. Thinking about going back and doing the paint job again actually so I will definitely check that out. I just did a TD kit as well, though I think my battery was dud so Im waiting on a new one before rewiring. I just ordered the Kylo Ren KR sabers hilt, unweathered so I can do it myself. So if I don't heat blue the flash hider, ill definitely be doing it with the quillons there.
Do you have a write up on your Falcon? Im just starting to mask off the panels for paint. The KR Kylo is nice. That should be a fun build. Whereabouts in California are you? I’m just south of Irvine.
 
Do you have a write up on your Falcon? Im just starting to mask off the panels for paint. The KR Kylo is nice. That should be a fun build. Whereabouts in California are you? I’m just south of Irvine.
No, it was a mess of pieces and parts that took over my kitchen haha. My paint job was a bit of a hodge podge, did some decals then got frustrated with them and decided to paint. Thats why I want to go back and repaint the entire thing. Also got some archive X paints for xmas so it felt likea good place to test them out. Im up in Santa Barbara County.
 
Build update:

Went ahead and blued the lower as well before painting. Had to remove a bit of material from the heat sink greeblie for the mount screws to sit flush to the lower. Dremmel handled it easy enough. I actually kind of like the banged up look after.

After that I added the scottjua stencil on the scope mount. I am truly awful at decals/stencils like this so it’s far from perfect application. I figure I will go back and scratch off anything else that needs it.

I decided to glue on (then mask off) the mystery disc greeblie, I’m not sure what’s considered accurate on this one as you could probably just mask off the area and leave it bright steel. To me it felt more “in universe” to have something be a separate piece and give it a bit of dimension.

Finally lower and mount get hit with a few passes of flat black. Along with the brass scope pieces.

Next step is weathering of the grips. I’m also still trying to figure out if the scope holder is blued or painted. Hard to tell from reference photos. If any one has thoughts on that they are more than welcome...
 

Attachments

  • 46B34F9C-93CB-49C7-9B2C-3960F3B6D100.jpeg
    46B34F9C-93CB-49C7-9B2C-3960F3B6D100.jpeg
    1.4 MB · Views: 184
  • 7F945872-94B4-40E0-AB8D-F7BFC0F434F2.jpeg
    7F945872-94B4-40E0-AB8D-F7BFC0F434F2.jpeg
    1.3 MB · Views: 172
  • 260862C8-6B22-400C-BD76-43D165AFDD04.jpeg
    260862C8-6B22-400C-BD76-43D165AFDD04.jpeg
    1.1 MB · Views: 173
  • 42CEA703-B6E1-46DA-8262-A37867535571.jpeg
    42CEA703-B6E1-46DA-8262-A37867535571.jpeg
    1.6 MB · Views: 182
Some small build updates:

Started a bit of grip weathering, cutting in the scratches and just generally banging up the grips a bit. Definitely not exact to the scratches on the hero. But a solid a approximation I think.

Painted the scope dial pieces. Did a bit of weathering on the scope holder, mount and screws. Planning on heat bluing some of the small parts this weekend.

Exploring the idea of drilling a pass through in the barrel to put LED in. If anyone has any experience or advice on his please chime in!
 

Attachments

  • A17239D3-F26D-490F-8E09-042DD06AC94D.jpeg
    A17239D3-F26D-490F-8E09-042DD06AC94D.jpeg
    2.1 MB · Views: 146
  • EE12DDEE-99E5-4DA7-96CE-8B524343C80F.jpeg
    EE12DDEE-99E5-4DA7-96CE-8B524343C80F.jpeg
    1.4 MB · Views: 139
  • 5C15CA2B-0691-461C-A3B5-B4786485BAFA.jpeg
    5C15CA2B-0691-461C-A3B5-B4786485BAFA.jpeg
    1.5 MB · Views: 148
  • 55B903E8-9402-45EC-BFFC-EDF946537ED3.jpeg
    55B903E8-9402-45EC-BFFC-EDF946537ED3.jpeg
    2 MB · Views: 142
  • 50EB9FA5-DB22-4A28-87A8-AEA152122AAD.jpeg
    50EB9FA5-DB22-4A28-87A8-AEA152122AAD.jpeg
    1.3 MB · Views: 151
You’re a brave man for doing that work inside on the kitchen table...lol.
Nice progress and update. That’s a steel barrel right? That’s gonna be a hell of a challenge....gotta keep the hole straight, need a long bit and probably a relatively large drill press to accommodate the length of the drill bit and the upper.

That said I’ve seen some do this with a Denix. A search might turn up something. Good luck.
Haha Really just the light sanding, weathering, and assembly happens at the table so I can hang out with my wife while I do it. Everything else happens outside or in the shop downstairs. It is a steel barrel, Ive been asking around people I know for any connections on a drill press haha also exploring maybe getting one as it would be useful and Ive been making some shop upgrades. Youre right that it would need to be a pretty large press though.
 
Haha Really just the light sanding, weathering, and assembly happens at the table so I can hang out with my wife while I do it. Everything else happens outside or in the shop downstairs. It is a steel barrel, Ive been asking around people I know for any connections on a drill press haha also exploring maybe getting one as it would be useful and Ive been making some shop upgrades. Youre right that it would need to be a pretty large press though.
As long as you can turn the work surface on the press vertically, you can work on anything that's as long as the space beneath your press. It opens up a lot of possibilities without getting a massive drill press.
 
As long as you can turn the work surface on the press vertically, you can work on anything that's as long as the space beneath your press. It opens up a lot of possibilities without getting a massive drill press.
That’s definitely a great point, I’m thinking I’m getting a little a head of myself on that anyway, need to finish the rest first then think about electronics.
 

Your message may be considered spam for the following reasons:

If you wish to reply despite these issues, check the box below before replying.
Be aware that malicious compliance may result in more severe penalties.
Back
Top