Hey there,
So I needed to throw together a quicky arc reactor to place in a suit for some pictures, and ended up coming across this at the local hardware store for $10:
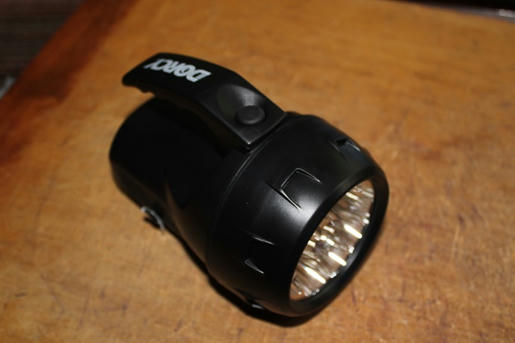
It's a Dorcy lantern, as best I can tell the same as this model (just a different color) on Ebay:
Dorcy LED Lantern 41 1047 Dorcy International | eBay
I got mine at a True Value. I like it because it had a great looking bezel that I thought I might be able to use, but also because of the orientation of the nine 5mm LEDs and the convex lens cover. The diameter looked good, and 4 Rayovac AA batteries were included. $9.99 didn't hurt either.
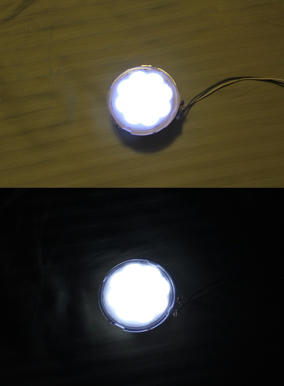
First thing I did when I got home was pop it through a piece of foam to see how it looked lit up:
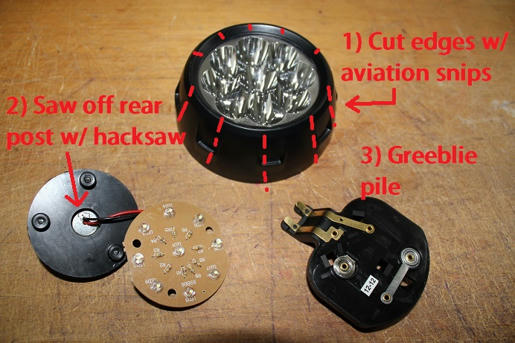
Running off of 4 AA batteries, I was actually pretty happy with the output, definitely not blinding but decent. Right away though, the measurements were too big. Most reactors seem to be around 75-85mm in diameter (a little over 3 inches), but this was closer to 4 inches at the edges. Bummer, because I really liked that bezel design with the vents, but oh well. Time to wreck it instead. Here are the guts:
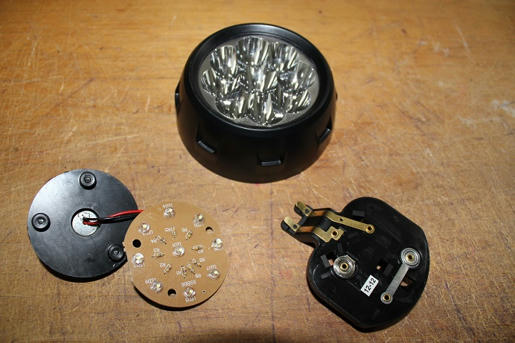
Now I should have included more destruction photos, but I wasn't sure it would disassemble at the time. Anyways, here was the process:
1) I used aviation snips to carefully cut back the bezel to separate it from the reflector and the lens. The reflector can be removed by compressing clips and turning it, but the lens is lightly glued in and needed gentle prying. If you go slow and use a flat-blade screwdriver for prying, they separate pretty nicely.
2) I snipped the wires as far from the circuit board as I could to give me some leads to work with, and then decided I also wanted to keep the plastic back plate to protect the circuit board later. I took a hack saw blade and manually sawed off the plastic tube that protrudes from the back, just to make the overall height of the piece a lot shallower.
3) The battery plate behind all of this ended up going to the greeblie pile. The battery holder is integrated into the body of the lantern, and can't really be used efficiently, so I trashed that.
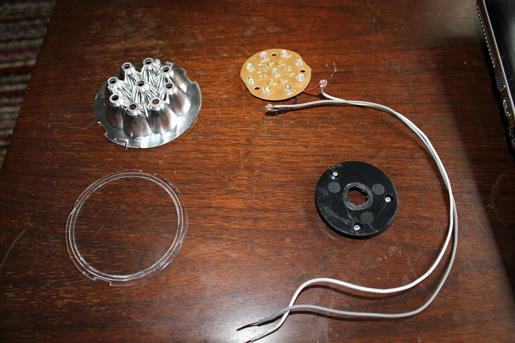
Here's what I had after surgery. I also extended the leads to the LEDs, just spliced on some wire and glue-coated them:
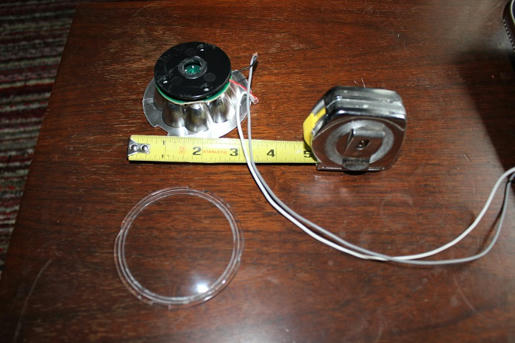
Then it was just a matter of screwing the pieces back together:
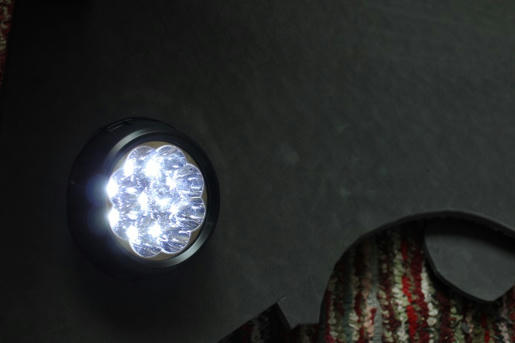
...And here's what you end up with. The lens can be glued onto the reflector, or fastened with a retainer ring. The lens on this looks great, it's got a great convex curve to it and is fairly sturdy.
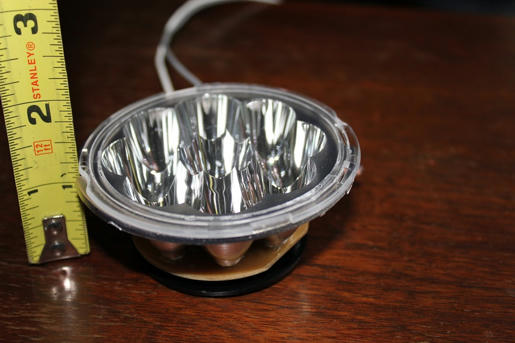
Adding a transluscent insert between the reflector and lens for a particular arc design would obviously be easy, I just preferred how this looked as is.
The final measurements of the assembly are 3 1/4" in diameter, and 1 1/2" deep (so about 83mm diameter by 38mm deep). The look of the reflector is what totally sold me on this, worked perfectly for my project. All said and done, I had all of my tools and materials on hand, so it was $9.99 plus tax. You'd realistically want to buy a battery pack to power this, and get a switch as well. The push button switch in the handle of the flashlight can actually be removed by prying the top cover off and then simply unscrewing it's retainer nut if you want to just use that, it just needs leads attached to it. There you go!
So I needed to throw together a quicky arc reactor to place in a suit for some pictures, and ended up coming across this at the local hardware store for $10:
It's a Dorcy lantern, as best I can tell the same as this model (just a different color) on Ebay:
Dorcy LED Lantern 41 1047 Dorcy International | eBay
I got mine at a True Value. I like it because it had a great looking bezel that I thought I might be able to use, but also because of the orientation of the nine 5mm LEDs and the convex lens cover. The diameter looked good, and 4 Rayovac AA batteries were included. $9.99 didn't hurt either.
First thing I did when I got home was pop it through a piece of foam to see how it looked lit up:
Running off of 4 AA batteries, I was actually pretty happy with the output, definitely not blinding but decent. Right away though, the measurements were too big. Most reactors seem to be around 75-85mm in diameter (a little over 3 inches), but this was closer to 4 inches at the edges. Bummer, because I really liked that bezel design with the vents, but oh well. Time to wreck it instead. Here are the guts:
Now I should have included more destruction photos, but I wasn't sure it would disassemble at the time. Anyways, here was the process:
1) I used aviation snips to carefully cut back the bezel to separate it from the reflector and the lens. The reflector can be removed by compressing clips and turning it, but the lens is lightly glued in and needed gentle prying. If you go slow and use a flat-blade screwdriver for prying, they separate pretty nicely.
2) I snipped the wires as far from the circuit board as I could to give me some leads to work with, and then decided I also wanted to keep the plastic back plate to protect the circuit board later. I took a hack saw blade and manually sawed off the plastic tube that protrudes from the back, just to make the overall height of the piece a lot shallower.
3) The battery plate behind all of this ended up going to the greeblie pile. The battery holder is integrated into the body of the lantern, and can't really be used efficiently, so I trashed that.
Here's what I had after surgery. I also extended the leads to the LEDs, just spliced on some wire and glue-coated them:
Then it was just a matter of screwing the pieces back together:
...And here's what you end up with. The lens can be glued onto the reflector, or fastened with a retainer ring. The lens on this looks great, it's got a great convex curve to it and is fairly sturdy.
Adding a transluscent insert between the reflector and lens for a particular arc design would obviously be easy, I just preferred how this looked as is.
The final measurements of the assembly are 3 1/4" in diameter, and 1 1/2" deep (so about 83mm diameter by 38mm deep). The look of the reflector is what totally sold me on this, worked perfectly for my project. All said and done, I had all of my tools and materials on hand, so it was $9.99 plus tax. You'd realistically want to buy a battery pack to power this, and get a switch as well. The push button switch in the handle of the flashlight can actually be removed by prying the top cover off and then simply unscrewing it's retainer nut if you want to just use that, it just needs leads attached to it. There you go!