You are using an out of date browser. It may not display this or other websites correctly.
You should upgrade or use an alternative browser.
You should upgrade or use an alternative browser.
1/88 Revel Slave 1
- Thread starter Toadmeister
- Start date
Toadmeister
Sr Member
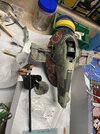
Decided to brush on the mottled contrasting grey-green. I’m using an old Jar-Jar of Poly S that has been sitting under my workbench for over a decade. Can’t hardly read the label! I can make out “ British Interior Grey-Green” barely. A long out of production jar from Polly S.
Learning from previous experience I used different brush sizes and techniques to get the chipped and semi random look. Colors are bright and contrasting right now but will be muted and blended once I do my Archive X grime overspray.


Learning from previous experience I used different brush sizes and techniques to get the chipped and semi random look. Colors are bright and contrasting right now but will be muted and blended once I do my Archive X grime overspray.
Last edited:
Toadmeister
Sr Member
That British Interior Grey-Green is an obscure color.


Looks like Mig, AK, Alclad II, and Vellejo do make a version.
Looks like Mig, AK, Alclad II, and Vellejo do make a version.
Toadmeister
Sr Member
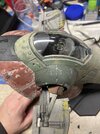
Laid down the misty Grime overspray. I did put it on too heavy! So I spent some time
 wet sanding with a 3600 grit sanding pad to bring back a little brilliance of the green. I than masked off and sprayed the Pullman Green shoulders with my old jar of Polly S.
The old Polly S jar airbrushed fine but dried very chalky. That’s the risk of old paint jars. It’s not terrible and certainly adds to the weathered look. I might go back and lightly touch it up with that Tamiya XF65 field Grey yet which is a close match.
The old Polly S jar airbrushed fine but dried very chalky. That’s the risk of old paint jars. It’s not terrible and certainly adds to the weathered look. I might go back and lightly touch it up with that Tamiya XF65 field Grey yet which is a close match.
Analyzer
Master Member
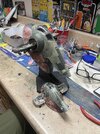
The skirt and fenders look perfect both color wise and weathering wise.
The darker green chipping on the side also looks perfect
Not sure about the light green/gray along the top part or the "nose". In this light it looks like it might be a tad too green? Could just be the color shift due to lighting though?
The darker green chipping on the side also looks perfect
Not sure about the light green/gray along the top part or the "nose". In this light it looks like it might be a tad too green? Could just be the color shift due to lighting though?
Toadmeister
Sr Member
Been working on this a little here and there. Finished the major painting and did some touch-ups and weathering. I have yet to do the splotches on the shoulders which are a bit dark green glossy looking. A final Matt coat will help too.

Toadmeister
Sr Member
Well I hadn’t worked on this all summer and autumn but renewed work after Christmas.
ALMOST DONE. Completed my weathering washes (oils) and put on a flat coat tonight. Got just a few decals, guns, rear sensor dish and canopy to attach yet.
ALMOST DONE. Completed my weathering washes (oils) and put on a flat coat tonight. Got just a few decals, guns, rear sensor dish and canopy to attach yet.
Attachments
Toadmeister
Sr Member
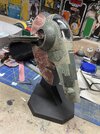
Minor decals done, final flat coat, Canopy and guns are installed. I’m calling her done.
Placed on a temporary stand at the workbench. I’ll do some better photography later this week.
Biggest woe for me on this kit is actually the canopy which is very toy-like with a hinge and tab. Sorta ruins the detailed miniature look. I’d buy an aftermarket vac-formed one if it existed.
Placed on a temporary stand at the workbench. I’ll do some better photography later this week.
Biggest woe for me on this kit is actually the canopy which is very toy-like with a hinge and tab. Sorta ruins the detailed miniature look. I’d buy an aftermarket vac-formed one if it existed.
Attachments
-
 08C0C23F-7601-4C73-A829-E1E6C5D84C04.jpeg1.8 MB · Views: 62
 -
 9F6738B9-8E5A-4DE0-B873-58A431A1D977.jpeg2.2 MB · Views: 65
 -
 0D3BE84E-6754-4F0D-8C32-E2EDD94C273D.jpeg1.7 MB · Views: 61
 -
 F339E892-57E0-48AB-9DB2-693568BBD908.jpeg2.1 MB · Views: 58
 -
 D95CA393-42F8-4B0E-A6BC-AD10B05D54F9.jpeg1.8 MB · Views: 70
Pinousse
Sr Member
Yeah, the canopy bug me for a while now, in fact the one that came with my kit arrived broken.
I contacted Revell and they sended me a brand new one for free but I also glued back the broken one too to make a buck for vac forming one.
If I am successfull at vacforming one I may as well do two and send you one. I am still building the vacform machine so it will take some time.
If I fail I will have to use the new one Revell was kind enought to send me.
Toadmeister
Sr Member
Cool! Yeah let me know how that vac-form works out.Yeah, the canopy bug me for a while now, in fact the one that came with my kit arrived broken.
I contacted Revell and they sended me a brand new one for free but I also glued back the broken one too to make a buck for vac forming one.
If I am successfull at vacforming one I may as well do two and send you one. I am still building the vacform machine so it will take some time.
If I fail I will have to use the new one Revell was kind enought to send me.
Similar threads
- Replies
- 7
- Views
- 1,163