1/72 TIE Defender (Resin 3D Print)

StevenBills

Sr Member
RPF PREMIUM MEMBER
Hello! This is a pretty simple build/paint. Someone over on Starship Modeler gave me the bug to build a TIE Defender. I'm a big fan of SW Squadrons, and the Defender is a playable ship in that game.

IMG_1270.jpg


The 3D model is fairly well detailed, and I bought the files from ModelWerks here. After reviewing all the parts, I was able to get things printed out pretty easily on my Elegoo Saturn, and everything fit nice and tidy on one build plate.

Then I ran into a hitch. The way that this is designed, the ball is split vertically into two halves. I didn't think this would be a problem, but after printing, support removal, curing (and resulting shrinkage), the two halves didn't exactly line up.

IMG_1292.jpg


That cockpit consists of 5 pieces, and there was just too many things going on for it all to fit together well. SO! Back to the computer I went. I brought all 5 files into MeshMixer:

Screen Shot 2022-12-13 at 11.13.51 AM.png


And combined them all into one part: (MM makes the preview of the model pretty low-rez. The actual model is fine)

Screen Shot 2022-12-13 at 11.12.19 AM.png


With that, it was saved out as a new STL file and brought into ChituBox, with supports being added:

Screen Shot 2022-12-13 at 11.16.21 AM.png


Screen Shot 2022-12-13 at 11.17.29 AM.png


This might not be the most optimal way of printing/supporting a sphere, but it printed perfectly on the first try, with just a few support marks on the back of the ball to cleanup.

IMG_1293.jpg


You can see a few layer lines in there, but I think between primer and a bit of sanding, those'll go away. It still blows me away that you can just print stuff like this. Here are some closeups of the cockpit and pilot: (and remember, this is all one part now):

IMG_1295.jpg


IMG_1294.jpg


This will all be painted black shortly.

I cleaned up the supports on the wings and the engine tri-section, and those got a layer of Tamiya fine surface primer:

IMG_1299.jpg


IMG_1297.jpg


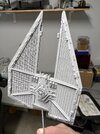
Here is a group shot of all the pieces together. A simple build, really.

IMG_1296.jpg


I'm going to wait for some warmer weather (maybe...) before I prime the new cockpit section and the rest of the parts.

Now on to color.... I know that the close Tamiya paint for the ANH TIEs is TS-32 Haze Grey, but I think that that is a bit too blue for my liking for this build. I am going to reference the SW Squadrons image at the top of this post for paint color: more gray with a dash of blue, rather than the other way around.

Anyway, that's all for now. I wasn't going to do a build thread on this one because it is such a simple build, but I thought I'd show some of the 3D stuff I did in MeshMixer in the hopes that it'll help someone else out someday.

Stay tuned for more!

SB
 

Attachments

  • IMG_1267-1.jpg
    IMG_1267-1.jpg
    652.1 KB · Views: 66
Wow! Didnt the Defenders have shields and supah fast! Like a less expensive TIE Advanced.

I like the five pieces into one for the sphere. Resin printing seems to have pretty significant shrinkage, and never quite predictable. You hope the pieces that are supposed to line up will warp and shrink in a similar fashion so that they line up.
 
Wow.

Round2 better get their act together, before 3D printers put them out of business.
It's definitely a disruptive technology in our hobby. The latest Fine Scale Modeler (Jan/Feb 2023) delves into 3D printing and what it means for the industry. It's interesting you mention Round2, because Jamie Hood from R2 is quoted in the article as saying this:

"While today's hobbyist embraces the craft of the making process, for the wider population, locating the tools, supplies and skills needed to build the model... is too big of a hurdle to overcome."​
3D printing is the future! :cool:

Wow! Didnt the Defenders have shields and supah fast! Like a less expensive TIE Advanced.

I like the five pieces into one for the sphere. Resin printing seems to have pretty significant shrinkage, and never quite predictable. You hope the pieces that are supposed to line up will warp and shrink in a similar fashion so that they line up.
Yep! The Defender has shields and a hyperdrive, making it a true adversary for the Alliance fighters.

And you're absolutely right about playing the "resin guessing-game": you never know how parts are going to be pulled and warped due to the suction of the build plate and the curing process, and hoping things line up later. For me, at least, it's never as simple as print and build. Lots of cleanup to do. But it's getting better!

SB
 
That looks amazing!

I have this and the Tie Bomber on my wish list and am hoping to pick them up after my wallet recovers from Christmas

I was wondering, if I was able to provide "proof of purchase" would you be willing to share the combined parts stl for the cockpit?
 
You hope the pieces that are supposed to line up will warp and shrink in a similar fashion so that they line up
It's not shrinkage in the usual sense of the word - printer resin is pretty dimentionally stable, but what you do get is deformation due to support and suction issues from the printing process. These usually only occur on the side that faces the build plate and can be eliminated with the right support, but that is a black art that I for one have yet to master.

It's very hard to visualise the problems in your head beforehand, even with the help of slicer software - I usually end up with a trial and error process, but that can get costly in wasted parts :(

The downside to getting the support right, is that you usually end up trashing any detail on the areas where you have ended up with tons and tons of support. There's always a catch :)
 
That looks amazing!

I have this and the Tie Bomber on my wish list and am hoping to pick them up after my wallet recovers from Christmas
Thanks! They had a $5 off code when I bought mine. So it went from $16 to $11.

It's very hard to visualise the problems in your head beforehand, even with the help of slicer software - I usually end up with a trial and error process, but that can get costly in wasted parts :(

The downside to getting the support right, is that you usually end up trashing any detail on the areas where you have ended up with tons and tons of support. There's always a catch :)
Yes, it's hard to picture how all of the forces that are combining when you print are going to affect your finished product. I haven't REALLY dialed in my settings yet (still get elephant's foot on prints that are printed on the plate), but I'm getting there.

As for this model, not much of an update. Next one should be the color, so stay tuned!

SB
 
Time for an update!

I painted the cockpit black. I didn't worry about any detail painting inside because you won't be able to see it at all.

IMG_1300.JPG


I then glued some styrene in the back of the engine section, closing it off:

IMG_1317.JPG


IMG_1318.JPG


Here are all the primed parts ready for paint!

IMG_1319.JPG


I came up with a Tamiya mixture that I think is a good mix of gray and blue. I used XF-19 Sky Gray and XF-18 Medium Blue. The ratio is like 5:1.

The photo below shows the color, and also starting on the kool shade portion of the wings. I decided to brush-paint the kool shade because I just couldn't bring myself to do all of that fiddly masking. There are 7 panels on each side of the wing, so 14 total per wing, multiplied by 3 wings, equals 42 panels that needed to be painted! It was time consuming but worth it. Also, looking at each wing this closely for so long made me think that I should have spent more time combing over each piece and being more careful with the support removal. Next time.

This image show blocking out the edges of the kool shade with a fine brush:

IMG_1320.JPG


This image is the completed wing:
IMG_1335.JPG


There are pros and cons for both brush painting and using the airbrush. I would have used a LOT less paint if I had airbrushed. But then, I would have used a LOT of tape, plus the time to mask all of the wings. I actually had to run to the hobby shop to get another XF-1, as mine was just thinner by the end and the pigment was practically gone.

Also, this is $40 of paint now. :eek: When did this hobby get so expensive?!

IMG_1337.JPG


In the next update I'll be doing some detail painting using XF-53 Neutral Gray.

Stay tuned!

SB
 
Finished this up over the holidays. Picked out some details with XF-53 Neutral Gray, and then gave it an overall Starship Filth oil wash. Broke out the airbrush and painted some subtle streaks and scoring around the gun areas, and then I topped it off with the addition of the red guns and I'm calling this one done!

IMG_1417.JPG


IMG_1418.JPG


IMG_1419.JPG


IMG_1420.JPG


Thanks for following along. The last post will be a photo composite. Just need to think of something.......

SB
 
Alrighty, here's the image I made with this model, and here's the caption that I put with it:

TIE Defender Hyperspace Jump - 2K.jpg


"The TIE Defender was Grand Admiral Thrawn’s secret pet-project, built in an Imperial factory on Lothal. Even though a group of pesky Rebels were able to infiltrate the factory and steal the TIE’s schematics, Thrawn felt confident in going ahead with a test of one of the things that made the Defender different than all the other TIEs in the Imperial fleet: It had the ability of jumping to hyperspace!"

You can see more of my stuff on my Instagram here: Star Wars Battlegrounds (@star_wars_battlegrounds) • Instagram photos and videos

And with that, this model hits the shelf! Thanks for looking!

SB
 

Your message may be considered spam for the following reasons:

If you wish to reply despite these issues, check the box below before replying.
Be aware that malicious compliance may result in more severe penalties.
Back
Top