Avanaut
Sr Member
In March 2014 I managed to purchase one of the super rare Nice-N Red Jammer kits I had been after for over two years. I bought it a few months before Nice-N models announced a shutdown and cancellation of all the subsequent Y-wing kits. It was devastating news, I really wanted to have the Gold Leader as well.
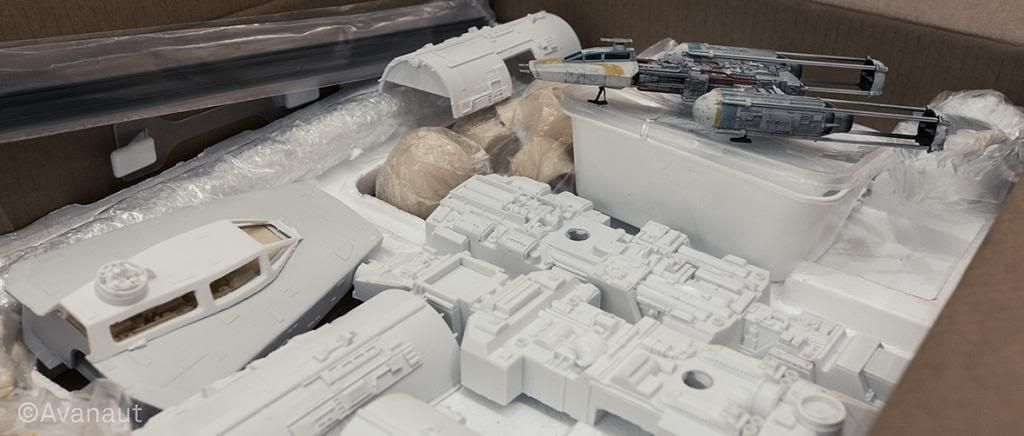
A newly arrived Nice-N Red Jammer and a Finemolds Y-wing for size comparison.
To start the build I had to take a deep breath as I have not built a studio scale model before nor have I built a resin kit before. I am up for a steep learning curve in order to pull this off. First I took all the time I needed to get familiar with the bits and pieces of the kit, I read Jason Eaton's instructions over and over and fondled the bits and bobs for week after week. In June 2014 I patiently started cleaning the parts from flash and whatnot. Originally I did have a plan to make this a Red Jammer build, then I figured it would have to be a gold squadron paint scheme, perhaps something in the line of the Y-wing referred to as the "Tiger Sprocket", the one with the orange panel on the front top left of the cockpit. There were supposed to be one major structural alteration to the model and that was inserting an astromech unit in the place of the Lanc turret. This will not be a permanent change, though, the Lanc turret part can be changed back to it's place whenever I decide to revert to that version. Then I also bought one vintage model kit to spice the model up just a notch with a couple of add-ons. The 1/35 Tamiya 8Rad was perfect for this as it was actually used as a source of parts when building the original models. The astromech I aim to use is a 3D printed model I found from shapeways.com. It's really nice but very realistic and due to small scale actually lacks some of the finest detail which has to be painted in.
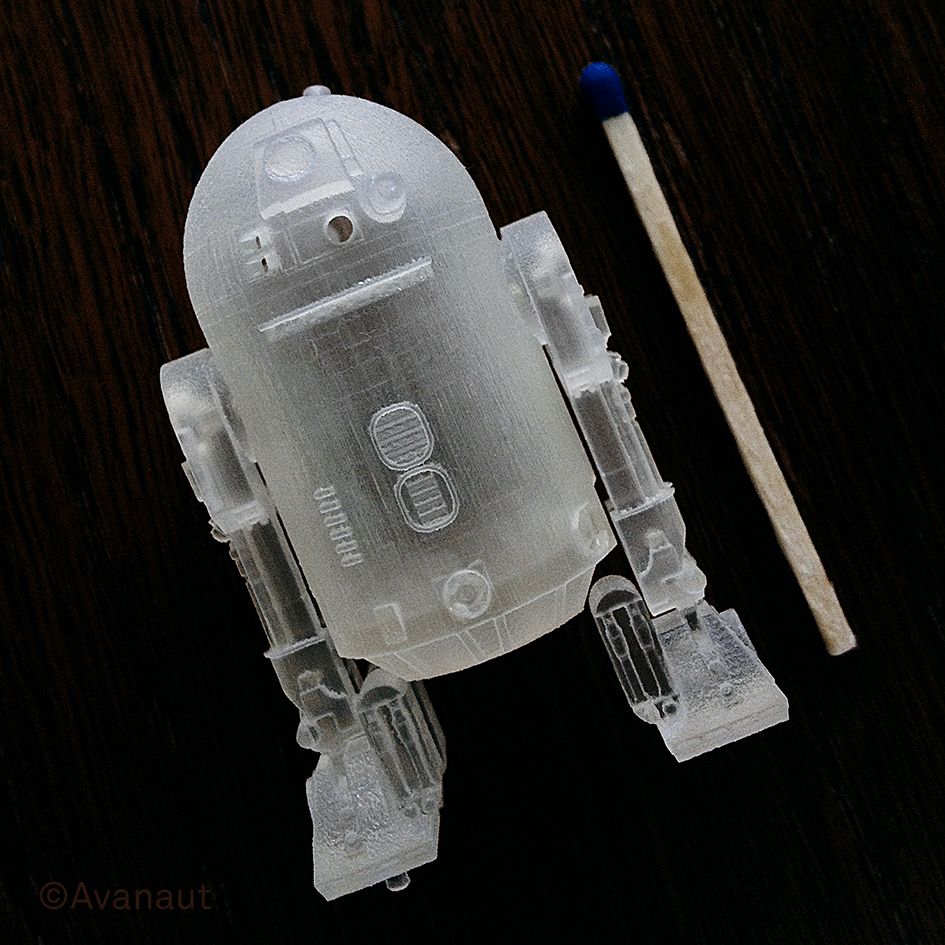
The shapeways' 3D printed astromech.
With the changes it's not really "studio scale" anymore, that's why I started this thread in General Modeling forum.
In August 2014 I started the assembly by prepping the aluminium armature with five mounting points. It went together well with the two hull pieces. Some extra work had to be done adding the wires for all the necessary lighting, but basically everything fit nicely in the prefab grooves within the hull structure.

Wiring and mounting points with Panavise Micro Mount bits. A test fitting.
In the light of some experiences of other Red Jammer builders I cut the resin cockpit support from the armature and replaced it with ABS/styrene support for sag free structure.

This resin cockpit support bit is known to sag over time and warm temps, I replaced it with rigid tube.
The Saturn engine cans had some slight warpage and cracks. I added internal supports to straighten the resin and to make it more rigid.


The big resin Saturn parts had minor issues, easy to fix.
This bird has to be able to sit and I need to add landing gear to it. It'll be removable pieces, easily switched between flying and landing configuration with the magic of neodyme magnets. Determining the opening spaces for the engine landing gears was not the easiest of things. I checked reference from the full size mock-up they built in London for the Yavin hangar scenes but it was inconclusive, the references I could find, stills from Bluray and behind-the-scenes photos, did not reveal this exactly. I also checked the Finemolds 1/72 model for reference but eventually decided to just wing it together, this was not going to be a faithful replica anyway. I cut holes to the cans with the idea that when the landing gear were retracted, no visible landing gear placement would be seen, dirt and soot would conceal possible seams as if there were no landing gear to begin with in the model. For landing configuration I am planning to construct something that resembles the coverless Finemolds solution but with the funny flaps seen on the full size filming mock-up. I'll get to that later. The engines as well as the internal supports for the landing gears went together without any hassle, as far as I can see, they seem to be straight, too.

Basic parts in place, the head not glued. The Lego pilot is obligatory.
Then I added the greeblies to the body... and the project fell apart!
As I saw the body with all the pieces attached, sans piping, I finally realized what the Y-wing really looks like, what it's dimensions and depth of detail were. This was the point I knew I needed something more than just a basic build with custom paint scheme, I needed to make the model more like the filming models. I had researched the models by reading everything, EVERYTHING! I got my hands on in RPF and elsewhere, I also have the essential books with known reference photos. Still, I did not know enough and, having an actual model at hand as a template, I started over. I found out that it takes about 55 different vintage model kits to make the Gold Leader alone. I wish there were more images of the Gold Leader available for study, but you know how it is. I have traced down almost 40 of those 55 kits, just to know what it's all about. Figuring out which kits add to the basic Red Jammer hull, not only containing the parts that are already there, has proven to be difficult – but fun. The old RPF threads do not have photographs anymore, links draw blanks and it is not always easy to understand the information because it's often just innuendo and references to PM's sent. I get that, people do not want to share the information they worked so hard to obtain (many Bothans died…), but without good reference images, it is impossible to find out on your own without the help of those who have it. As opposed to some aged threads, there are some newer threads with a lot of fantastic information available even now, great stuff, really! All it takes is patience, pen and paper for taking notes and the ability to cross reference. Also, the bird often referred to as the MOM Tour Y-wing is documented reasonably well and the photographic material is available online. The MOM is rich in detail and pretty as hell, although I'm not the biggest fan of the snakepipes on it's wings. Anyway, going thru kit scans day after day has led to purchasing a few of those 40 kits I know, kits that I think have suitable parts for beefing up the Red. While still waiting for some of the kits to arrive in mail, I will start tearing some of the already glued parts off…
To be continued.

A newly arrived Nice-N Red Jammer and a Finemolds Y-wing for size comparison.
To start the build I had to take a deep breath as I have not built a studio scale model before nor have I built a resin kit before. I am up for a steep learning curve in order to pull this off. First I took all the time I needed to get familiar with the bits and pieces of the kit, I read Jason Eaton's instructions over and over and fondled the bits and bobs for week after week. In June 2014 I patiently started cleaning the parts from flash and whatnot. Originally I did have a plan to make this a Red Jammer build, then I figured it would have to be a gold squadron paint scheme, perhaps something in the line of the Y-wing referred to as the "Tiger Sprocket", the one with the orange panel on the front top left of the cockpit. There were supposed to be one major structural alteration to the model and that was inserting an astromech unit in the place of the Lanc turret. This will not be a permanent change, though, the Lanc turret part can be changed back to it's place whenever I decide to revert to that version. Then I also bought one vintage model kit to spice the model up just a notch with a couple of add-ons. The 1/35 Tamiya 8Rad was perfect for this as it was actually used as a source of parts when building the original models. The astromech I aim to use is a 3D printed model I found from shapeways.com. It's really nice but very realistic and due to small scale actually lacks some of the finest detail which has to be painted in.

The shapeways' 3D printed astromech.
With the changes it's not really "studio scale" anymore, that's why I started this thread in General Modeling forum.
In August 2014 I started the assembly by prepping the aluminium armature with five mounting points. It went together well with the two hull pieces. Some extra work had to be done adding the wires for all the necessary lighting, but basically everything fit nicely in the prefab grooves within the hull structure.
Wiring and mounting points with Panavise Micro Mount bits. A test fitting.
In the light of some experiences of other Red Jammer builders I cut the resin cockpit support from the armature and replaced it with ABS/styrene support for sag free structure.
This resin cockpit support bit is known to sag over time and warm temps, I replaced it with rigid tube.
The Saturn engine cans had some slight warpage and cracks. I added internal supports to straighten the resin and to make it more rigid.
The big resin Saturn parts had minor issues, easy to fix.
This bird has to be able to sit and I need to add landing gear to it. It'll be removable pieces, easily switched between flying and landing configuration with the magic of neodyme magnets. Determining the opening spaces for the engine landing gears was not the easiest of things. I checked reference from the full size mock-up they built in London for the Yavin hangar scenes but it was inconclusive, the references I could find, stills from Bluray and behind-the-scenes photos, did not reveal this exactly. I also checked the Finemolds 1/72 model for reference but eventually decided to just wing it together, this was not going to be a faithful replica anyway. I cut holes to the cans with the idea that when the landing gear were retracted, no visible landing gear placement would be seen, dirt and soot would conceal possible seams as if there were no landing gear to begin with in the model. For landing configuration I am planning to construct something that resembles the coverless Finemolds solution but with the funny flaps seen on the full size filming mock-up. I'll get to that later. The engines as well as the internal supports for the landing gears went together without any hassle, as far as I can see, they seem to be straight, too.
Basic parts in place, the head not glued. The Lego pilot is obligatory.
Then I added the greeblies to the body... and the project fell apart!
As I saw the body with all the pieces attached, sans piping, I finally realized what the Y-wing really looks like, what it's dimensions and depth of detail were. This was the point I knew I needed something more than just a basic build with custom paint scheme, I needed to make the model more like the filming models. I had researched the models by reading everything, EVERYTHING! I got my hands on in RPF and elsewhere, I also have the essential books with known reference photos. Still, I did not know enough and, having an actual model at hand as a template, I started over. I found out that it takes about 55 different vintage model kits to make the Gold Leader alone. I wish there were more images of the Gold Leader available for study, but you know how it is. I have traced down almost 40 of those 55 kits, just to know what it's all about. Figuring out which kits add to the basic Red Jammer hull, not only containing the parts that are already there, has proven to be difficult – but fun. The old RPF threads do not have photographs anymore, links draw blanks and it is not always easy to understand the information because it's often just innuendo and references to PM's sent. I get that, people do not want to share the information they worked so hard to obtain (many Bothans died…), but without good reference images, it is impossible to find out on your own without the help of those who have it. As opposed to some aged threads, there are some newer threads with a lot of fantastic information available even now, great stuff, really! All it takes is patience, pen and paper for taking notes and the ability to cross reference. Also, the bird often referred to as the MOM Tour Y-wing is documented reasonably well and the photographic material is available online. The MOM is rich in detail and pretty as hell, although I'm not the biggest fan of the snakepipes on it's wings. Anyway, going thru kit scans day after day has led to purchasing a few of those 40 kits I know, kits that I think have suitable parts for beefing up the Red. While still waiting for some of the kits to arrive in mail, I will start tearing some of the already glued parts off…
To be continued.
Attachments

Last edited:
")