You could try Treadwell’s method from post #896.
You could also modify his method by using plastic disks of the appropriate thickness cut out of plastic sheeting. You could even cut the disks out of the same thickness of plastic, just make more to build up to each element’s thickness. The important thing here is to make sure every disk has its center marked; not a problem if you used a compass to lay them out on the plastic. You can drill each disk with the same size bit that is large enough for whatever size rod you want to use. In fact, it most likely would be easier to drill the disks as they are laid out on the plastic sheets before you cut out the perimeters. It would be best to use a spur center drill bit that woodworkers use. Yes, I know…labor intensive, but plastic is easy to work with. If you are very lucky, the job can be made easier if the diameters you need match commercially available hole saws. If so, you can replace the pilot drill bit with a center spur bit of the same size (usually 1/4") so it won’t wander. Oh, and make sure you place the sheet plastic on a sacrificial scrap of wood to make it easier to drill.
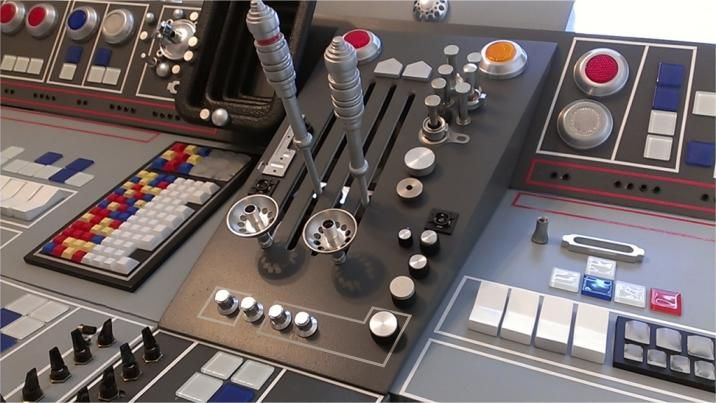
Perhaps the most elegant method is to use a wood turning lathe, if you or a friend have one. The lever handles could be turned from from wood or some types of plastic. One of the handles you already have could serve as a pattern, or you could draft a working drawing with dimensions to work from. It might even be more succinct to make a full sized drawing, cutting it in half lengthwise—and using one of the halves—cut out the interior to the exterior image line leaving the paper that surrounds it to use as an actual template to lathe from. Of course, such a template should be glued to poster board or thin plastic sheet for durability, preferably before the interior of the drawing is cut out, and then use an Exacto type of knife to cut along the image line. If you use a decent hardwood, the rods could be lathed integrally with the handles. Otherwise, the handles will need to be drilled out either on the lathe (accurate) or later by hand.
Hope this makes sense and that some of it helps.
Mark


")