1:1 Millennium Falcon Cockpit Replica - Group Build

Re: 1:1 Millennium Falcon Console Replica

Hi Gang,

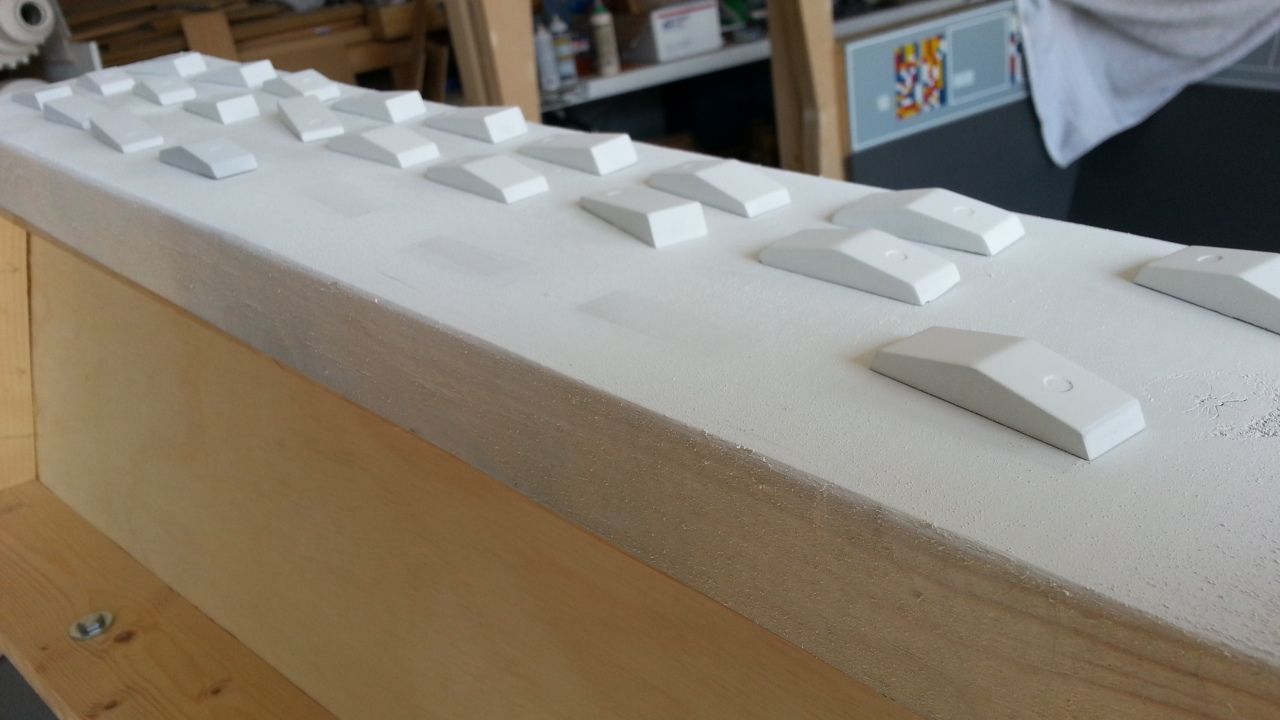
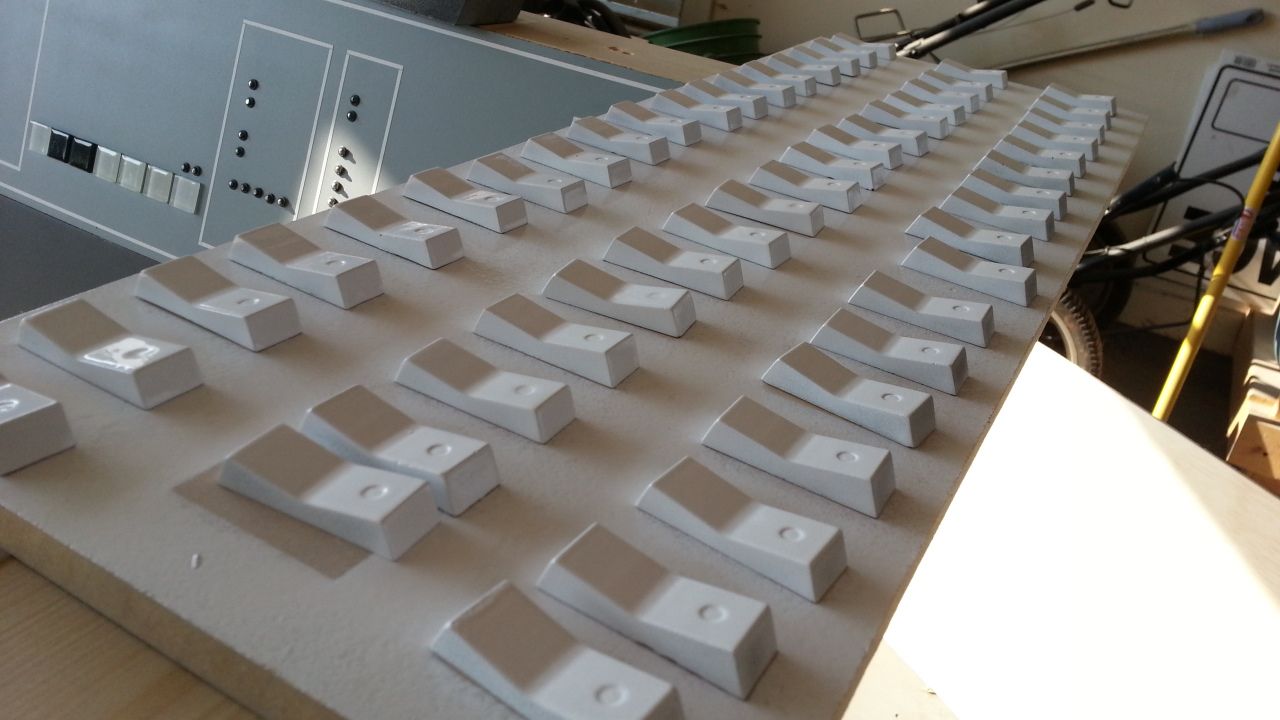
I'm pleading COMPLETE ignorance on this one... I've been looking on line on HOW to illuminate this button. Can anybody help me out? I've been tinkering with the idea to use these on the main console instead of the picture frame bumpers I painted white...

http://i778.photobucket.com/albums/...Console Build/20130617_200902_zpsbb78a86b.jpg

http://i778.photobucket.com/albums/...Console Build/20130617_200847_zpsc4fcec95.jpg

Original Idea - I think illuminated buttons would add to the overall design. :)
http://i778.photobucket.com/albums/...Console Build/20130328_170541_zpse9129ef9.jpg

More to Come

There are a few ways you can wire this, depending on what you'd like to do. Here are your options:

1. LIGHT ON ALL THE TIME - Connect power to "+" and ground to "-".
2. LIGHT ON WHEN BUTTON DOWN - Connect power to "C", ground to "-", and connect "NC" and "+" together.
3. LIGHT ON WHEN BUTTON UP - Connect power to "C", ground to "-", and connect "NO" and "+" together.

If your devices are incandescent, then polarity won't be an issue. Just supply the correct voltage from a source that can handle the current draw. If they are LED's, than you'll have to observe polarity, and perhaps use a current-limiting resistor (if one isn't built-in). I can help you calculate what you'd need for a resistor if need be. Good luck, and great build!
 
Re: 1:1 Millennium Falcon Console Replica

I might just have to do that. I've been working on the front panel now so I've got a lot to go:D . I love what you're doing though. When I was a kid I started building a falcon cockpit but with the skills I had it really didn't go that far. Now that I've grown up (and became a machinist) my skill sets have matured a little. To bad there's not a Star Wars sim out there you could hook up a projector for the out the window view and have all the switches and displays work in the cockpit.

Hi H,

I would love to create a MF cockpit using the large airline flight sims! That would be an amazing project/ride/experience! It wouldn't surprise me if Disney is planning something similar with the MF, X&Y Wings, etc. for their upcoming theme park.

And again... post those build pics. We would love to see them. :)

- - - Updated - - -

This is amazing! Awesome work so far.

Hi M,

Thank you so much for taking the time to read the thread. It's been quite a ride so far! I just received the 3D model of the canopy from Starkiller so I am diving in and planning out how I'm going to fabricate the canopy. This is one part of the build I'm really excited about!

Thanks again for looking and for the very kind words. Stay Tuned for More!

- - - Updated - - -

There are a few ways you can wire this, depending on what you'd like to do. Here are your options:

1. LIGHT ON ALL THE TIME - Connect power to "+" and ground to "-".
2. LIGHT ON WHEN BUTTON DOWN - Connect power to "C", ground to "-", and connect "NC" and "+" together.
3. LIGHT ON WHEN BUTTON UP - Connect power to "C", ground to "-", and connect "NO" and "+" together.

If your devices are incandescent, then polarity won't be an issue. Just supply the correct voltage from a source that can handle the current draw. If they are LED's, than you'll have to observe polarity, and perhaps use a current-limiting resistor (if one isn't built-in). I can help you calculate what you'd need for a resistor if need be. Good luck, and great build!

Hi P,

Thanks for the info. Unfortunately, all the 12v adapters I have are only "+" and "-". I don't have a ground wire option (unless it's inside the housing). And I'm not smart enough to know how to even begin creating a ground - although i do know what you mean. lol :)
 
Re: 1:1 Millennium Falcon Console Replica

Hi Gang,

I've been in constant talks with the LED supplier and we're close to finalizing the order. I had one quick question for those LED experts. In your opinion, would go with bright LEDs and add a dimmer or go with "warm" LEDs to soften the overall look? Having originally used the Christmas Tree LEDs, I very quickly realized the the regular "Bright" LEDs were in affect, TOO bright. So would "warm" be better for this application or should I go with bright and add a dimmer switch?

Ideas?
 
Re: 1:1 Millennium Falcon Console Replica

Hi, just see this thread again, and I missed out the conversation about the connection.
I saw your switch (post 2955) it was stated 220V for the switch light power.
Just make sure if the switch (LED or not) using 12V power or 220V AC to power the switch light.
Basically the switch light power and the load are separate things.
If you have 12V LED switch, and you want to lit 12V pre-wired LED, you can cross connect C with (+) or (-), depending on how you connect the load (LED).
If you cross (+), then it has to connect to (+) on the load.

Well, I did some explanation based on your 220V switch picture
Picture1.jpg

NO (normally open) means when you push the button, the switch light will go on and the load will go on (lit).
NC (normally close) means when you push the button the switch light will go on and the load will be off.

The best way is to check will ohmmeter, place on pin on C and the other on NO, see which one is.

Not sure I understand your last question regarding bright or go dimmer.
If I may share this:
1. LED is very bright and focus (narrow angle) beam. Therefore depending on how big the area you want to lit, the distance between the LED and the surface area need to be calculated. The longer the distance, it can cover more area, but it looses the brightness.
2. You can make the beam wider by doing the following:
- sand off the tip of the LED (creating a diffuser right at the tip of the LED itself)
- add diffuser (can be white paper, sandblast film, sanded clear sheet etc, use your creativity)
3. The wider the spread, the dimmer the light gets (it lost the brightness due to light spread/bias)
4. Careful about "black spots", a diffuser can eliminate that.
5. Use resistor as a fixed dimmer, or trimpot for adjustable dimmer.

Does your term bright and warm referring to focused/diffused, or the color as in white/warm white?
If you refer to warm as diffused, you can achieve it by:
1. Add diffuser
2. Longer distance
3. Dimmer (but this is not as effective as the two above, becuase it you had black spots, it will not go away).

Hope it helps.
 
Re: 1:1 Millennium Falcon Console Replica

Hi, just see this thread again, and I missed out the conversation about the connection.
I saw your switch (post 2955) it was stated 220V for the switch light power.
Just make sure if the switch (LED or not) using 12V power or 220V AC to power the switch light.
Basically the switch light power and the load are separate things.
If you have 12V LED switch, and you want to lit 12V pre-wired LED, you can cross connect C with (+) or (-), depending on how you connect the load (LED).
If you cross (+), then it has to connect to (+) on the load.

Well, I did some explanation based on your 220V switch picture
View attachment 199475

NO (normally open) means when you push the button, the switch light will go on and the load will go on (lit).
NC (normally close) means when you push the button the switch light will go on and the load will be off.

The best way is to check will ohmmeter, place on pin on C and the other on NO, see which one is.

Not sure I understand your last question regarding bright or go dimmer.
If I may share this:
1. LED is very bright and focus (narrow angle) beam. Therefore depending on how big the area you want to lit, the distance between the LED and the surface area need to be calculated. The longer the distance, it can cover more area, but it looses the brightness.
2. You can make the beam wider by doing the following:
- sand off the tip of the LED (creating a diffuser right at the tip of the LED itself)
- add diffuser (can be white paper, sandblast film, sanded clear sheet etc, use your creativity)
3. The wider the spread, the dimmer the light gets (it lost the brightness due to light spread/bias)
4. Careful about "black spots", a diffuser can eliminate that.
5. Use resistor as a fixed dimmer, or trimpot for adjustable dimmer.

Does your term bright and warm referring to focused/diffused, or the color as in white/warm white?
If you refer to warm as diffused, you can achieve it by:
1. Add diffuser
2. Longer distance
3. Dimmer (but this is not as effective as the two above, becuase it you had black spots, it will not go away).

Hope it helps.

Without seeing the switch or it's data sheet, I would be VERY cautious in recommending 220 VAC to power the light! The 220 VAC rating is most likely what the switch is rated to handle, NOT THE LIGHT ON THE SWITCH! The light itself may very well be 5 - 12 VDC, but I would have to see the data sheet to know for sure.
 
Re: 1:1 Millennium Falcon Console Replica

Pianomanpj,
I agree, that's why I said "Just make sure if the switch (LED or not) using 12V power or 220V AC to power the switch light."
That 220V marking was placed right on the light switch pin.
It is very odd place if that's for indicating the switch voltage rating.
I did find a switch that requires 220V AC for the light, it's nothing unusual, even for LED switch.

SofaKing01 resides in US, so the power should run on 110V AC anyway.
 
Re: 1:1 Millennium Falcon Console Replica

IMIM2,
Yeah, I can see what you were saying, but it didn't come across to me the first time I read it. (Sounds like we're both on the same page, anyhow...) It just gives me the willies to think of someone putting 220 VAC through a 12 volt device! POOF!! :wacko
 
Re: 1:1 Millennium Falcon Console Replica

Dude youre goin to be a legend. I swear bro give me a shoutout when youre famous! Brilliant work my friend!
 
Re: 1:1 Millennium Falcon Console Replica

IMIM2,
Yeah, I can see what you were saying, but it didn't come across to me the first time I read it. (Sounds like we're both on the same page, anyhow...) It just gives me the willies to think of someone putting 220 VAC through a 12 volt device! POOF!! :wacko

I've decided against using those switches - I have approx 50-60 blue and white for sale if anybody wants to make an offer. :) I'm looking into either square pilot lights or having TAP Plastics create a colored transparant beveled knob. I'm thinking about backlighting them similar to the flat 3mm 1 inch squares seen through the cockpit and MF. :) As always... it's a work in progress. :)

- - - Updated - - -

Dude youre goin to be a legend. I swear bro give me a shoutout when youre famous! Brilliant work my friend!

Hi Harry,

WOW! Thank you for the VERY kind words... I'm very flattered. As I've mentioned 1,000 times, I just wish I was further along. The recent car repair really set me back but I do have a bunch of cockpit related side projects that HAVE to be done so I might as well knock those out before getting back to the canopy.

Again, thank you so much and stay tuned for more updates! :)
 
Re: 1:1 Millennium Falcon Console Replica

Hey Sofaking I got your pm and replied but I don't know if you got it.
I think I can make them for you but I'll need dimensions.
 
Re: 1:1 Millennium Falcon Console Replica

Hi Gang,

The rocker/slider knobs are sanded and ready for primer and paint! I'm also working on the Vicker's vents...

Vents are now glued together.
20130622_094214_zps52bf39cf.jpg


All the knobs are ready for paint!
20130622_094237_zps62d0e7cd.jpg


This batch getting their first coat!
20130622_094255_zpsb91664e2.jpg


I "hope" to get to the new instrument panels this weekend. So Stay Tuned!
 
Re: 1:1 Millennium Falcon Console Replica

Hi Gang,

Well... it might not seem like much of an update but... I discovered I had another "whoops" moment... I spent the day fixing the door frame. Without getting into the gory details... measure, measure, measure...

More knobs getting works...
20130622_143440_zpsab3da3bc.jpg


Measure, measure, measure...
20130622_143451_zpsff9b6044.jpg


That looks a little better
20130622_174952_zps43484db2.jpg


NOW the padding templates fit MUCH better... Mostly...
20130622_175526_zps24af06bb.jpg


More Tomorrow!
 
Re: 1:1 Millennium Falcon Console Replica

Hi Gang,

Well... I never get as much done I would like... It took some time but believe it or not... Despite the few pics. I did manage to get the door frame finally situated and ready for an actual door! :) I also finished up the Vicker Vents and of course rockers, rockers, rockers...

The first half of the rocker knobs getting their first layer of white... the other 50+ rockers... grey... A HUGE thanks to Starkiller for his 3D skills and printing
20130623_074712_zpsaa0b3a05.jpg


ANOTHER HUGE THANKS to Maruska and his 3D printed Vickers Vent greeblie he donated to the build. I decided to fill in the 3D print and sand smooth. Once the sanding was complete I sprayed with black paint before adding the metal spray. I'm really happy with the results!
20130623_154706_zpsb7a2511d.jpg


They look metal to me :)
20130623_154716_zps9ce90153.jpg


After a lot of cutting, trimming, filling and sanding... filling and sanding... and a very uncooperative table saw :angry I finally brought the door frame to a 95% solution. I went ahead and decided to paint the frame. This helps me find all the minor imperfections - which I don't plan on completely fixing... after all... Han beat the hell out of her. :) She looks naked without her padding...

20130623_161234_zps2df8958a.jpg


I also started work on the door itself. Since I have to save a little money after the car repair, I'm using up as much scrap wood as I can. Normally, I would have made this out of one piece of MDF... but with enough filler and sanding I should be able to pull it off... I hope!

This is the base of the door with a quick pattern shown in pencil. I will then transfer the pattern to thinner MDF which will in essence be an overlay of the outline you see - then of course... greeblies. Not sure if I'm going to detail the backside... You can see the two halves of MDF
20130623_161245_zps6f4d1ec0.jpg


20130623_161304_zpsc73806a3.jpg

I'm considering taking the horizontal support piece (between the "padding") off the bottom on the door frame - not sure it's needed but I'll hold off until I get closer to a finished product.

More to Come!
 
Last edited:
Re: 1:1 Millennium Falcon Console Replica

Yeah, I figured the door might be a little tricky. Looking good!

Hey T,

I don't know what happened or where I got the horribly wrong measurements from. The only I can think of is I used the dimensions from the door... not sure how or why they were applied to the frame... oh well... another crisis averted... Mostly. ;)
 
Back
Top