You are using an out of date browser. It may not display this or other websites correctly.
You should upgrade or use an alternative browser.
You should upgrade or use an alternative browser.
Nike Mag V2 Mod Discussion (Page 58 Shopping List)
- Thread starter Taff83
- Start date
-
- Tags
- back to the future
- Status
- Not open for further replies.
Was anyone aware of this?
Back to the Future 'ZBoard Hoverboard' hits Indiegogo | The latest news from the Computer and IT Industry | PC Retail
032262
This guy is wearing Brad's jacket and a pair of V2s. He must be a member here.
Back to the Future 'ZBoard Hoverboard' hits Indiegogo | The latest news from the Computer and IT Industry | PC Retail
032262
This guy is wearing Brad's jacket and a pair of V2s. He must be a member here.
Greeky04
Well-Known Member
.jpg")

This is a stand from my work which is meant for our laptops but we dont use them anymore so I re-purposed it for my MAG's. I printed off an image of the front grille of the delorean but as you can see its too short as I only have an A4 printer
 if anyone has the ability to print a hi res version of the delorean front end and can print it off let me know and maybe we can work something out
toe mod was going south, so I abandoned the idea and re-glued it back together and redone the beading. only had separated about 2 inch's so still looks good. I took my time and done it very slowly, 20 seconds hair-dryer, then pushed a little. But still felt it wasn't going right. So where does that leave me?
I have decided that its just to destructive to warrant the job to such a well built shoe. Tearing it open and destroying an air-tight glue seal and potentially shortening the life of my Mags just isn't worth it. Unless your a BTTF buff like us you're not going to notice what so ever. Yes it will bug me personally being how OCD I am, but I just cant bear the thought of trying to do a 'Jedifyfe' and messing it up. Ill leave that bit to the pro's if I ever want it done.
As for the rest of the MODS they are still going ahead as planned, I will just leave the toe mod out of it.
Ordered another pair of Mags yesterday, one for display and one to wear.
I totally appreciate all you guys that have had the b**ls to go through with the toe MOD. If you have completed the toe MOD, I take my hat off to you.
Vormz
Sr Member
There's another (maybe easier) toe mod method. Emmet explain it few pages ago. The "iron" method
http://www.therpf.com/f9/nike-mag-v2-mod-discussion-page-58-shopping-list-171951/index143.html
http://www.therpf.com/f9/nike-mag-v2-mod-discussion-page-58-shopping-list-171951/index143.html
Last edited:
cavx
Master Member
I totally appreciate all you guys that have had the b**ls to go through with the toe MOD. If you have completed the toe MOD, I take my hat off to you.
There's another (maybe easier) toe mod method. Emmet explain it few pages ago. The "iron" method
http://www.therpf.com/f9/nike-mag-v2-mod-discussion-page-58-shopping-list-171951/index143.html
I was not going to mod the toe either because I didn't want to slice up the shoe but then the iron or "steam" method was presented and well, now I have two pair with modded toes.
The only thing I found is that you may get wrinkles on the larger sizes because you are simply changing the shape of the toe box and not making it smaller. On the smaller US8 pair, the toe looks similar to that of the 2011 MAG - almost shaped like a bullet. On my US9.5s, I didn't like the way the toe box looked because it appeared to bulge. Jedifyfe had pointed out that the best result would come from both heat forming and trimming.
So on the smaller pairs, it seems heat method works fine.

On the larger pairs you may have to trim the excess or risk wrinkles. Here is my US9.5 set with a flattened toe which makes them look more "sock type".

Was anyone aware of this?
Back to the Future 'ZBoard Hoverboard' hits Indiegogo | The latest news from the Computer and IT Industry | PC Retail
032262
This guy is wearing Brad's jacket and a pair of V2s. He must be a member here.
http://www.therpf.com/f9/close-hoverboard-you-can-get-now-introducing-zboard-198045/
Huh. Weird that I missed that entire thread.
There's another (maybe easier) toe mod method. Emmet explain it few pages ago. The "iron" method
http://www.therpf.com/f9/nike-mag-v2-mod-discussion-page-58-shopping-list-171951/index143.html[/QUOTE
Yes i do recall seeing it, but still think I'm gonna leave it be to be on the safe side. Things are moving along nicely with the other mods.
I've managed to get the ankle bubble open and the "EL" compartment. I have also removed those bits of clear plastic from inside using heat. I'm surprised how easy it was to separate these parts...Chinese knock offs at there finest. Has anyone got a pic of the EL in the heel in place before gluing it back up? More specifically using the EL panels from elwireseller_uk on eBay.


Where you get ya Footwear Bag from man? that thing is sweeeet as. Next project me thinks.Load your file onto a USB stick and go to Office Works.
https://fbcdn-sphotos-a-a.akamaihd....2_10152410525078841_8576512599447888104_n.jpg
I customized my ALMANAC bitmap in Paint to fit a thick DVD case and they charged me $3.30 to print it on glossy paper which they then even trimmed to size for me.
Can anybody tell me if i use the original channel already in the shoe for the ankle bubble lights when re-installing them i do i make a new hole for the wires to pass through? I don't wanna just pull them through in case ya do use it. Then I can solder new wire to the existing then pull it through, thus utilizing the original channel and running new wire through it.
Putting a torch inside the shoe while working on it really helped and taking pics

Big one was easy to get out, popped right off. Small one....nope. Proper had me on it for like 15mins

Yeah build the NIKE FOOTWEAR Bag from scratch. My build thread for my tube bag is HERE. The new version will be even better
Will it have the sound effect of when Doc turns the knob?
Hi guys been following the forum for awhile, finally decided to buy a pair, mags have just arrived and gonna start to mod them soon, can anyone tell me where to buy the el sheet? looked on ebay uk but not sure which to buy? is this any good
5"x6" EL Panel Sheet Pad Back Light Display Backlight G | eBay
Also can someone tell me what i exactly need to mod? I've reading back through the whole forum now, el sheet, leds, inverters?
Thanks guys
5"x6" EL Panel Sheet Pad Back Light Display Backlight G | eBay
Also can someone tell me what i exactly need to mod? I've reading back through the whole forum now, el sheet, leds, inverters?
Thanks guys
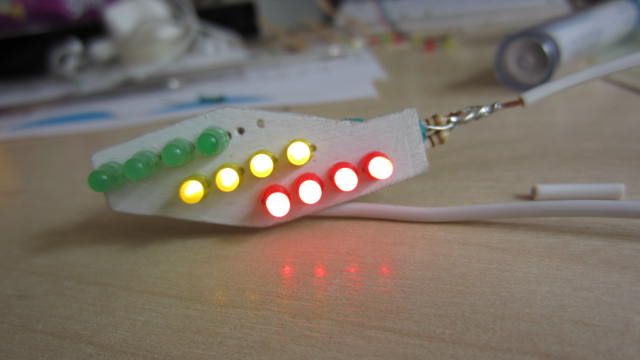
To all electronics buffs, as i am not. I have done one of the ankle bubble lights, wired it all up and checked all the connections with a multimeter and all is good. All LEDs checked individually and good, resistor ok. Yet the green row just doesn't want to shine....any thoughts?
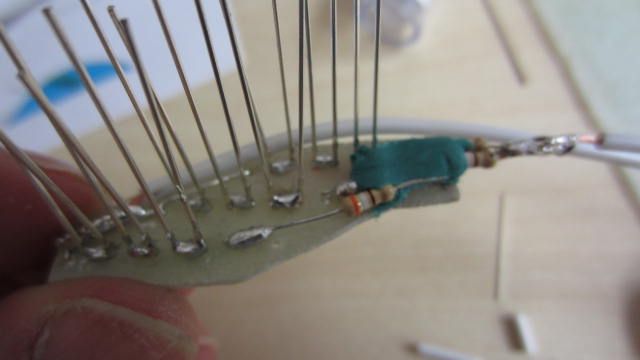
Ignore the 2 extra holes next to the green row, got a wee bit excited with the drill

Ignore the 2 extra holes next to the green row, got a wee bit excited with the drill

Last edited:
To all electronics buffs, as i am not. I have done one of the ankle bubble lights, wired it all up and checked all the connections with a multimeter and all is good. All LEDs checked individually and good, resistor ok. Yet the green row just doesn't want to shine....any thoughts?
http://i1259.photobucket.com/albums/ii543/marcsbay69/Mag Mods/IMG_2033_zpsa7a58f09.jpg
Ignore the 2 extra holes next to the green row, got a wee bit excited with the drill
http://i1259.photobucket.com/albums/ii543/marcsbay69/Mag Mods/IMG_2031_zps2a7e0fb6.jpg
You most likely soldered one of the green LEDs with the polarity reversed. I've done this before.
You most likely soldered one of the green LEDs with the polarity reversed. I've done this before.
Yeah did think that also that also, but all the correct way.... mystery continues... cheers Jedi

- Status
- Not open for further replies.
Similar threads
- Replies
- 10
- Views
- 2,919
- Replies
- 5
- Views
- 1,041
- Replies
- 4
- Views
- 954
- Replies
- 12
- Views
- 1,617