Boneman
Member
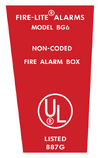
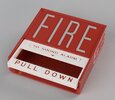
As anyone who has seen my threads on here, I'm a huge "The Thing" fan. After building my MacReady Final Battle cosplay and LED Road Flare projects, I decided to do a fun little build in recreating the fire alarm pull station complete with claxon. I did some research and found that the fire alarm shown/used in the film was a 'BG6-N Pull Station'. My initial concept was to use my laser cutter and recreate this alarm box using 1/8" acrylic. However on doing a quick search I stumbled upon an actual BG6 pull station for sale on eBay! So $60 later and I was the proud owner of one! Just having that unit alone was a small victory! Now to make it come 'alive'!


Adding Sound
This was actually pretty straight forward. I purchased a small Sound & Speaker module off Amazon - the XLW Module - 16MB Push Button Activated Sound Module with Speaker. This was $26CAD for 2 and I used the other one to provide sounds and sfx in a display base of a model I built. It's a simple little unit with some configurable settings, USB C programming and recharging and has volume control and you can load up to 16Mb of MP3 files on it, or record your own voice messages. The great thing is that it is VERY thin.

To get the claxon sound used from The Thing, I simply downloaded a clip off YouTube that has the sound (a 5 minute loop), then converted it to an MP3 and loaded it onto the XLW module.
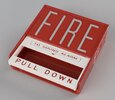
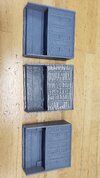
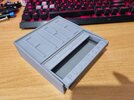
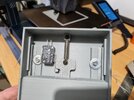
I cut off the included switch and wired on a NO micro switch, so when you pull the handle, the metal piece that moves on the inside would make contact with the micro switch and activate the sound board. I also added wires to where the main ON/OFF switch is so I can extend that to an external switch on the side of the BG6 at a later date (so I don't have to open the BG6 box to turn on and off the main power to the XLW module).

Mounting Electronics
I kept this pretty simple and basic as I didn't want to over think this as well as trying not to alter the actual BG6 unit and make it convertible back to stock should I ever want to.
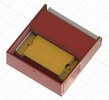
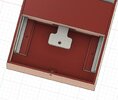
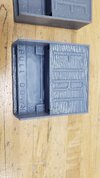
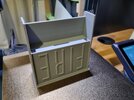
I cut various pieces and shaped of EVA foam as supports for the XLW module as well as a support for the micro switch.


Wall Mounting & Display
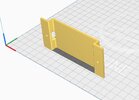
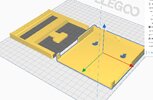
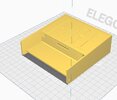
Fairly simple yo mount onto my wall, however during testing I found that if you put the BG6 directly against the wall, it really muffled the sound output of the small speaker. To solve this, I simply made a 1/4" standoff mounting plate to give it a bit of space off the wall. I used my laser cutter to cut x2, 1/8" pieces, glued them together and drilled mounting holes.
I found these hammer in wall anchors that were pretty cool and super simple to install. 3 screws later (2 top, 1 bottom) and presto, the BG6 fire alarm was mounted and ready for action!


"I don't know what it is, but it's weird and it's pissed off!"
It's actually pretty loud and the video doesn't do it justice! The sound module has multiple volume settings.
If you are interested in having your own The Thing alarm box, message me for details (providing you can supply your own BG6 pull station).
Adding Sound
This was actually pretty straight forward. I purchased a small Sound & Speaker module off Amazon - the XLW Module - 16MB Push Button Activated Sound Module with Speaker. This was $26CAD for 2 and I used the other one to provide sounds and sfx in a display base of a model I built. It's a simple little unit with some configurable settings, USB C programming and recharging and has volume control and you can load up to 16Mb of MP3 files on it, or record your own voice messages. The great thing is that it is VERY thin.
To get the claxon sound used from The Thing, I simply downloaded a clip off YouTube that has the sound (a 5 minute loop), then converted it to an MP3 and loaded it onto the XLW module.
I cut off the included switch and wired on a NO micro switch, so when you pull the handle, the metal piece that moves on the inside would make contact with the micro switch and activate the sound board. I also added wires to where the main ON/OFF switch is so I can extend that to an external switch on the side of the BG6 at a later date (so I don't have to open the BG6 box to turn on and off the main power to the XLW module).
Mounting Electronics
I kept this pretty simple and basic as I didn't want to over think this as well as trying not to alter the actual BG6 unit and make it convertible back to stock should I ever want to.
I cut various pieces and shaped of EVA foam as supports for the XLW module as well as a support for the micro switch.
Wall Mounting & Display
Fairly simple yo mount onto my wall, however during testing I found that if you put the BG6 directly against the wall, it really muffled the sound output of the small speaker. To solve this, I simply made a 1/4" standoff mounting plate to give it a bit of space off the wall. I used my laser cutter to cut x2, 1/8" pieces, glued them together and drilled mounting holes.
I found these hammer in wall anchors that were pretty cool and super simple to install. 3 screws later (2 top, 1 bottom) and presto, the BG6 fire alarm was mounted and ready for action!
"I don't know what it is, but it's weird and it's pissed off!"
It's actually pretty loud and the video doesn't do it justice! The sound module has multiple volume settings.
If you are interested in having your own The Thing alarm box, message me for details (providing you can supply your own BG6 pull station).
Last edited:

") Handle works great and plays.
Handle works great and plays.