Boneman
Member
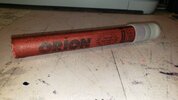
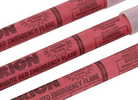
Been searching for a while now and haven't been able to find any kind of prop Road Flare, so I'm taking a stab at making my own, complete with LED effects. This came about as a wanted costume accessory for my MacReady Final Battle Cosplay Costume (The Thing). I wanted the flare to light up bright with some red LEDs, perhaps hidden in a small amount of polly-fill smoke.


LED Lighting
I started out by contacting Evan Designs, who manufacture various mini and micro LED products use for scale model kits and train setups. I outlined what I was trying to do and they immediately got back to me with a combination of several products that fit the concept I was needing. They set me up with the following:


Cost of LEDs was $38.55 USD
Did some initial testing and I think I'm happy with the result. I think I need to find some small gems or crystals to bounce and scatter the light around a bit more so I'll be thinking on the best way to achieve that, but for now they seem to do the trick. I don't think it will be as bright as I would like it, but I'm dealing with a very compact size and limited power source. The LEDS are controlled by a momentary ON micro switch.
Flare Body/Construction
I'm using some 1.075" OD electrical conduit with about 0.75" ID to store the batteries and electronics. Road Flares seems to vary in length between 16" and 12.3" as semi standard sizes, based on burn times (15min vs 30 min). The batteries and holder JUST fit inside, like JUST!


I plan on drilling a hole for the micro switch to be mounted up inside the body, with the button poking through to the outside so I can press to activate the flare.
More to come over the next few weeks....
LED Lighting
I started out by contacting Evan Designs, who manufacture various mini and micro LED products use for scale model kits and train setups. I outlined what I was trying to do and they immediately got back to me with a combination of several products that fit the concept I was needing. They set me up with the following:
- Red "Lightning Effect" LED/circuit (LED Size: Mega)
- Several "Flickering LEDs"; 2 Red, 1 Orange (LED Size: Mega)
- 2 AA Battery stick holder (for 3VDC operation)
- Micro Switch - momentary ON function (press to turn ON, release to turn off)
Cost of LEDs was $38.55 USD
Did some initial testing and I think I'm happy with the result. I think I need to find some small gems or crystals to bounce and scatter the light around a bit more so I'll be thinking on the best way to achieve that, but for now they seem to do the trick. I don't think it will be as bright as I would like it, but I'm dealing with a very compact size and limited power source. The LEDS are controlled by a momentary ON micro switch.
Flare Body/Construction
I'm using some 1.075" OD electrical conduit with about 0.75" ID to store the batteries and electronics. Road Flares seems to vary in length between 16" and 12.3" as semi standard sizes, based on burn times (15min vs 30 min). The batteries and holder JUST fit inside, like JUST!
I plan on drilling a hole for the micro switch to be mounted up inside the body, with the button poking through to the outside so I can press to activate the flare.
More to come over the next few weeks....
Attachments
Last edited: