My Fifth Element Multipass build - TONS of Pics

Re: My Fifth Element Multipass (build)

Man, that just looks too neat and tidy LOL! You should see the mess of solder and wires inside mine which took me HOURS to get it to fit!

:lol
Awesome.

Im glad we can have such great discussions about these things with everyone staying cordial. :)

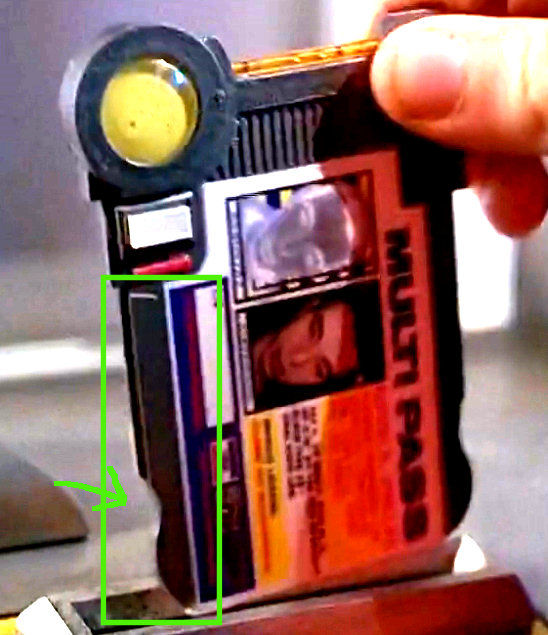
as a transition from battery cover to electronics, I thought I'd show what it looks like with the cover removed.
You can see in the second one I've built that I added a few small strips to the screw hole locations to beef that area up a bit.

web.jpg
 
Re: My Fifth Element Multipass (build)

Man, that just looks too neat and tidy LOL! You should see the mess of solder and wires inside mine which took me HOURS to get it to fit!

Thanks Kurtyboy!

Occam's Razor applies here, the original prop makers would not have been able to spend a lot of time messing with it and having it sealed in, so the simplest solution is that they would have had access to the entire electronics compartment. :)
 
Re: My Fifth Element Multipass (build)

What the heck is that line just south of the red bar? It looks like there's a whole other layer there, over what I call the "lower arm" of the pass. But there's no other screen grabs to support this, and I cannot make sense of how that would even work.

I don't think you're imagining things, Matt. With the brightness and contrast cranked up, it really does appear to be an additional layer of acrylic or something. A hastily added arrow ('cause I know how you loves 'em!) points out where it looks like the clear material extends over the curve in the lower arm:

mp.jpg


We might be having a coincidental hallucination, but it does seem like something's been added there. Maybe a quick, dirty, and mostly invisible way to keep the thing from flopping around in the slot (that's what she said) for some reason?
 
Re: My Fifth Element Multipass (build)

Nice catch. Looks like a clear piece. Maybe they put it on to protect it from being scratched rather than the mark being a scratch. It also explains that odd white mark down the side. The plastic would collect the light from the face and amplify at the edges of the plastic.


Edit. Look at the indent on the top side. It looks like there is very fine line maybe indicating there is one on there as well.
 
Re: My Fifth Element Multipass (build)

Thanks guys.
:) :thumbsup


I corrected the styrene thickness in the battery cover modification post^, its 0.040" Styrene.
 
Ok, moving on with the battery/LED/electronics. :)

First thing needed for the button is a parts doner.
For that I found this cheap LED keychain light.

web.jpg


Remove the screws, SAVE these screws (guess what for;))

web.jpg


Opened up.

web.jpg


With the button set aside you can see the part that Im after

web.jpg


web.jpg


Trim it down and double side tape it down (only the edges, not the center)

web.jpg


That battery I used is a 2516


More parts off the keychain light

web.jpg


Here you can see what that part is used for (bottom contact for the battery)

web.jpg


Original button glued/taped onto the back of the yellow dome.
Depending on how tall your battery is you may have to sand down the top of the plastic button

web.jpg


Stick the battery contact down in the battery cover

web.jpg


I flattened out the lead on the resistor and that slips under the metal disc on the button

web.jpg


front view of the button with the yellow dome removed.

web.jpg


I can go more in depth with how I soldered the leads on the LEDs if anyone is interested.

:)
 
That's almost exactly the same light Fotokid and I used!. The difference was that the one's we used had a smaller, black plastic piece that only needed two tiny pieces trimmed off. Nice though, thinking of picking up some more for when I do the Leeloo, Corben, and then a custom one.
 
Yea great find, works perfect in our passes! Although I will say that your wiring and placement is WAY cleaner than mine.
 
About to embark on another one of these builds and would love to attempt two things, removable card section and custom graphics.

One question, how did you get the grommets into the pass? mine aren't wide enough by the hole but only by a tiny bit. Did you have to epoxy them in?
 
This... is... amazing. I was just talking to a prop-maker friend of mine the other day about how I'd love if he did a multipass. I hadn't even researched yet. Would you consider doing two for me if I covered all expenses + a little somt'n somt'n for you? I have no skills in prop making what-so-ever.
 
This thread is more than 12 years old.

Your message may be considered spam for the following reasons:

  1. This thread hasn't been active in some time. A new post in this thread might not contribute constructively to this discussion after so long.
If you wish to reply despite these issues, check the box below before replying.
Be aware that malicious compliance may result in more severe penalties.
Back
Top