Talisen
Sr Member
Excuse any formatting or image inserting issues. I actually haven't posted a thread here in forever.
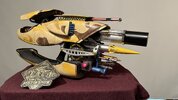
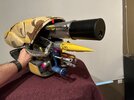
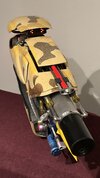
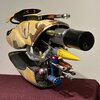
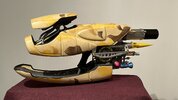
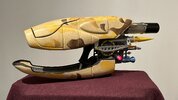
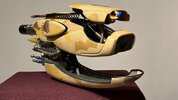
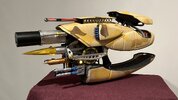
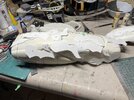
Last week I finished my 8 month journey of assembling and finishing my JakeySnakey630 ZF-1 kit (with a few of eethan's metal upgrades). Overall the Kit was extremely impressive in both engineering and assembly. Jake was alway accessible to answer questions for a Servo newbie and with help if I damaged a piece in the process.
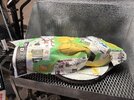
I made a few slight changes to his kit, one was replacing the supplied FDM printed front scope lens with a tinted clear resin printed lens. I also added a square of an old fluorescent light fixture diffuser to the rear scope (again, replaced the supplied FDM window). And finally I swapped the drawer liner with one I found locally for both colour (dark grey) and that I needed more since the inside of the scope cavity gets the liner treatment as well (as seen in Matt Munson's Project workbench SDCC propstore video)
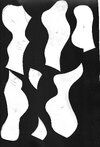
I developed my own mask patterns using both the Propstore auction and the aforementioned SDCC video) and used Micheal's craft store paint to airbrush the outer shell. Any metal "anodized" parts were Tamiya clear paints and most of the rest were standard Rustoleum rattle can paints.
Overall I'm super thrilled with the end result, I took it to our local Toronto Prop Expo this past Saturday and took home 1st place Best in show.
Last week I finished my 8 month journey of assembling and finishing my JakeySnakey630 ZF-1 kit (with a few of eethan's metal upgrades). Overall the Kit was extremely impressive in both engineering and assembly. Jake was alway accessible to answer questions for a Servo newbie and with help if I damaged a piece in the process.
I made a few slight changes to his kit, one was replacing the supplied FDM printed front scope lens with a tinted clear resin printed lens. I also added a square of an old fluorescent light fixture diffuser to the rear scope (again, replaced the supplied FDM window). And finally I swapped the drawer liner with one I found locally for both colour (dark grey) and that I needed more since the inside of the scope cavity gets the liner treatment as well (as seen in Matt Munson's Project workbench SDCC propstore video)
I developed my own mask patterns using both the Propstore auction and the aforementioned SDCC video) and used Micheal's craft store paint to airbrush the outer shell. Any metal "anodized" parts were Tamiya clear paints and most of the rest were standard Rustoleum rattle can paints.
Overall I'm super thrilled with the end result, I took it to our local Toronto Prop Expo this past Saturday and took home 1st place Best in show.