Vacformedhero
Sr Member
Hi , decided it's better to start up my own thread to document my learning while converting the hero series millennium falcon into something that resembles a film prop. It has been over 12 years since I last built and painted a model (I am excluding revell snap together models I built for my son)
painting techniques have vastly improved and I am going to attempt some of them . As mentioned previously I was very heavy handed with my ertl falcon and used heavy dirtying down with powder paint and grey airbrushed and then removed with thinners on a cloth.
i think I now have the patience to do a proper paint job.
another aspect of this build is making it special . With that in mind I will light this kit and enable it to be mounted.
during this process I need help , especially with materials .
issues with the model:
eliminate some of the softer details and like many here replace with kits, while I will where possible use equivalent kits to replicate the details, it would cost me too much to be slavishly copying the 5 foot model..... This will have elements of both , whichever I think is cooler to the eye.
installing an armature to allow the model to be displayed in three ways , vertical , in flight and horizontal. I will use aluminium box section, help needed here is how to effectively bond materials, although where possible I will add structural rigidity to the model and even go as far as screwing as much
as possible together.
lighting the kit, I want this baby on display (negotiations have kicked off ) , I have an off the shelf answer that I will post here soon . Problems to overcome are light leakage through the model , I believe silver is the best light blocker .....any feedback appreciated.
weathering the model to look real, this will be my biggest hurdle and time sink. I have found excellent explanations on filters and damage on this forum which have given me a good base to start from.
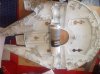
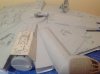
The first two show rustoleum plastic primer direct onto the surface with no preparation or cleaning , as you can see this is very poor. Nearly all the paint have lifted after a few days
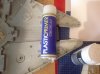
the next one isprofessional colour support plastic primer , a clear plastic preparation usually used for car bumpers, I superglued (rocket quick dry) a model part to this and I cannot move it (green tank wheel)
the he final one and the one I will probably go with is The Army Painter colour primer uniform grey (used by war gamers to prime whole armies) again superglued tank wheel didn't come off .
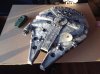
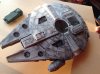
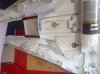
The last two images are my previous attempt at weathering a falcon, some of the heavier sides I like but overall too strong and tonally needs to be more subtle
my thread is for anyone so feel free to submit your learnings from your builds and any suggestions are most welcome
painting techniques have vastly improved and I am going to attempt some of them . As mentioned previously I was very heavy handed with my ertl falcon and used heavy dirtying down with powder paint and grey airbrushed and then removed with thinners on a cloth.
i think I now have the patience to do a proper paint job.
another aspect of this build is making it special . With that in mind I will light this kit and enable it to be mounted.
during this process I need help , especially with materials .
issues with the model:
eliminate some of the softer details and like many here replace with kits, while I will where possible use equivalent kits to replicate the details, it would cost me too much to be slavishly copying the 5 foot model..... This will have elements of both , whichever I think is cooler to the eye.
installing an armature to allow the model to be displayed in three ways , vertical , in flight and horizontal. I will use aluminium box section, help needed here is how to effectively bond materials, although where possible I will add structural rigidity to the model and even go as far as screwing as much
as possible together.
lighting the kit, I want this baby on display (negotiations have kicked off ) , I have an off the shelf answer that I will post here soon . Problems to overcome are light leakage through the model , I believe silver is the best light blocker .....any feedback appreciated.
weathering the model to look real, this will be my biggest hurdle and time sink. I have found excellent explanations on filters and damage on this forum which have given me a good base to start from.
The first two show rustoleum plastic primer direct onto the surface with no preparation or cleaning , as you can see this is very poor. Nearly all the paint have lifted after a few days
the next one isprofessional colour support plastic primer , a clear plastic preparation usually used for car bumpers, I superglued (rocket quick dry) a model part to this and I cannot move it (green tank wheel)
the he final one and the one I will probably go with is The Army Painter colour primer uniform grey (used by war gamers to prime whole armies) again superglued tank wheel didn't come off .
The last two images are my previous attempt at weathering a falcon, some of the heavier sides I like but overall too strong and tonally needs to be more subtle
my thread is for anyone so feel free to submit your learnings from your builds and any suggestions are most welcome


")