The Millennium Kestrel: older Wonderfest build

BB43MAN

Well-Known Member
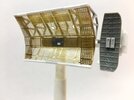
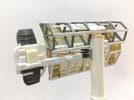
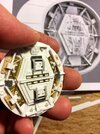
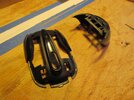
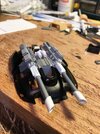
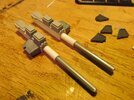
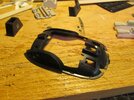
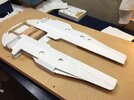
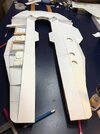
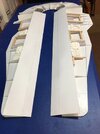
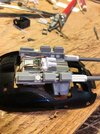
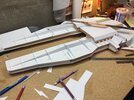
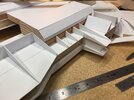
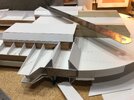
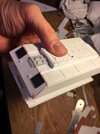
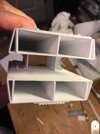
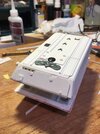
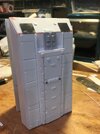
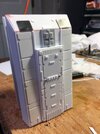
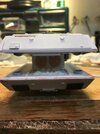
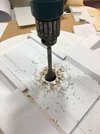
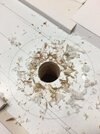
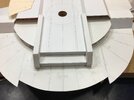
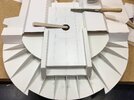
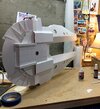
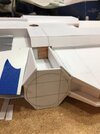
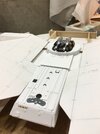
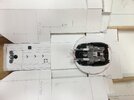
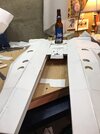
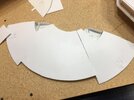
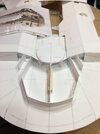
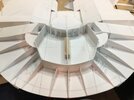
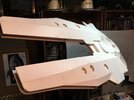
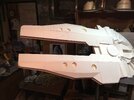
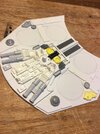
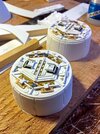
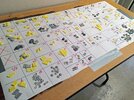
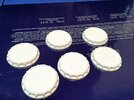
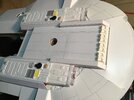
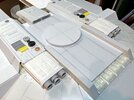
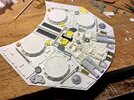
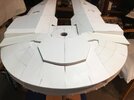
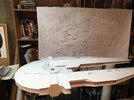
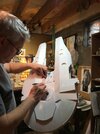
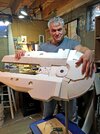
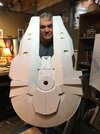
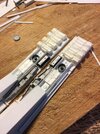
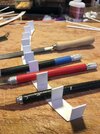
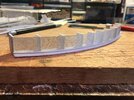
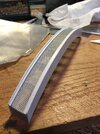
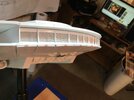
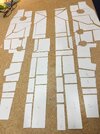
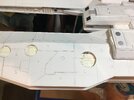
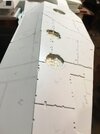
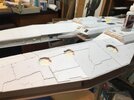
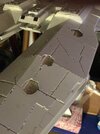
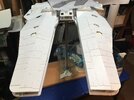
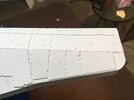
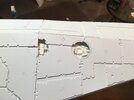
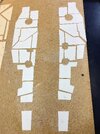
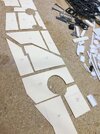
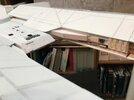
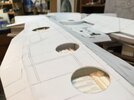
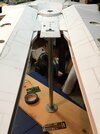
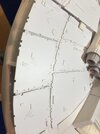
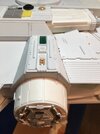
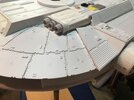
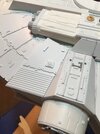
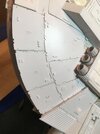
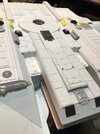
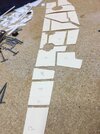
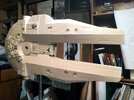
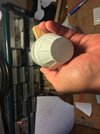
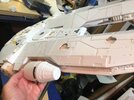
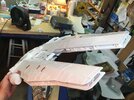
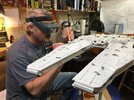
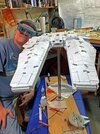
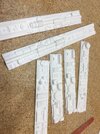
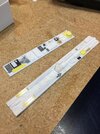
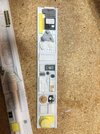
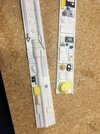
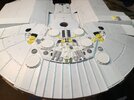
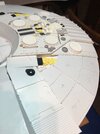
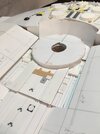
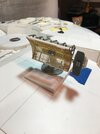
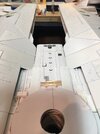
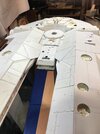
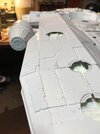
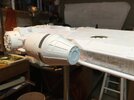
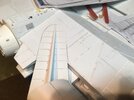
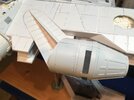
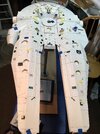
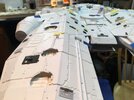
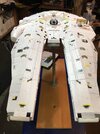
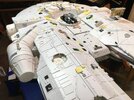
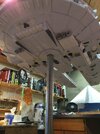
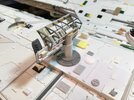
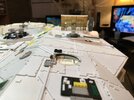
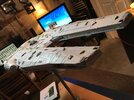
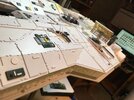
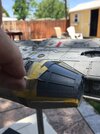
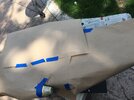
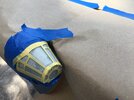
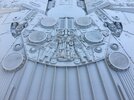
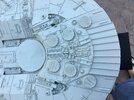
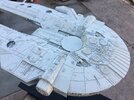
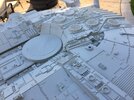
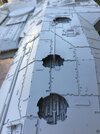
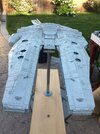
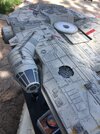
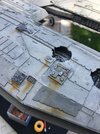
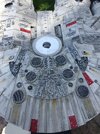
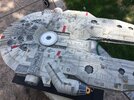
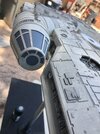
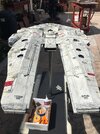
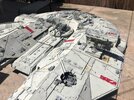
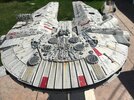
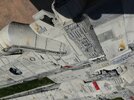
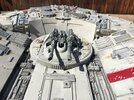
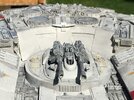
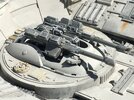
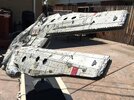
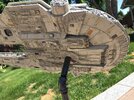
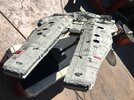
Hey, first time posting in years. I'm going to post this in sections to keep it interesting. A few years back I was wanting to attend Wonderfest in Louisville, KY and I didn't want to go empty-handed to the model competition so, I started looking for design ideas online. I had never built Star Wars anything but, when I I saw some Star Wars-style concept art by Gavin Rothery that I really liked, I knew that was what I wanted to try. It was his riff on the Falcon and something about it really stood out for me. The more I looked at it, working the angles in my mind, the more I could see how I could pull it off but, I didn't want a small build. I wanted something big. The only pics I could find from him were renders at low rez, and there were no orthos of his design so, I had to draw it out draftsman-style, using his pics as guidance, then I enlarged it to something that could be a filming model size. I started trying to interpret surface details with what I could ID from his thumbnails and noticed a few were the standard Falcon detail parts. I didn't have any of those so, I resigned myself that I would have to scratch pretty much all of it....till my friend, Blappy, stepped in with a surprise karma bomb gift of cast resin detail parts. Saved me a TON of time and Blappy, I thank you again. I couldn't call it the Falcon so, what's in the family like that? Kestrel. The Millennium Kestrel was "hatched" and the build began. Enjoy and hit me up with questions you may have.
tumblr_22e0c0d7e85984c5e979da77f520c55d_f56c1d5d_1280.jpg
tumblr_77a8b22e15d0670868cd727a92eb2dea_9794e5a4_1280.jpg
tumblr_d1b3e161cd9fe84a28ff4dba3825e6c5_c52cda99_1280.jpg
1.JPG
2.JPG
3.JPG
4.JPG
5.JPG
10.JPG
12.JPG
13.JPG
16.JPG
17.JPG
18.JPG
19.JPG
21.JPG
22.JPG
 
Pt. 2. The renders doesn't have a radar dish so, I wanted one but, not the round one from ANH so, I kind of riffed off JJ's rectangle design. Using brass parts from a 1/96 radar I had laying around, and some brass wire, I made it work. The sides were next, and not having a Sealab kit, scratched those too. The main gun was next. A discarded PC mouse was the base, with various tubes and wires to try to knock something up that would pass a "guns". The cladding is .020 sty with .040 ribbing, for strength.
 

Attachments

  • 23.JPG
    23.JPG
    113 KB · Views: 56
  • 25.JPG
    25.JPG
    177.5 KB · Views: 56
  • 24.JPG
    24.JPG
    251.3 KB · Views: 54
  • 27.JPG
    27.JPG
    144.8 KB · Views: 53
  • 29.JPG
    29.JPG
    203.3 KB · Views: 58
  • 30.JPG
    30.JPG
    287.7 KB · Views: 54
  • 34.JPG
    34.JPG
    251.5 KB · Views: 49
  • 32.JPG
    32.JPG
    258.9 KB · Views: 50
  • 31.JPG
    31.JPG
    292.1 KB · Views: 48
  • IMG_2313.JPG
    IMG_2313.JPG
    231.1 KB · Views: 46
  • IMG_2301.JPG
    IMG_2301.JPG
    174.3 KB · Views: 45
  • IMG_2300.JPG
    IMG_2300.JPG
    167 KB · Views: 44
  • IMG_2294.JPG
    IMG_2294.JPG
    175.4 KB · Views: 48
  • 35.JPG
    35.JPG
    236.8 KB · Views: 48
  • IMG_2332.JPG
    IMG_2332.JPG
    2.3 MB · Views: 44
  • IMG_2333.JPG
    IMG_2333.JPG
    1.9 MB · Views: 44
  • IMG_2334.JPG
    IMG_2334.JPG
    1.7 MB · Views: 50
Pt. 3. The length of the mandibles dictated I couldn't use an existing Falcon kit so, had to make the tops and bottoms of the "escape pod arms" bigger. It was like building two starfleet shuttlecraft, TBH. I didn't feel like building another gun for the bottom (that hardly anyone would see) so, I used that point as the hole for the display stand, which was galvanized pipe. More test-fitting to make everything mirror the opposite side. Last pic is a test fit of the gun/topside.
 

Attachments

  • IMG_2364.JPG
    IMG_2364.JPG
    1.8 MB · Views: 50
  • IMG_2366.JPG
    IMG_2366.JPG
    1.6 MB · Views: 48
  • IMG_2367.JPG
    IMG_2367.JPG
    2 MB · Views: 37
  • IMG_2369.JPG
    IMG_2369.JPG
    1.8 MB · Views: 38
  • IMG_2370.JPG
    IMG_2370.JPG
    1.9 MB · Views: 35
  • IMG_2371.JPG
    IMG_2371.JPG
    1.9 MB · Views: 38
  • IMG_2374.JPG
    IMG_2374.JPG
    1.6 MB · Views: 33
  • IMG_2373.JPG
    IMG_2373.JPG
    2.2 MB · Views: 33
  • IMG_2376.JPG
    IMG_2376.JPG
    1.7 MB · Views: 36
  • IMG_2386.JPG
    IMG_2386.JPG
    1.4 MB · Views: 32
  • IMG_2395.JPG
    IMG_2395.JPG
    1.5 MB · Views: 42
  • IMG_2397.JPG
    IMG_2397.JPG
    2.2 MB · Views: 37
  • IMG_2403.JPG
    IMG_2403.JPG
    1.7 MB · Views: 37
  • IMG_2404.JPG
    IMG_2404.JPG
    1.5 MB · Views: 36
  • IMG_2405.JPG
    IMG_2405.JPG
    1.3 MB · Views: 46
Pt. 4. The bigger base skin is laid down and I started working on the stern curvature. I first tried it in one-piece fashion but, had to do it in smaller panels to avoid buckling. I mounted it on the angled stand to get a sense of how big this was going to be. When I couldn't stop smiling, I knew I was on the right track. For the cockpit, I drew out the shape, taking a few tries with file card first, to get it right. Then I cut the first layer out of .020 sty, rolled it into a cone, then I cut another layer with the windows and wrapped it around the first cone. I was going to create a lighted cockpit but two things changed that plan: 1. Time crunch for the trip to Kentucky and 2. I just didn't feel like it. The back deck was next and you can see some of Blappy's donated parts in yellow. That man is a true hero to this build.
 

Attachments

  • IMG_2406.JPG
    IMG_2406.JPG
    1.8 MB · Views: 49
  • IMG_2408.JPG
    IMG_2408.JPG
    1.9 MB · Views: 42
  • IMG_2410.JPG
    IMG_2410.JPG
    1.4 MB · Views: 39
  • IMG_2416.JPG
    IMG_2416.JPG
    1.4 MB · Views: 35
  • IMG_2420.JPG
    IMG_2420.JPG
    1.4 MB · Views: 36
  • IMG_2423.JPG
    IMG_2423.JPG
    1.4 MB · Views: 34
  • IMG_2425.JPG
    IMG_2425.JPG
    1.6 MB · Views: 36
  • IMG_2426.JPG
    IMG_2426.JPG
    1.6 MB · Views: 35
  • IMG_2436.JPG
    IMG_2436.JPG
    1.9 MB · Views: 34
  • IMG_2435.JPG
    IMG_2435.JPG
    2.3 MB · Views: 38
  • IMG_2440.JPG
    IMG_2440.JPG
    1.8 MB · Views: 36
  • IMG_2441.JPG
    IMG_2441.JPG
    1.8 MB · Views: 37
  • IMG_2443.JPG
    IMG_2443.JPG
    2.9 MB · Views: 40
  • IMG_2444.JPG
    IMG_2444.JPG
    1.9 MB · Views: 38
  • IMG_2448.JPG
    IMG_2448.JPG
    1.8 MB · Views: 35
  • IMG_2450.JPG
    IMG_2450.JPG
    2.1 MB · Views: 38
  • IMG_2452.JPG
    IMG_2452.JPG
    749.6 KB · Views: 44
  • IMG_2456.JPG
    IMG_2456.JPG
    801.8 KB · Views: 54
Pt 5. Next was the detailing beginning on the bottom. Being lazy, I pulled out some older molds I had made for a large scratchbuilt battlestar I did. The under "rockets" was next from a block of resin, and details being added on that. Back to the back deck. The vents/fans were made from the docking ring of a 1/32 Apollo Command Module from Monogram and the screen was cut to size, a mold made, and I cast 6 of them. Works like a charm. Since I decided lights weren't going to be added, I didn't have to worry about lighting the engine area so, I moved onto to the final base skin before the paneling began.
 

Attachments

  • IMG_2457.JPG
    IMG_2457.JPG
    693 KB · Views: 51
  • IMG_2458.JPG
    IMG_2458.JPG
    720 KB · Views: 52
  • IMG_2459.JPG
    IMG_2459.JPG
    1.6 MB · Views: 48
  • IMG_2464.JPG
    IMG_2464.JPG
    588.3 KB · Views: 50
  • IMG_2465.JPG
    IMG_2465.JPG
    783.7 KB · Views: 45
  • IMG_2476.JPG
    IMG_2476.JPG
    1.5 MB · Views: 51
  • IMG_2478.JPG
    IMG_2478.JPG
    2.1 MB · Views: 47
  • IMG_2484.JPG
    IMG_2484.JPG
    2.2 MB · Views: 67
  • IMG_2489.JPG
    IMG_2489.JPG
    2 MB · Views: 67
  • IMG_2490.JPG
    IMG_2490.JPG
    1.9 MB · Views: 64
  • IMG_2491.JPG
    IMG_2491.JPG
    2.6 MB · Views: 57
  • IMG_2497.JPG
    IMG_2497.JPG
    2.1 MB · Views: 52
  • IMG_2499.JPG
    IMG_2499.JPG
    2.5 MB · Views: 47
  • IMG_2501.JPG
    IMG_2501.JPG
    2.6 MB · Views: 45
  • IMG_2506.JPG
    IMG_2506.JPG
    1.9 MB · Views: 57
Pt. 6. Let's talk about hull paneling. As everyone knows, those ILM boys/girls are a crafty bunch and to replicate the distinct paneling on the Falcon, I would have to figure out how to do it without wasting a ton of styrene. Enter: file folders. I drew guide lines on the hull, using Gavin's renders as a guide, then cut each panel out of file card with an Xacto and metal ruler, laid them on the mandibles and checked for fit. When they worked, I then traced them onto sheet styrene and cut them out. For the opposite mandible, I just flipped the cards, traced them onto more styrene sheet, and cut them out. I used a nibbler to make the notches and cleaned up the edges with a file.
 

Attachments

  • IMG_2541.JPG
    IMG_2541.JPG
    2 MB · Views: 45
  • IMG_2543.JPG
    IMG_2543.JPG
    1.8 MB · Views: 38
  • IMG_2544.JPG
    IMG_2544.JPG
    1.6 MB · Views: 37
  • IMG_2546.JPG
    IMG_2546.JPG
    1.4 MB · Views: 39
  • IMG_2549.JPG
    IMG_2549.JPG
    1.7 MB · Views: 39
  • IMG_2552.JPG
    IMG_2552.JPG
    1.9 MB · Views: 37
  • IMG_2554.JPG
    IMG_2554.JPG
    1.8 MB · Views: 33
  • IMG_2555.JPG
    IMG_2555.JPG
    1.7 MB · Views: 34
  • IMG_2556.JPG
    IMG_2556.JPG
    1.5 MB · Views: 36
  • IMG_2557.JPG
    IMG_2557.JPG
    1.5 MB · Views: 34
  • IMG_2540.JPG
    IMG_2540.JPG
    2.5 MB · Views: 33
  • IMG_2537.JPG
    IMG_2537.JPG
    2.2 MB · Views: 34
  • IMG_2493.JPG
    IMG_2493.JPG
    1.6 MB · Views: 31
  • IMG_2494.JPG
    IMG_2494.JPG
    1.3 MB · Views: 29
  • IMG_2496.JPG
    IMG_2496.JPG
    1.5 MB · Views: 29
  • IMG_2519.JPG
    IMG_2519.JPG
    941.6 KB · Views: 29
  • IMG_2520.JPG
    IMG_2520.JPG
    1.6 MB · Views: 32
  • IMG_2522.JPG
    IMG_2522.JPG
    1.7 MB · Views: 28
  • IMG_2523.JPG
    IMG_2523.JPG
    1.6 MB · Views: 31
  • IMG_2524.JPG
    IMG_2524.JPG
    1.1 MB · Views: 30
  • IMG_2531.JPG
    IMG_2531.JPG
    1.7 MB · Views: 28
  • IMG_2536.JPG
    IMG_2536.JPG
    2.4 MB · Views: 44
Pt. 7. Next was the side details. Again, as everyone knows, the Falcon is loaded with details and greeblies on the sides but, I didn't want to spend weeks on each panel so, masters were made, molds poured and castings were made from that. More detailing took place, with more of Blappy's incredible greeblies, and me making what I couldn't find. Test fitting continued, making slight corrections here and there till it resembled Gavin's version. The test fitting and completion of the cockpit happened about this time and, thinking of the incredible Lasse Henning, I threw a few shots of me in there for scale.
 

Attachments

  • IMG_2612.JPG
    IMG_2612.JPG
    2.2 MB · Views: 48
  • IMG_2610 - Copy.JPG
    IMG_2610 - Copy.JPG
    480.9 KB · Views: 44
  • IMG_2606.JPG
    IMG_2606.JPG
    1.8 MB · Views: 40
  • IMG_2602.JPG
    IMG_2602.JPG
    2.5 MB · Views: 38
  • IMG_2616.JPG
    IMG_2616.JPG
    1.2 MB · Views: 34
  • IMG_2619.JPG
    IMG_2619.JPG
    1.7 MB · Views: 38
  • IMG_2622.JPG
    IMG_2622.JPG
    1.8 MB · Views: 36
  • IMG_2627.JPG
    IMG_2627.JPG
    2.1 MB · Views: 38
  • IMG_2636.JPG
    IMG_2636.JPG
    2.2 MB · Views: 42
  • IMG_2646 - Copy.JPG
    IMG_2646 - Copy.JPG
    6.2 MB · Views: 40
  • IMG_2600.JPG
    IMG_2600.JPG
    1.6 MB · Views: 40
  • IMG_2598.JPG
    IMG_2598.JPG
    1.6 MB · Views: 37
  • IMG_2562.JPG
    IMG_2562.JPG
    2.4 MB · Views: 37
  • IMG_2563.JPG
    IMG_2563.JPG
    1.8 MB · Views: 31
  • IMG_2564.JPG
    IMG_2564.JPG
    1.8 MB · Views: 33
  • IMG_2572.JPG
    IMG_2572.JPG
    1.8 MB · Views: 32
  • IMG_2574.JPG
    IMG_2574.JPG
    1.6 MB · Views: 34
  • IMG_2576.JPG
    IMG_2576.JPG
    1.4 MB · Views: 32
  • IMG_2580.JPG
    IMG_2580.JPG
    1.6 MB · Views: 38
  • IMG_2583.JPG
    IMG_2583.JPG
    1.6 MB · Views: 39
  • IMG_2589.JPG
    IMG_2589.JPG
    1.5 MB · Views: 33
  • IMG_2593.JPG
    IMG_2593.JPG
    1.7 MB · Views: 45
Pt. 8. Cockpit access tube was built up from sty card at .040, and more hull detailing started going on. About this time is when I couldn't stop grinning. It was nearly ready for paint and markings.
 

Attachments

  • IMG_2648.JPG
    IMG_2648.JPG
    1.5 MB · Views: 41
  • IMG_2649.JPG
    IMG_2649.JPG
    1.8 MB · Views: 33
  • IMG_2657.JPG
    IMG_2657.JPG
    1.6 MB · Views: 31
  • IMG_2660.JPG
    IMG_2660.JPG
    1.6 MB · Views: 36
  • IMG_2665.JPG
    IMG_2665.JPG
    2 MB · Views: 36
  • IMG_2666.JPG
    IMG_2666.JPG
    1.6 MB · Views: 37
  • IMG_2669.JPG
    IMG_2669.JPG
    2 MB · Views: 34
  • IMG_2670.JPG
    IMG_2670.JPG
    1.9 MB · Views: 38
  • IMG_2672.JPG
    IMG_2672.JPG
    2 MB · Views: 39
  • IMG_2676.JPG
    IMG_2676.JPG
    2 MB · Views: 38
  • IMG_2677.JPG
    IMG_2677.JPG
    1.6 MB · Views: 35
  • IMG_2679.JPG
    IMG_2679.JPG
    1.7 MB · Views: 40
  • IMG_2682.JPG
    IMG_2682.JPG
    2.1 MB · Views: 39
  • IMG_2684.JPG
    IMG_2684.JPG
    1.9 MB · Views: 43
Pt. 9. When I was happy with everything I moved on to the base coat of paint. Rattle can was the order of the day (Testors MM) and I gave her about two coats overall. The gun was painted separately and attached later. I used different colors for the cockpit windows, to simulate "glass". Next up, the wash and decals, and dullcoat.
 

Attachments

  • IMG_2710.JPG
    IMG_2710.JPG
    1.8 MB · Views: 45
  • IMG_2709.JPG
    IMG_2709.JPG
    2.3 MB · Views: 40
  • IMG_2708.JPG
    IMG_2708.JPG
    2.2 MB · Views: 40
  • IMG_2707.JPG
    IMG_2707.JPG
    2.1 MB · Views: 39
  • IMG_2703.JPG
    IMG_2703.JPG
    2.3 MB · Views: 39
  • IMG_2701.JPG
    IMG_2701.JPG
    2.4 MB · Views: 41
  • IMG_2699.JPG
    IMG_2699.JPG
    2.1 MB · Views: 43
  • IMG_2698.JPG
    IMG_2698.JPG
    1.6 MB · Views: 37
  • IMG_2689.JPG
    IMG_2689.JPG
    2.2 MB · Views: 48
Pt. 10. Finally at the end, the washing could start. I used a combination of both paint thinned and acrylic cut with water. The Testers spray grabs the acrylic pretty nice. I wiped excess with a folded clean paper towel. The red/gray markings are painted on, using masking fluid for the "chipped areas". I made sure to wait for a nice sunny day to take the beauty shots. The data plate was custom made. Enjoy.
 

Attachments

  • IMG_2713.JPG
    IMG_2713.JPG
    2.5 MB · Views: 95
  • IMG_2715.JPG
    IMG_2715.JPG
    2.3 MB · Views: 79
  • IMG_2717.JPG
    IMG_2717.JPG
    3.3 MB · Views: 67
  • IMG_2722.JPG
    IMG_2722.JPG
    2.9 MB · Views: 67
  • IMG_2724.JPG
    IMG_2724.JPG
    1.9 MB · Views: 64
  • IMG_2727.JPG
    IMG_2727.JPG
    2.5 MB · Views: 71
  • IMG_2745.JPG
    IMG_2745.JPG
    2.7 MB · Views: 72
  • IMG_2748.JPG
    IMG_2748.JPG
    3 MB · Views: 67
  • IMG_2751.JPG
    IMG_2751.JPG
    1.5 MB · Views: 65
  • IMG_2753.JPG
    IMG_2753.JPG
    2.1 MB · Views: 47
  • IMG_2755.JPG
    IMG_2755.JPG
    2.7 MB · Views: 48
  • IMG_2758.JPG
    IMG_2758.JPG
    1.7 MB · Views: 53
  • IMG_2759.JPG
    IMG_2759.JPG
    1.7 MB · Views: 66
  • IMG_2784.JPG
    IMG_2784.JPG
    2.5 MB · Views: 63
  • IMG_2786.JPG
    IMG_2786.JPG
    3.3 MB · Views: 72
  • IMG_2793.JPG
    IMG_2793.JPG
    2.5 MB · Views: 98

Your message may be considered spam for the following reasons:

If you wish to reply despite these issues, check the box below before replying.
Be aware that malicious compliance may result in more severe penalties.
Back
Top