Boushh Helmet build

Fantastic job on the weathering so far. This thread has really giving me a new appreciation for this helmet. Can't wait to see the finished piece.

Thanks! But ermm... I haven't started painting yet? What weathering are you referring to? Or do you mean the physical weathering? ;)
 
Ahh, thanks! It was addictive adding the scars, trust me! ;)

Sadly im overseas for a week, so will not be able to do any more until this weekend.
 
So while overseas and unable to continue on my project, I did further research and lo and behold, discovered that I had made a mistake with one of the battle scars! They were streaking in the wrong direction! Something I need to remedy when I get back:

Photo%2018-5-15%2010%2021%2002%20am%201_zpsnlehbiwp.jpg
 
So, you may want to consider using a 2 part putty (sometimes reffered to green or grey stuff) to fill gaps and fix mistakes. Guessing you have been using plastico or something like it?
 
So, you may want to consider using a 2 part putty (sometimes reffered to green or grey stuff) to fill gaps and fix mistakes. Guessing you have been using plastico or something like it?

Yes, the 2 part epoxy putty that I am using is the Tamiya one. Really great quality, hard and smooth drying:

41NtYPOSSrL.jpg
 
Ahh very nice! It looked like plastico for a moment there :$

I will need to take pictures of my build, Ive stalled for the moment as I am having trouble finding leather. Also trying to build my own electronics for the visor, along with fans to help keep the wife comfortable while wearing the bucket.
 
Ive stalled for the moment as I am having trouble finding leather.

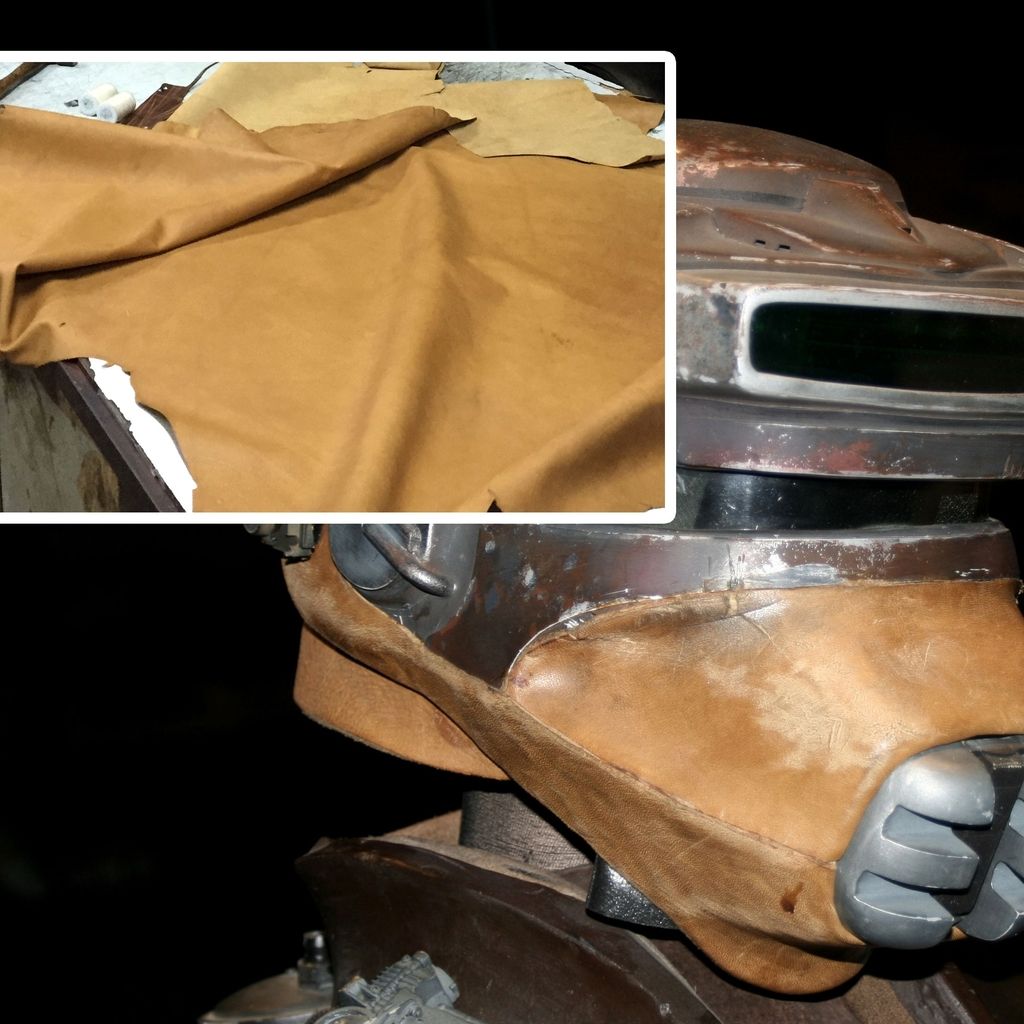
Yes the leather is a tricky one. I scoured high and low to find this (see the inset picture):

leather_zpsptysouz0.jpg


It is a 2mm thick calf leather, that in my opinion most closely resembles the base colour of the actual leather. Here are a couple of things I concluded when looking at the original:

1. The snout is a thinner one compared to the back covering piece and the strap. The snout also has a smoother texture compared to the back piece. The back is definitely cowhide, as can be seen by the texture, but for the life of me, I couldn't find cowhide that is exactly the same colour as the snout leather that I found. As such, I will be folding 2 pieces together to simulate the thickness.

2. The original piece reveals a lighter tan colour when scratched. When I tried to scratch mine, the colour doesn't get much lighter. I guess when I come to it, I will scratch the leather, rub in a tan colour, and blend it in. Hopefully I can get it as realistic as possible. I really like the base colour of the leather that I found, so I will weather it from this starting point. I am foreseeing several tones of greys, browns, tans and oranges.

I do have a pretty big piece of leather, and if you are keen, we can work something out.
 
Last edited:
FYI!!! the calf hide recommended in the Kit instructions is the correct thickness. Get and non-dyed hide. When you wet it to soften it up so that it wraps, it will darken. Then you can use oil or just rub it with you hands to get the correct color and sheen. Check out the pics on my thread of when I first put the leather on. Just getting it wet darkened it a lot. The original leather was very light and unstained.
 
Yes I figured it was non dyed to begin with. But where I come from, we don't get that. So had to look for one with the closest resemblance.
 
Last edited:
Have not been able to continue the helmet over the last week as I was overseas, and now that I'm back, I'm a little busy with other projects and errands. Nevertheless, here's a little update:

Thanks to Katscan, I ordered the C3PO part for the Boushh Rangefinder antenna thingy. It arrived today, and here it is:

Photo-26-5-15-4-25-13-pm_zpsph5l4wnq.jpg


To be honest, I've never ordered 3D printed stuff before, and I'm quite puzzled by the grainy feel to it. It's not outright rough, but not smooth either. Luckily, this is a small part, and then only part of it will be used (red rectangle), there are only a few areas that need to be smoothened out. I'll see how it goes when I get to it.
 
Last edited:
Ya, looks like it was done on an SLS machine which laser sinters plastic powder together as opposed to an SLA which does the same except the laser cures resin. The SLA is much smoother however the SLS is very strong. For this small part with lots of fine detail the SLA should have been used, hopefully your part is still usable.
 
Ya, looks like it was done on an SLS machine which laser sinters plastic powder together as opposed to an SLA which does the same except the laser cures resin. The SLA is much smoother however the SLS is very strong. For this small part with lots of fine detail the SLA should have been used, hopefully your part is still usable.

Funny thing is, I ordered this from Shapeways, and specifically chose this:
[h=5]
Polished Metallic Plastic
[/h]Grey nylon plastic with a subtle metallic sparkle and polished sheen (formerly Polished Alumide.)

But apparently it came more like this:


[h=5]White Strong & Flexible[/h]White nylon plastic with a matte finish and slight grainy feel.

I have sent an email to Shapeways for clarification. Let's see what they say.

Worst case, I can slightly bondo the part, or scratch build it, but I'm just not feeling the love at this moment.
 
Last edited by a moderator:
If anyone is in the area, the original Boushh costume (along with a ton of others from SW) is currently on display at the EMP Museum in Seattle Washington until October
 
If anyone is in the area, the original Boushh costume (along with a ton of others from SW) is currently on display at the EMP Museum in Seattle Washington until October

Unfortunately, I am in Singapore, on the other side of the planet. Take more photos!

So here's a little update:

Masked up the parts where the leather will go, so that the paint won't screw up the adhering of the leather to the helmet, and primed. Discovered some areas where more sanding is needed.

Photo%2028-5-15%205%2013%2053%20pm_zpsbagnywfl.jpg


Photo%2028-5-15%205%2021%2025%20pm_zpsodch1ar5.jpg
 
And here we go with the smoothening up of some areas. And yes, I corrected the wrong-directioned battle damage on the front left rim. ;)

Photo%2028-5-15%206%2017%2009%20pm_zpsnau9tqna.jpg
 
So while waiting for the filler to dry, I decided to make the templates for the markings on the helmet.

I made them on my Silhouette Cameo for cutting later, and saved it as a jpg for anyone to download and scale to your needs. Do note that in the actual helmet, the markings are made by sticking vinyl onto the helmet directly, and not airbrushed on. I leave it up to you to decide how you want to apply it, spray or stick. Enjoy!

Boushh20Decal_zpspjp8nqn2.jpg
 
This thread is more than 8 years old.

Your message may be considered spam for the following reasons:

  1. This thread hasn't been active in some time. A new post in this thread might not contribute constructively to this discussion after so long.
If you wish to reply despite these issues, check the box below before replying.
Be aware that malicious compliance may result in more severe penalties.
Back
Top