ASHPD - Portal Gun [image heavy, just the way you like it]

While Volpin will always have the last say on Portal Guns

That's kind of a ****ty thing to say, actually.

I think it's quite the opposite. Volpin is the guy who pioneered the build and dared to do it first, but what you're saying is kind of akin to going "Kelly Johnson? Pfft, Wilbur and Orville are the guys to talk to about airplanes..."

Volpin has the first word, and should be remembered for it, but saying the first of any replica is the unrepeatable pinnacle of that prop is kind of, well, odd, especially around here where new things are constantly being discovered and presented.
 
Volpin has the first word, and should be remembered for it, but saying the first of any replica is the unrepeatable pinnacle of that prop is kind of, well, odd, especially around here where new things are constantly being discovered and presented.

Agreed. This blows my work out of the freaking water.

I've always sort of wanted to revisit that project - the ASHPD was my first build back in the days when all I had was a dremel and an orbital sander. I've learned a lot since then, and one of the biggest lessons I've found is that my model is woefully inaccurate.

From the oval cross section of the barrel chamber, to the thin spindly claws, to the complicated rear portion of the lower front casing, every subtle nuance has been captured in this work. I'm really looking forward to the final result.

TC, if I can help in any way (I've got a pretty good cache of sound effects and decal art as well should you need it) please let me know. This is fantastic, and I can't wait to see more.
 
Fantastic!! Machining! Laser cutting! A triumph!
If you ever decide to print up a run of those blueprints, I'd love to be on the list. Thanks for the detailed build thread, very inspiring.
 
I love this prop soooooo much, and I'm so glad that someone as talented as you is tackling it, TC.

I wish I had 10% of the skill you have with curved surfaces. It still boggles my mind just how perfect those shells are.

I can't wait to see it finished!
 
I had a thought, but instead of posting it in a new post, I figured I'd post it here since it applies to the ASHPD.

I was thinking about how I would do an ASHPD if I decided to do it. Unlike most of us here, I decided to think outside the box on this. The thought that popped into my head was as followed: I know there are some people who used pieces pulled from a mold, pink foam and bondo or the paper craft method for the white "shield" pieces (basically the first piece under the barrel and the second white piece that covers the back. You know, the only white pieces on the portal gun). But thanks to Indy Mogul's Sword tutorial, it got me wondering about the use of foam.

Basically, in the build tutorial for the sword, Zack used the kind of foam that is interlocking floor foam mats that you can use in the floor of your workshop, like in the example linked. Now, I know that the shapes of those particular pieces aren't really a completely curved shape, but I'm wondering this: couldn't you use such foam floor mats (about an inch thick or less) and resin (or bondo) to harden it up and/or sand it? Or would the foam mats not retain the shape because they aren't absorbent and wouldn't be able to absorb resin or stick to bondo?

I ask because I'm surprised someone hasn't attempted this above mentioned idea (I know people have used such foam for costuming purposes). I know this isn't as insane as combustible lemons, but the question is sort of like throwing science at the wall and seeing what sticks.
 
Last edited:
Truly awesome!!!! I just finished Portal 2 and now I'm in Portal mode... Of course I knew someone would be working on a project like this on the RPF. Well done sir! Can't wait to see more!
 
The changes won't look like much, but boy was it time consuming.

First off, I added the notches on the back of the prong tips and then popped them into place.

54-prongtips.jpg

55-prongtips.jpg

Ignore the clay, I just needed something temporary to hold everything in place.
56-prongs.jpg


I then spent a great deal of time working on the rear shell. After adding the notch down the center I could tell the left side (from the player view) needed a little bulking up. It is likely you will not notice much of a difference from the previous photos, but it is there. Much more even now. You may notice I also added the slope inside of the light hole.

57-rearshell.jpg

58-rearshell.jpg

59-rearshell.jpg


Additionally, a bit of time was spent cleaning up the inside. You may notice the depth of thickness sharply changes towards the rear. This little slope is where the back of the rear body bumps up. It all fits like a glove.

60-rearbodyinside.jpg

61-shellandbody.jpg


I just need to add the shapes towards the front where the hoses for the prongs exit from, then I'll be about done with the rear body. After that it's mostly just clean up work before molding, with the exception of something to go inside of the barrel when viewed from the front. Even in Portal 2 (at least for the Xbox), they haven't added anything for when a player looks up the barrel... I have an idea for that, something that I think will make fans of the game grin when they see it.

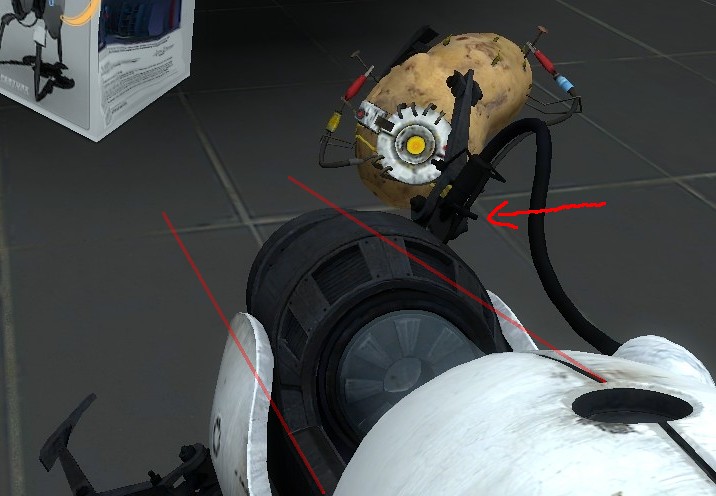
Also, I'm wondering if anyone has any ideas for the light on the top.
lightcover.jpg

It's roughly 5/8th inch in diameter, slightly bigger maybe, with a parallel pattern of lines running across the top. It would need to be clear so it could be lit with both colors. Any suggestions?
 
Clear casting resin & mold.

Submerge your LED's in the mold with resin, let cure, then treat the surface as you see fit.

Based on that picture, I'm thinking you should run a very fine sawblade along the face to give those grooves, then frost the whole thing for distribution.
 
This thread is more than 8 years old.

Your message may be considered spam for the following reasons:

  1. This thread hasn't been active in some time. A new post in this thread might not contribute constructively to this discussion after so long.
If you wish to reply despite these issues, check the box below before replying.
Be aware that malicious compliance may result in more severe penalties.
Back
Top