NCC 7100 Stargazer - From Picard's Ready Room

Took some photos with the good camera last night. I'll have them up soon.

Hey JMChladek, wish I had a chance to talk with you about your Constellation at Wonderfest. It was really great to see it in person.

I'd tossed around the idea of a base hull, with all donor parts attached, separate nacelle sub assemblies, and spaces for original refit parts. I looked a resin/fiberglass Stargazer at Wonderfest which was very nice butmade from a smoothie, which is great, but will not help my yellow model.

Unfortunately the only correct donor part was the Valkryie. I also noticed the nacelle supports we're much too short leaving the pylons much too close to the hull.

Because I am super particular about the fit of my parts I will continue to work on my own model as if it could be a master. Don't hold your breath. It's been almost two years and I still just got my X Wing droid plate master apart for a correction.
 
LOL, it isn't like I am in very much of a hurry either anyway. One other project I wouldn't mind doing is a kitbash of a pair of 1/350 Enterprise refits to make a Stargazer/Constellation class. In that event, most everything not Enterprise oriented would have to be scratchbuilt and it "might" be close to studio scale. That project won't be attempted for a few years yet either.
 
Hope those pics you took of your build turned out, Nighteyes.


Seems like there is quite a number of people who have been interested in the parts used on the Ready Room Stargazer.
 
Hey Nighteyes....I've been in the hospital with a collapsed lung much of November and December, just got released a few days ago. I was wondering if you had any new updates on your build?
 
Hi Stevielewis, so sorry to hear. I hope you are okay now! What a terrible ordeal.

The only progress Ive made has been aquiring the Guramu Zan. I owe you some photos from before though so I will get those posted.

I will have access to some equipment come Feb so Im making a new solid MDF buck for the hull. Not sure about this at this size.

Also realized I'm using the a later version of the refit kits, there are some extra holes in a few parts that need to be filled, like the notch for the wires on the nacelle halves.
 
I've been rewatching some TNG and I noticed the model stands on an acrylic rod still come Best of Both Worlds. We can see the glue on what's left of the acrylic rod on the underneath that attaches to the repaired stand.

My hope was to build a model light enough for the clear acrylic rod. We will see about the MDF master and a few vac pulls. I am hopeful but all I was really looking for was a nice smooth angle and even edge on the saucer. Hoping to at least wind up with a useful leading edge of already formed plastic.
 
I suppose there is an advantage to using one big block of MDF, namely being able to machine the saucer bevel. If you went the acrylic route, as I foolishly decided to, you'd have to bevel the edges by hand. Takes the better part of a day and the acrylic makes an irritating noise as you run the blade across it.
 
Lol. I know that noise.

The main thing Im trying to do is to keep it light enough for the relatively thin acrylic rod to go with the display base. The tapered curve around the saucer is my main concern, if I fill and sand its a potential weight gain area. Id still love to use acrylic for the top and bottom... much stronger and gives you the option for a serious fx style mount. You are doing the right thing ProfKSergev.
 
You are doing the right thing ProfKSergev.

Well, eventually I will. The stand placement on the Ready Room prop is so inelegant to me that I'm still puzzling where to put the mounting point on mine. I'd prefer it to come straight out the back between the impulse engines, but the detail there would have to be compromised.

Speaking of which, have you been watching the new Blu Rays? There are two clear shots of the impulse deck in Peak Performance, but I'm almost certain one of them incorporates an inaccurate CG replacement to mask underexposure. And of course they're of the larger, Jein-built miniature.
 
Better views help either way, since Jein detailed the larger model to look like the ready room version. I'm still hoping for better shots of the yellow model when they get to later seasons. I was under the impressions they were recombining the original film elements and only using the computer for the compositing and replacing of the video effects like phasers and beaming. I think you'll get a better look at the Jein model as log as they didn't loose the film. They look amazing but I've only seen season one.

Plenty of wiggle room for you at this scale though with an idea of what is supposed to be there detail wise. If I were you I'd put the mounting point on the back center and use the Orguss bit as the cover. You could probably get another mount under the xabungle mech detail are too.
 
Trekcore already has some excellent BluRay screen caps of the Jein studio model of the Stargazer up from "The Battle" and a couple sampler images of the Hathaway from "Peek Performance". I copied the season 1 screen caps of the Gazer and it revealed a few interesting details, including white numbers on the side shuttle bays like what the Reliant had.

TrekCore Star Trek Multimedia Screencaps and Information!
TNG :: TrekCore

We likely won't see a decent shot of the Ready Room model until "Who Watches the Watchers" as there was a scene where Picard was conversing with a native of the planet in his office and she was looking over the Stargazer model briefly in the foreground of the shot.
 
Hi Nighteyes. Thanks for the get well wishes and all. No problem with getting your pics posted if you don't have the time right now. I was just curious if you had gotten any more work done on your build.
 
Finally some photos.

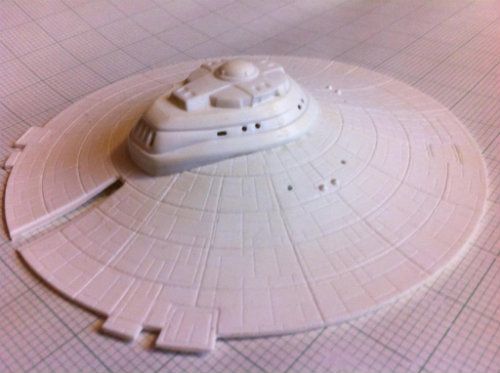
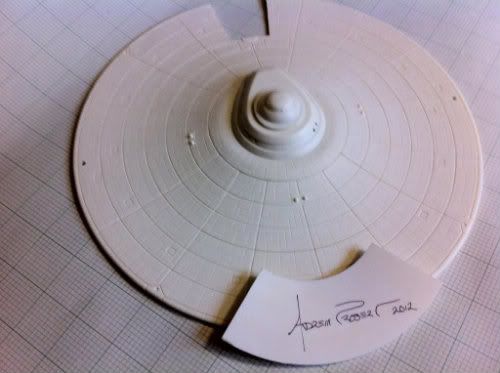
I am often quite particular about the fit and construction of model parts. So much so that I am diverging from the reference material here and there. Since my goal is to keep the model as light as possible I'm using styrene as often as possible. Here a bridge upper is attached to the lower saucer using a little extra plastic around the gap. The 12 holes have been filled with segments of sprue and I have left some extra saucer detail around the edge.
image-1_zps9b42233b.jpg


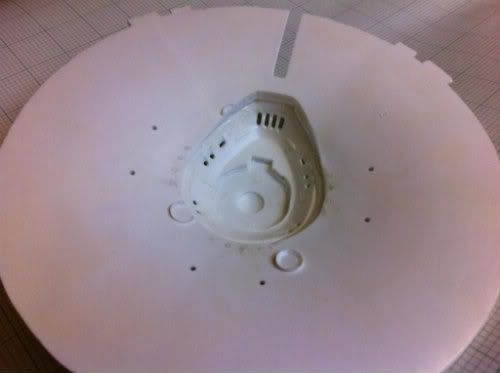
Excess plastic has removed from the interior.
image-1_zpsf69a5ce4.jpg


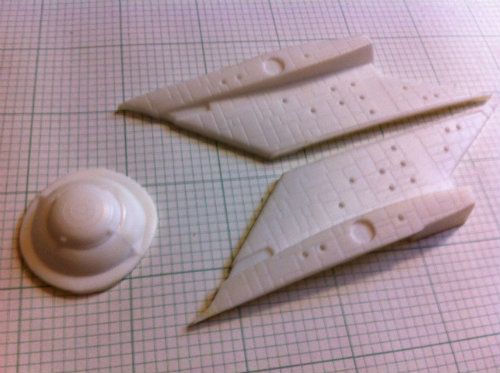
In order to avoid breaking the rings detail when combining bridge dome halves I only trimmed the rear half of the part from underneath. This way there is less of a seam on top. One thing Im not sure the kits out there get is the distance between the hull and the nacelles. To my eye it looks like only half of the kit part was used and combined with some extra scratched neck. Only half way through some trimmings on these parts.
image-1_zps3772bb15.jpg


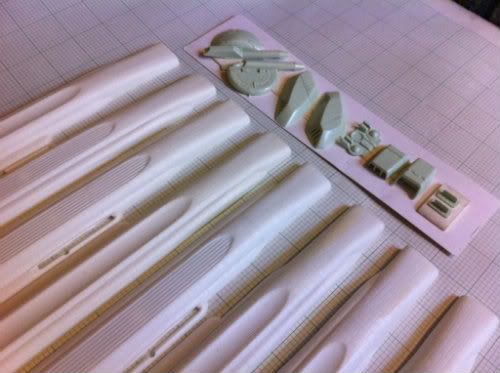
This may be the only time the awful tile detail can be tolerated. It also makes a handy guide to cutting the nacelles the correct length. I'd love to know what details are on the flat ends. These parts are from later editions of the refit kit so the round notch on the interior nacelle halves will have to be corrected. Orguss bits now sit flat.
image-1_zpsdff737be.jpg


Swappable panels fit is very good.
image-1_zps0cd54f67.jpg
 
Wait a sec. I thought the bottom of the Stargazer model was supposed to be an upper saucer piece from a 1/537 Enterprise, not a lower saucer with the B/C deck grafted onto it.

EDIT: Okay, I suppose maybe it is (at least for the Ready Room model) as I checked the Drexler photos again. So I'm assuming Jein might have gone with a pair of upper saucers when the effects model was made since I've always thought it was two upper saucers as opposed to an upper and lower saucer with the teardrop grafted to it. Learn something knew everyday I guess.

Nice work so far!
 
Last edited:
Hmmm, now I'm curious. Yes, the evidence suggests bottom. But there is a pretty pronounced rake on the E saucer bottom that likely would interfere with how the Xubungle roboman body fits.

Although, I do admit it has some of the lower saucer tells, such as the docking hatch port on the starboard front side, the landfall footpad on the front port side and the window holes. It seems like somebody would have to have gone to a lot of trouble to scribe those details when they ended up just grinding off the details from the fourth ring out. It makes me wonder if perhaps they grafted the inner section of a lower saucer out to the third ring with an upper saucer from the fourth ring to the edge (which you seem to be working on).

To quote a certain pointy eared science officer... fascinating. I'm enjoying the work to this point.
 
Okay, I can see it. Fourth ring I can see an edge where it was blended probably into a disk of acrylic or styrene. Your interpretation of it looks very nice.

Considering Sternbach's drawings that were used as a basis for the Okudagrams from "Peak Performance" seem to suggest upper saucer halves, I have to wonder since he worked on the Ready Room model if he was secretly thinking "this would have been A LOT easier model to build if we used ******* upper saucer halves!" ;)
 
Haha! So much easier the other way.

Yes it does make you wonder what they were thinking with their transplant, especially when nearly all of the detail unique to the lower saucer has been lost. I like your theory that it was simpler to utilize two uppers for the studio model. Checking The ProfK build it appears he is using the lower saucer as well. As does the micro machines version.

I'll bet xabungle is there to cover the opening for the refit neck. I hope one of these can be found, and it also appears there is another part attached to the feet. Another Stargazer mystery.
 
Yup, I'm looking at my Micro Machines Gazer right now. All things considered, they did a pretty good job rendering the thing. Its got some simplifications to the design in spots, but overall it is a nice little 3D reference to glance at in a pinch.

I have to wonder if the multiple views that Drexler posted might have been shot for Micro Machine references since it covers a lot of the angles and even though the mini has NCC-2893 on it, it is painted a tan/yellow color, just like the ready room model.
 
This thread is more than 7 years old.

Your message may be considered spam for the following reasons:

  1. This thread hasn't been active in some time. A new post in this thread might not contribute constructively to this discussion after so long.
If you wish to reply despite these issues, check the box below before replying.
Be aware that malicious compliance may result in more severe penalties.
Back
Top