scotthothpatrol
Well-Known Member
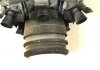
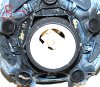
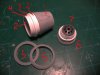
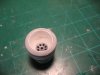
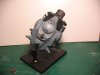
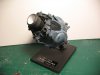
I happened to come across some pictures that Jason Eaton had posted a while back showing better views of the 223 pod from the Star Wars Chronicles Vehicles book. They really gave good info on the back end of the thing that had been missing from other reference material. From these picts I could not help but to give my own 223 model a reboot The engine looked like it was machined. Not having that kind of equipment I went for the next best thing which is to scratch build my own. I don't know the measurements for it so I went with my best guess. Perhaps this will inspire some one to try there own reboot. The parts I used are as follows:
1 Airfix 1/144 Saturn V parts 62 and 63 (I made castings so I could keep the originals)
2 Plastruct TB-36
3Plastruct TB-40
4 Styrene strip .01
5 Plastruct RI-32
6 Airfix 1/144 Saturn V 1st stage engine
7 Tamiya Hanomag wheel (my own addition not used on original)
8 I also noticed an additional kit part used on the rear end. It looks like The Tamiya 8 Rad part A-19 is a good match so I went with that. Also the part that sits on it is cut off the rod and turned the other way. The cavity the engine sits in I added some detail for interest.