So I've been doing a ton of research on ANH graflex and I'm trying to make this build 100% vintage. I know that this might not be 100% movie accurate, but I'm trying to get it as close as I can to promo/screen accuracy while keeping it 100% vintage. It has taken me quite a bit of time to hunt down and acquire these parts. Now that I have all the parts I need for this all vintage build, I though I would share my findings. When I can find the time I will post pic's of it all together. First is the early Folmer No, patent # Graflex.


Next is the Exactra 20 calculator. Thanks to Crucible Custom Props! Scott is milling the bubble strip to size for me ATM.

Next we have the saberfreak vintage T-tracks. I know that no one really knows for sure where the original grips come from. I personally believe that most likely, a few different types of T-tracks were used over the years and Roger Christian has said a few conflicting things over the years. It's understandable that at his age and how fast he put this lightsaber prop together over 40yr ago that he doesn't recall every detail about the prop, and if there were different sources on different sabers/blasters. That being said I was able to source the last of Kal's T-tracks (Thanks man!) These are the same tracks that Kal sent to Roger Christian when he was recreating the original ANH prop for his personal collection. Here is a photo of the T-tracks before I have cut, sanded and paint them. Also a photo of Roger holding the same T-tracks in this lap that I'm using, and a screen shot of an interview with Christian saying these are the same grips he used on the original prop. As I stated before I'm going for 100% vintage so these work for my build.


Last but not least! This pain in the ass D-ring and ring bracket. So we do not have a photo of the bottom of ANH flex as of today. So all I can do is go off the info we do have. Using the photos that are available and WW. reverse engineering, I had come to conclusion that the ( ring bracket ) is made of aluminum and the D-ring is stainless steel. I was able to get the right size D-ring off of an old vintage case. Here are the measurements of the WW. D-ring and my vintage one.


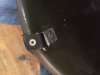
I was pretty happy to have found the correct size vintage d-ring! The ring bracket that I was going to use was off the case also, but it just didn't seem right. I really believe that the bracket is aluminum. So I was on the hunt again... Eventually I came across this old, WWII German helmet. I happen to walk by it and just decided to take a look.when I look inside.. I say to my self ( that looks an awful lot like the WW bracket and it's ALUMINUM! SOLD!
Next is the Exactra 20 calculator. Thanks to Crucible Custom Props! Scott is milling the bubble strip to size for me ATM.
Next we have the saberfreak vintage T-tracks. I know that no one really knows for sure where the original grips come from. I personally believe that most likely, a few different types of T-tracks were used over the years and Roger Christian has said a few conflicting things over the years. It's understandable that at his age and how fast he put this lightsaber prop together over 40yr ago that he doesn't recall every detail about the prop, and if there were different sources on different sabers/blasters. That being said I was able to source the last of Kal's T-tracks (Thanks man!) These are the same tracks that Kal sent to Roger Christian when he was recreating the original ANH prop for his personal collection. Here is a photo of the T-tracks before I have cut, sanded and paint them. Also a photo of Roger holding the same T-tracks in this lap that I'm using, and a screen shot of an interview with Christian saying these are the same grips he used on the original prop. As I stated before I'm going for 100% vintage so these work for my build.
Last but not least! This pain in the ass D-ring and ring bracket. So we do not have a photo of the bottom of ANH flex as of today. So all I can do is go off the info we do have. Using the photos that are available and WW. reverse engineering, I had come to conclusion that the ( ring bracket ) is made of aluminum and the D-ring is stainless steel. I was able to get the right size D-ring off of an old vintage case. Here are the measurements of the WW. D-ring and my vintage one.
I was pretty happy to have found the correct size vintage d-ring! The ring bracket that I was going to use was off the case also, but it just didn't seem right. I really believe that the bracket is aluminum. So I was on the hunt again... Eventually I came across this old, WWII German helmet. I happen to walk by it and just decided to take a look.when I look inside.. I say to my self ( that looks an awful lot like the WW bracket and it's ALUMINUM! SOLD!
Attachments
Last edited:


.JPG")


")