Hamilton: An American Musical - King George III

Re: Hamilton: An American Musical - King George and Hamilton/Washington

I've got an event coming up next week so everything else is on hiatus until costumes for that are finished, but I managed to get a few more things done on this first.

I’ve been putting off this part of the crown for a long time, but I finally found the right gold paint which made me realize that the end of this thing is actually kind of in sight. So I sat down and hashed out the actual foundation of the crown. Sorry there aren’t many photos, but I was kind of making things up as I went and didn't think to stop.

The hat base is a cheap velour bowler from a Halloween store.
20170425_135638.jpg
The brim was wider than I needed, so I had earlier cut it down by half. It ended up being too small compared to the diameter of the crown, but luckily I had saved the cut-off brim piece (pays to be a hoarder), so I glued and stitched it back on. Putting the crown over the brim, I marked where the crown sat, and then cut the brim back down along that line with about 1/2” of allowance. From there I did a bunch of measuring and marked where the center top ball/cross piece will sit and punched a hole for that.

I had also earlier cut the red velvet cover for the top, so that was technically ready to go. But I made another dumb whoopsie and had to fix it first. I cut the circle down by an inch thinking it was too large/full, but after gathering the edge and testing it with the hat and crown, I realized the velvet was too tight and the gathers weren’t doing much. Which made it too flat and low compared to the height of the crosses and fleur-de-lis around the edge, and the fullness didn’t match the reference photos. It needed padding underneath for support, which meant the velvet was now too small and I needed that extra inch back. I do have more of the velvet, but I didn’t want to throw away the piece I was already using, so I repeated the hat fix and sewed/glued the strip of fabric back on. This was really unnecessary, but it did work and it made me feel good about not wasting materials I guess.

In the meantime, I glued very thin and semi-flat pieces of poly fill to the very top edge of the hat like a halo.
20170615_141909 copy.jpg 20170615_141919 copy.jpg
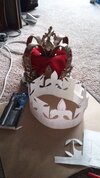
I built it up slowly, testing it with the velvet and crown, and ended up with two thin layers. I regathered the velvet and put it on, then put the crown over that, and voila! It looked like it was supposed to. I marked where I wanted the velvet to sit (a little higher than level with the brim so I’d get yet more more fullness on the top) and glued it down, shaping the gathers as I went. I gathered it a little too tightly in the front so I ran out of gathers towards the end and the back is kind of flat, but it should be disguised well enough by everything else.
20170615_150325.jpg

It’s a small step, but I also made the slot in the ball for the top cross piece.
20170614_164846.jpg

And now it’s starting to look like a real thing!
20170615_150037 copy.jpg
 
Re: Hamilton: An American Musical - King George and Hamilton/Washington

So event #1 is over but I have another coming up in August that I have to jump right into prep for, so this is going to be sidelined a bit again, but I wanted to get a few more things done on it first.

I finally got some new gold paint - Plaid Liquid Leaf in brass - and repainted the collar pieces.
20170710_131512.jpg 20170710_131547.jpg
This paint is kind of a miracle. I’m still trying to figure out how to get a smooth enough application for the large crown pieces, but the color and shine are close to exactly what I wanted for everything. Leagues better than any acrylic or spray I’ve ever used. I also got some of the right color acrylic for the collar cross and repainted that (I don’t think I took any photos of it before, but I initially used a random medium blue I already had, and I didn’t like it at all). The blue was sealed with a heavy coat of Crystal Clear to make it look more enameled, and then the gold was redone with the Liquid Leaf and the stones were glued on.
20170710_131428.jpg 20170719_104430.jpg
All the other pieces got their red stones after repainting too.
20170711_104033.jpg

Biggest progress was on the actual construction of the crown pieces. I ultimately decided on zip ties as the best/easiest way to connect the strips securely. I cut a square of the same plastic rent sign everything else was made from and cut/sanded a hole on each side and a slit in the middle, and cut matching holes in one end of each strip.
20170710_144953.jpg
After a few tests with scrap strips, I zip-tied the actual strips to the square so the thick end of the tie was hidden underneath the square. Then I glued the other ends of the strips to the inside back of each cross along the base (I was originally going to zip tie the base of the strips too, but I realized the fur doesn’t cover enough of the bottom of the crown so any holes in that horizontal cross/fleur-de-lis strip would show). The ball was then glued into the slit in the middle of the square.

To attach the ball to the top of the hat, I marked the placement of the ball then removed the whole plastic crown piece. I cut a small hole in the center top of the hat base and velvet cover and stitched the velvet to the hat around that hole.
20170710_145211 copy.jpg 20170711_140957 copy.jpg
The whole thing was covered with a few layers of plastic bags to protect it during painting, then I slipped the crown piece back on and pushed the ball and square down to rest against the top of the hat and into the hole. I glued the peg from the ball into the hole pretty liberally and used a little heavy-duty thread and a piece of wire on the inside to reinforce it (the wire was glued over as well).
20170711_143649.jpg 20170711_143636.jpg

Once the strips and top were secure, I glued on the ball chain trim and started on the filigree squares. And tada! Actual crown finally!
20170719_104300 copy.jpg

In the meantime I've scrapped the idea of making the garter separate from the pants. I wanted it separate so I could get another piece done, but it's just so much easier to sew the rhinestone trim directly on the pants. I've also decided I need to make the scepter too, so now that the crown is coming along I might start researching that.
 
Re: Hamilton: An American Musical - King George and Hamilton/Washington

Yay Hamilton!!!!! I can't wait to see how this turns out. Love the detail on the diy crown.
 
Re: Hamilton: An American Musical - King George and Hamilton/Washington

Yay Hamilton!!!!! I can't wait to see how this turns out. Love the detail on the diy crown.

Thanks! I'm having a lot of fun with the detailing. Definitely the best part of this project so far. Hopefully I can keep picking away at it fairly regularly.
 
Re: Hamilton: An American Musical - King George and Hamilton/Washington

I picked up a couple pieces of Leslie Odom Jr's Aaron Burr wardrobe from the original off-broadway production at the Public Theater. Let me know if there's any detail you'd like reference for on the boots or shirts!

s-l1600-3.jpgs-l1600-4.jpgs-l1600-1.jpgs-l1600-2.jpg
 

Attachments

  • s-l1600.jpg
    s-l1600.jpg
    137.9 KB · Views: 107
Re: Hamilton: An American Musical - King George and Hamilton/Washington

It's been slow going thanks to school and work, but I got to see the show at the Pantages on Saturday and I'm still kind of in awe, so that's given me a boost of inspiration and energy to start working on this again despite whatever else. I'm hoping to have enough progress worth doing an update by the end of the week. (@JupiterThdrbolt Now that I've seen the stage version in person, I just had to tell you that I'm even more impressed with your Jefferson costume. You did such an amazing job on it!)

I picked up a couple pieces of Leslie Odom Jr's Aaron Burr wardrobe from the original off-broadway production at the Public Theater. Let me know if there's any detail you'd like reference for on the boots or shirts!

Oooooh. I'm jealous! I'm not quite ready to start on Hamilton or Washington so I don't need the boot reference (yet), but anything about the shirt you can share would be so helpful. Thanks!
 
Last edited:
Re: Hamilton: An American Musical - King George and Hamilton/Washington

Oh wow, thank you!!! That is the best compliment ever!!! I have tickets in March, I can't wait to see it IRL!

You're very welcome! :) You'll love the show. It's so incredible. I'm already looking for the next time and place I can see it again.
 
Re: Hamilton: An American Musical - King George and Hamilton/Washington

Very small update, but it's something.

I finished the filigrees on the crown. There should be an extra one on each vertical strip right at the top of the curve, but I when I ordered the filigrees I had only figured on 24 total (2 per vertical strip and 16 for the horizontal band) rather than 28, so I came up short. The ones around the band seemed more important and were easier to secure, so I did the full 16 there and skipped the last set on the vertical strips.

I’ve also been playing with paint some more. I still love the Liquid Leaf, but on some of the materials it was giving me a better shine than on others so the lack of consistency was starting to bother me. I also haven’t figured out a way to get a reliably smooth finish over large areas yet. So on the collar pieces I went over the Liquid Leaf with a DecoColor Premium paint marker. The gold tone is a little more white/pink than the yellow/brass I wanted, but the shine is stronger. And the crown color varies a bit in photos anyway. So I’ve made peace with the compromise for now. (I also keep reminding myself that costumes and props can always be remade, but in this case I'm not sure I ever want to have to make these again, so ...) There’s still one more gold alternative/test I’m considering for the crown, so we’ll see.

In the meantime, I sprayed the crown with a sandable filler primer to fill in some scratches, then a black primer to give the gold a good base.
20171001_153303 copy.jpg 20171007_142911 copy 2.jpg

And I’m still picking away at the embroidered star badge.
20171007_210839 copy.jpg
I’m about halfway through the little starburst lines. I was initially going to stitch ALL the starburst lines the same way I did the edge and the lines at each point, but it was extremely time consuming and tedious, and looking at more reference images I realized the starburst was a bit more solid than I had assumed. So I left each point line of the starburst, but now I’m filling in the rest of it with single stitches/lines, and I actually really like the effect. Because the cross in the center is so small and fiddly, I’ll probably do single lines of thread there too.

After seeing the show and now knowing how key the scepter is to the costume, I’ve decided I definitely have to make it. But now that I’m in the home stretch with the crown, I’m waiting until that’s totally done. And again looking at more reference images, I was reminded that the garter is a separate piece from the pants, so I’m back to the original plan of making the garter as its own thing.
 
Re: Hamilton: An American Musical - King George and Hamilton/Washington

My inspiration after seeing the show in September is still going strong, but between school and holidays and getting sick, time has been short. I did finally manage to make some notable progress this past week though.

Firstly, I finished the chest star badge!
20180108_093709a.jpg
I did end up making some changes from the show's design and what I had planned, namely the silver paint. I could say it was for the sake of creativity or originality or personalization, but in truth it just wasn't looking right after the way I had to go about making it. The silver paint I added to the background hid a few sins and made it look a bit more dynamic, so all in all I'm happy with it.

As far as crown progress goes...

Because the edges of the bead trim were visible on the back sides of the vertical strips, it was looking a little rough, so I cut some 1x9" strips of cardstock and glued it over the back to cover it.
20180106_185643 copy.jpg

Back when I started posting on the crown, I gave a little preview of the filigrees/beads/gems/rhinestones and said I’d come back to it when it was more relevant. I’ve been putting off organizing that because there’s so much to slug through, but here we are.

  • The top cross and ball uses 5mm round red cabochons (4), 18mm round clear cabochons (2), 30mm teardrop pearl pendants (2), 12mm beads (3), and 4mm round clear rhinestones (about 75). I initially got 6mm beads for the sides of the cross but they ended up too small, so I used the 12mm on the sides too.
  • Each vertical strip uses 25mm square filigree stampings (2), 13x18mm oval red rhinestone (1), and 4mm round clear rhinestones (10).
  • Each Maltese cross around the base uses 25mm clover filigree (1), 18mm round clear rhinestone (1), 8mm round blue rhinestones (2), 8mm round red rhinestone (1), 8mm round clear rhinestone (1), 6x12mm navette clear rhinestones (8), and 3mm round clear rhinestones (16).
  • Each fleur-de-lis around the base uses 8mm round blue rhinestone (1), 8mm round clear rhinestones (9), 4mm round clear rhinestones (18), and 3mm round clear rhinestones (11).
  • The horizontal band uses 25mm square filigree stampings (16), 13x18mm oval green rhinestones (4), 13x18mm oval red rhinestones (4), 13x18mm oval clear rhinestones (8), and 4mm round clear rhinestones (64), and 3mm round clear rhinestones (64).
And of course there were some whoopsies. For everything that uses 3-4mm rhinestones, I initially mis-measured and bought 6mm which ended up too big next to the 8mm stones, so I had to buy smaller replacements. I also had to buy more than I needed for pretty much everything, which was a hassle, so total cost and actual cost will end up fairly different on this project.

I started with the 18mm round clear stones on the centers of the Maltese crosses, then did the 13x18 oval stones around the base and the 13x18 red stones on the vertical strips. There's not much definitive strategy to this, but I am kind of working my way down in size as that seems to be the easiest way to handle it.
20180108_093859 copy.jpg
The stage-used crowns have a specific asymmetrical pattern to the red/green/clear oval rhinestones on the horizontal strip around the base (and the real historical crown has a similar asymmetrical pattern). I couldn’t figure out exactly what the pattern was, and the asymmetry bothered me, so I simplified it: stones under the crosses are green, stones under the fleur-de-lis are red, and stones in the spaces between crosses and fleur-de-lis are clear.
20180106_185606.jpg

I'm hoping to get the rest of the stones done in the next few weeks. It seems like a comparatively small/quick step, but it takes a long time with holding each stone in place as the glue sets.
 
Last edited:
Re: Hamilton: An American Musical - King George and Hamilton/Washington

I managed to finish the rhinestones faster than I thought. The larger stones took quite a while because with their weight, I had to hold each one in place as the glue set so they wouldn’t slide around. The smaller stones being lighter didn’t really drift much if at all while they were setting, so I could move faster from one to the next. I also added stones around the ball on top after this, and I've started painting it.
KG 5.jpg
All told, there are about 550 stones (!!!) on this thing.

I also assembled the livery collar. I’ve been waiting since there aren’t many places to easily store it as a whole piece, but I’m getting close to starting on the cape so I wanted the collar ready to go for that. (I was also bored and antsy and the collar was an easy thing to get done.)
KG 4.jpg
 
It's been an age and I don't have much to update. Real Life got crazy again.

I painted the whole crown with DecoColor Premium gold paint pens, which had turned out well in swatch tests. But like the liquid leaf paint, it turned out hard to get a smooth non-streaky surface on the larger flat areas, and I ended up hating it. So now I'm in the process of sanding that off as much as possible and looking for yet another gold option. Top contenders right now are gold leaf and spray paint. Gold leaf has the potential for an amazing finish but really depends on my ability to apply it well, and could be either easier or harder to work around the rhinestones (don't have to tape anything off, but also have to manually work around every stone). Spray paint has the benefit of being quick and easy, but I'll have to tape off the rhinestones and the finish will never be as dimensional as I want.

This whole process has been so out of the ordinary and experimental for me, I'm also seriously considering just relegating this to a glorified mock-up (probably finishing it, and maybe trying to sell it or use it as a back-up?) and making a second one out of metal. We'll see what happens.
 
George is still kicking, I promise. And we're in the home stretch.

Last I worked on the crown, I had tried using the DecoColor Premium gold paint pen and the whole thing failed kind of epically. Having an airbrush or being a better painter would have made a difference, but as is it just wasn't happening.

So I had sanded it down as much as possible to get ready for another attempt with something else, and I was considering gold leaf versus spray paint. I was initially leaning towards gold leaf purely for the amazing finish it can give, but I've been hesitant because I kind of doubt my ability to get that kind of finish, especially using it for the first time and using it on an item like this with so many small, fussy areas (rather than more open areas that would be easier to access and burnish). I was recently reintroduced to Montana spray paint, specifically the gold chrome which I saw someone use on an Iron Man helmet to great effect. When it goes to plan, it seems to have as close to the color and finish I want that I'll probably be able to get with a spray paint. So I decided to track that down.
20181010_165858 copy.jpg

This is the sixth gold paint in general (and fourth spray paint) I've bought for this project, so I'm really hoping I can use it effectively enough and it can give me something I'm happy enough with. (I've also seen some good results with Rustoleum Specialty Metallic, so that's a possibility too if I really have to.)

Going back to a spray, I also had to test some methods of masking the rhinestones. My criteria was that it had to be something I already had, and would both mask the rhinestone enough to block the paint but also remove cleanly without sticking to the stones or fouling the paint finish. I asked around in some crafting communities and got a lot of good suggestions, ultimately narrowing it down to Vaseline, liquid latex, mustard, and toothpaste. From my own ideas I added Tacky Glue and puffy paint, and did tape too as backup. I did a test piece using the 3mm rhinestones (being the smallest and most fiddly, I figured anything that works on those will work on anything larger).
44755112_1874306842647448_17128582979518464_o.jpg

Everything masked the paint well, so the decision really came down to cleanup. The Vaseline and toothpaste smeared too much, both seeping into the stone setting and getting on the paint. The mustard was a little better, but still too messy. The tape didn't want to stick, so that had too much risk of falling off mid-painting. The Tacky Glue stuck too much and was hard to remove. So the best contenders were latex and puffy paint. The puffy paint peeled off a little cleaner and was easier to apply in the first place (small nozzle tip on the bottle, and thicker so didn't run and didn't need layering) so I chose that.

In the meantime I've cleaned up the stones to make sure all the little gold smudges from my messy paint pen application are gone. After I mask the stones I'll be doing a few sanded layers of primer, then black base coat, then the gold. Then adding the faux fur trim, then then then done!
 
It's been two years in the making, but this dumb sucker is finally finished.

I changed the plan up a little and decided to add the fur trim before painting. I initially wanted to save that for last so I wouldn't have to cover the fur up for painting, but I realized that gluing the trim on might require more direct handling than I want to put the finished paint through (being an unsealed chrome, it's going to be hard enough to keep fingerprints off it anyway). I also scrapped the original plan of cutting out small circles of black faux fur and gluing that into the white for the ermine spots. I did try it, but it was too messy and clunky. So I just colored in the spots with a marker like I should have thought of in the first place.
20181104_211214.jpg

The masking went pretty quickly, and I decided to mask all the large stones too instead of doing those with tape.
20181104_220147.jpg

I ran out of sandable primer the first time I prepped this thing for paint, and I ended up getting a different brand this time which I'm regretting now. It sanded fine, but left a bit of a texture rather than the extremely smooth finish the other stuff had. I considered putting this on hold to get the good primer and spray it again, but it wasn't too terrible so I kept going.
20181106_160652.jpg
After primer, I sprayed a black base.
20181108_162111.jpg
Then the Montana gold chrome.
20181110_120018.jpg

My fears about the texture from the primer were substantiated, so there are a lot of patches that are kind of grainy and then the chrome finish didn't turn out as well as it could have. After the second coat I thought again about doing the primer and paint over, but at that point I needed this done, so I did a third coat and called it good. Even with a so-so base, this paint is no joke.
20181115_222944.jpg
The top piece was the smoothest and painted the best. This is just three light coats of the Montana gold chrome on plastic and I can hardly even believe it.

Tearing off the plastic bags was really satisfying.
20181115_222912.jpg

And then tada! The lighting isn't great so all of it looks really dull and flat here, but more or less there it is.
20181115_223541.jpg
Up until the literal moment that I tore the plastic bags off, I was really underwhelmed. After the paint, I felt "eh" partly because of the inconsistent application, but also for reasons I couldn't really pin down. After I pulled the puffy paint mask off the rhinestones and saw those with the paint, I still felt mostly "eh." Maybe it was having been working on it and looking at it in just bits and pieces for so long, maybe it was losing perspective. Don't know. Then when I pulled the bags off and got to see the paint and the rhinestones with the velvet and fur, it suddenly clicked and I fell in love.
Screen Shot 2018-11-16 at 5.35.44 PM.png

I still want to make an improved Version 2.0. That impulse hasn't changed at all. I'd never made anything like this before, and when I started I really wasn't sure how I was going to actually do it and if it would even work. I improvised a lot during the process, learned a whole lot too, and now there's a lot I know how to do better or differently altogether. Just for another challenge, and to be that much more extra accurate, I kind of want to do one in metal. Given how heavy this one is already, one made of metal would probably be for photos and display only, not wearing out to events anywhere. But it would still be pretty fabulous.

But at the very least, I will be making another one with pretty much the same exact materials and overall process. Most stuff I had to buy in more quantity than I needed, so I would only have to reorder a few little things. I can scale the pattern down a little to fit continuously on the 24" length of the plastic sign, so it doesn't need an extension piece and will fit the base hat and my head and frame a bit better. I can also be smarter with painting: get the good sandable primer again, then go straight to black base and the well-proven Montana gold chrome, and glue the rhinestones on last.

Feeling good enough about the whole process that I'm willing to redo it has also given me the confidence to make another crown of very similar design for a costume that made its way onto my list unexpectedly last week, so that'll happen someday too.

In the meantime, with this out of the way, I'm getting back into what's next on this incredibly long haul project. It might be a while, but stay tuned!
 
So it's been another 2 years, but I'm still working on version 2.0 of the crown. I've been staring at it for all that time but never had the motivation to jump back into it. I'd kind of moved on, both to other parts of the King George costume and just other projects entirely. But with the show being released in film format last summer, I got the bug again and started finally making steps towards version 2.0 with some specific upgrades and changes: template size, gold surface, and rhinestone details.

The main problem with the original template for the horizontal fleur-de-lis and cross band was the length. It was too long for the 24" sign I used as the base material, so the cross in the back had to be cut from a separate piece and glued in which was a little unsightly. The finished length was also longer than the band on the base hat which was about 23", creating a gap between the crown piece and the hat and widening the profile. It made the whole thing a little bobble-headed and oversized on me.

So for 2.0, I remade the template in a few different sizes. I liked the size of the individual fleur-de-lis and crosses themselves so I wanted to just shorten the length of the piece rather than completely scale it down. The only place to do that was in the gaps between the fleur-de-lis and crosses, and on the last template I basically removed that whole gap.
20200710_191243.jpg

The finished length was almost exactly 24" and it didn't disrupt how the fleur-de-lis and crosses sit next to each other (they weren't squished too close together) so it worked perfectly.

The other, and even more problematic, big issue was the gold finish. I went through so many paints on the first version before finally settling on the Montana Gold chrome. It looked pretty dang good, even though I botched the primer and didn't get as clean a finish as I could have. But it didn't take long for the finish to corrode with fingerprints and what I can only describe as oxidization. That's because I didn't seal it, which at the time was a trade-off for not dulling down the bright finish. It's been frustrating to see the paint darken and dull, but I was able to make peace with it after deciding that first crown was a prototype and knowing I'd do an improved remake. But I don't want to use paint again, at least not spray paint, so that puts me back at square one for the gold again.

One of the first gold tests I did way back on the first crown was an adhesive vinyl/mylar sort of stuff.
IMG_20170407_180231_541.jpg

At the time time I scrapped it because I couldn't get it to behave how I wanted on the curved strips: it lays nice on the outside of the curve, but on the underside the edges buckled and wouldn't stay adhered even with notches cut. But I'd loved how amazingly reflective it is. This time I played with it a little more and figured out some ways around the earlier problems, and decided that was what I'd use for the second crown.
20200831_170113.jpg

Good color, amazing surface, pretty resilient stuff considering I've had the same sheet of it for at least six years (if not longer) and it hardly has a blemish. (The scratches and dimples on this test piece are from not cleaning the plastic surface before applying it and seeing just how resilient it is.)

But then I started really comparing it to the finish on the stage-used crown instead of just hyperfixating on "ooh, shiny!" and I realized the stage crown has more of a soft finish.
Screen Shot 2017-05-12 at 3.10.35 PM.png

Still super gold, still smooth. But it's not like a mirror. So now I'm rethinking the surface again, which continues to be the biggest challenge to this whole prop. Next step will probably be getting samples of some adhesive vinyls that are a softer, kind of brushed gold instead of mirrored to see how I like that finish. I'm also thinking about finding someone who can cut the pieces out of brass for me.

The other and most superficial upgrade is all the little bits and bobs on the crown, namely rhinestones and metal filigree stampings. What I used the first time worked really well, but there was room for improvement. I bought all the rhinestones in silver settings rather than gold, figuring they wouldn't show or I could just paint them along with the rest of the crown, but gold settings would be better (especially now that I'm not doing any real painting). Some rhinestones ended up a little too small based on my size estimates, and others I realized after more research were the wrong shape. I also wanted to add some of the filigrees that I'd skipped the first time.

So:
-5mm red cabochons and 18mm clear cabochons on the top cross -> flat-back rhinestones. The rhinestones aren't necessarily more accurate, but they match the faceted design of all the other stones so the continuity looks more aesthetically pleasing to me.
-4mm round clear individual rhinestones on the ball -> 6mm rhinestone sparse chain. The larger rhinestones better match the proportions, and the sparse chain includes the gaps between stones.
-4mm round clear rhinestones on the gold squares -> 4mm and 5mm on the squares that have oval gems, and just 5mm on the plain squares. The 4mm rhinestones kind of got lost next to everything else and the finished result looked a little more subtle than is accurate, so the 5mm will be more sparkly and ostentatious. 5mm doesn't quite fit on the edges around the oval gems, so those will stay 4mm.
20200831_171229.jpg
20200831_171519.jpg

-Add the setting under the 13x18 red oval rhinestones on the vertical strips. Don't know why I skipped these.
20200831_171709.jpg

-Large cluster of 3mm and 4mm rhinestones around the 8mm clear rhinestones on the fleur-de-lis -> just three 4mm rhinestones on each side of the 8mm trio.
20200831_170059.jpg

-6x12 navette clear rhinestones on the crosses -> 5x10 clear rectangle rhinestones. The rectangle shape looks more accurate and has a slightly larger profile so again, more sparkly and ostentatious.
-18mm round clear rhinestones in center of crosses -> 18mm square rhinestones. The square is more accurate.
-Add the rectangular filigrees to the edges of the crosses. I don't know why I skipped them last time.
20200831_173317.jpg

-Use larger clovers and add the flat-back gold pearls around the 18mm rhinestones in the cross centers. Just more accurate. I have two options: the filigree clover which is larger and open (just wire-work, not a solid piece) or the plain setting which is solid and smaller. The solid setting is more accurate and will be easier to glue neatly, but the wire filigree has cleaner edges.
20200831_194509.jpg
20200831_212511.jpg

-Add extra square filigrees at the top of each vertical strip. I skipped them before because I thought the curve of the strip would be too extreme to get the filigrees to lay flat enough. This time I'm just going to make it work.
-3mm round clear rhinestones -> all removed or replaced with 4mm. Some of the 3mm were ultimately unnecessary, and the others were too small to be appropriately noticeable.

There are also some other incidental changes to materials and construction. Getting rid of basically all painting meant the ball at the top had to be shiny gold already, so I'm switching to a gold Christmas ornament for that. I'll also be adding patches of black fur to the white fur trim instead of coloring the fur.

I don't know when I'll actually start constructing this. I can't really do anything until I decide on a material/process to get the gold finish. But I'll at least be researching that.
 

Attachments

  • 20200710_191243.jpg
    20200710_191243.jpg
    866.9 KB · Views: 54
This thread is more than 3 years old.

Your message may be considered spam for the following reasons:

  1. This thread hasn't been active in some time. A new post in this thread might not contribute constructively to this discussion after so long.
If you wish to reply despite these issues, check the box below before replying.
Be aware that malicious compliance may result in more severe penalties.
Back
Top