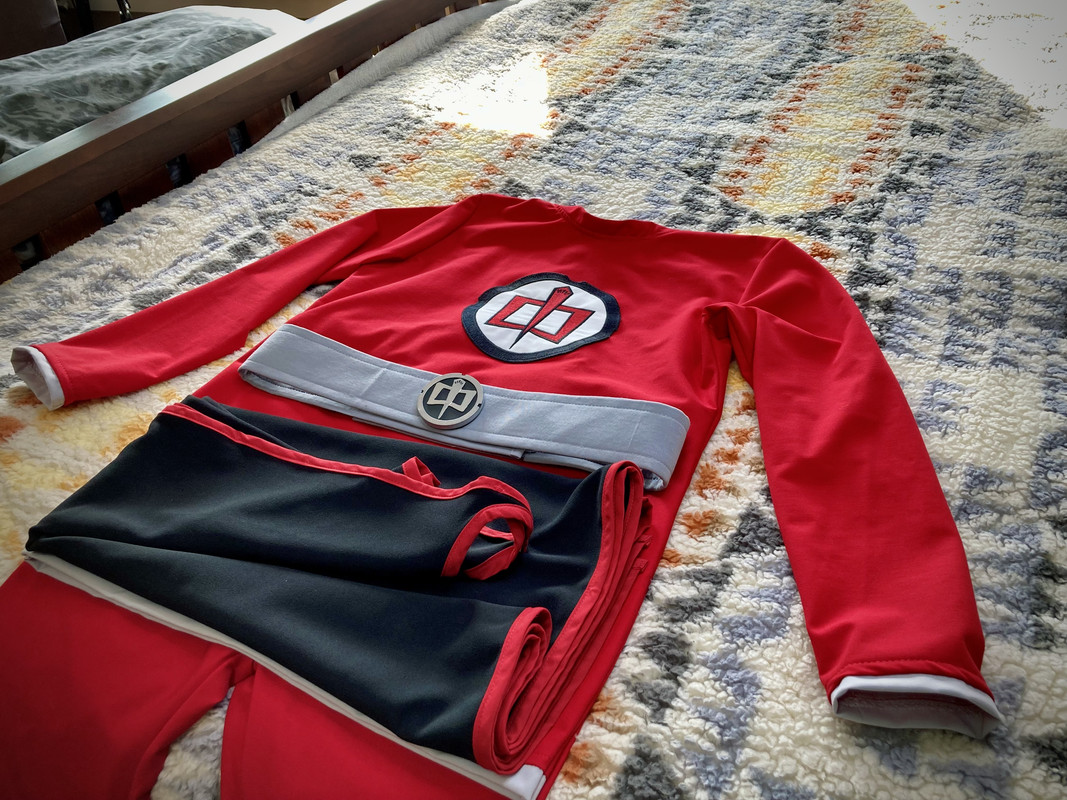
The Greatest American Hero Suit

Love this! 13 years ago I made a Suit for my 4yr old. It wasn't very fancy, but I loved the end result. I still have the Suit today :p
That suit looks amazing! I bet it got a lot of use! Thank you for sharing. Great to know there are others who appreciate the classics!
 
With spat patterns in hand, it’s time to assemble.

I’m concerned about two things with regard to the material:

1) Seeing shoelaces and other undergarments through the spats. If you look carefully at some promotional photos and screen caps, you can see what appear to be calf high sock lines.

2) The possibility of the spats “falling down” as I move and walk around. I’d like to support the spats in some way.

To hopefully mitigate these issues, I will line the inside with excess cape material. The crepe texture should provide some “stick” and the additional layer should provide some stiffness and help hide things underneath the spats.

I traced and cut red fabric from the patterns twice, marking each carefully on opposite sides. The first set is for the right foot while the second mirrored set is for the left. My numbering system, starting at big toe, right is 1-2-3-4 clockwise and left is 1-2-3-4 COUNTERclockwise.

I laid each of the pieces on a rough cut of the black cape material, then pinned and stitched to bond the layers together. For assembly, I followed my numbering system and pinned and stitched the pieces inside out. Giving the right foot a quick trial fit, my reaction was, “Holy spats Batman, this might work!”

To create the piping, I use the same light grey material from the cuffs and waist. I folded the material in half and stitched a 1/2” seam. I pulled 1/4” cotton filler cord through the fabric to provide the internal support. I then pinned and stitched the piping to the edges of the spats. I finished the spats by sewing some white Velcro to the connection tabs that run under the shoe.

I’ll just say this… many harsh and vulgar curses were vocalized on this day. This was not an easy process for a beginner seamsperson. Seams were ripped and extra stitches were made. Being somewhat of a perfectionist, I’m not exceptionally proud of the end result… BUT I finished and the spats are passable I think.

GAH24.jpg

GAH25.jpg

IMG-8881.jpg

GAH25a.jpg

GAH25b.jpg

GAH25d.jpg

GAH25c.jpg


Mistakes Made: When bonding the layers, I should have left more seam allowance and cut back the black fabric before attaching the piping. My failure to do this resulted in black fabric being visible at the seam line. Also, having a bit of extra red would have made the seam much cleaner. When testing the fit, I should have taken more notice of the heel. The fit was much looser than I desired but once the piping was applied there was no practical means to tighten it, save using the seam ripper.
 
After so much uncertainty doing things out of my comfort zone, I finally have a task that I’m confident with… the belt buckle!

I’ve been using Blender for a year or so after finally moving away from SketchUp. It was a very intimidating transition and a steep learning curve filled with tutorial videos, but I have become reasonably comfortable using it.

Blender allows you to add and subtract shapes easily. For the buckle, it’s a short wide cylinder with a smaller cylindrical negative space in the center. Three squarish notches at 9, 12 and 3 o’clock with the scissors logo embossed in the center. I created a GIF to roughly illustrate the steps I took.

I designed the buckle with a diameter of 2.5” per the comments in another thread. This seemed small to me so I had a friend print the buckle on his resin printer at 100%, 110% and 120%… or 2.5”, 2.75” and 3”. This allows me to compare visually to reference photos and pick the right size before fabricating a belt of equal width. Spoiler alert, it’s 2.5”.

I will spray paint the buckle with metallic aluminum and fill the depressions with flat black.

BMLGAHBuckle.gif

GAH27g.jpg


Mistakes Made: I plan to attach the buckle to the belt with Velcro. I should have created a depression on the back side.
 
Great thread! I had a thought about the original costume shoes, even though you already found a pair that work.
This pic you posted makes me think the shoes are lighter weight than men's dress shoes, as they don't seem to be pulling the costume down very much:

r04-jpg.jpg


I assume that the orignals might be men's "jazz" dance shoes, probably custom painted/dyed red.

I found a pic of some vintage 1980's Capezios and they appear to match the shape:
il_fullxfull.133289972.jpg


It may be hard to find vintage 80s Capezios, but there are current companies like Bloch that make similar styled shoes.
 
Another thought about the original: This pic shows some invisible zippers on the inside of the calves, which makes me think the spats weren't separate pieces, but part of the pants:

r03-jpg.jpg


The pic of Katt holding the costume in my last post also would seem to confirm that the spats were connected, since there's no way spats would be able to hold up the shoes and still be attached seamlessly to the pants if they were separate. I'd say the pants/leggings were all one piece, with gray bands added below the knee to give the appearance of boots/spats. The invisible zippers are probably there so that the pants can zip closed for a tight fit around the calves and ankles, like some sweat pants do. (EDIT: it looks like the zippers may not extend all the way to the bottom of the spats, so I'm not exactly sure of their function - perhaps they allow for Katt to get his shoes on and off better? Maybe someone with more costuming experience could speculate better).

The belt also appears to be an functional, adjustable belt, as you can see a metal loop peaking out in the above pic (and a couple of your other posted pics of the original costume shows some excess belt length behind the outer layer, on the right side).

Great work again, I hope my comments don't sound like I'm nitpicking your work, I just was interested in figuring out how the original was constructed. Obviously, there's lots of ways to recreate it and still have it look like the screen worn costume.
 
Last edited:
That is AMAZING. The best American series (besides the Six Million Dollar Man) that was ever produced.

Sigh, I've been teasing this in other posts, but let me do it finally. I'll go over to the entertainment section and post what I've written so far for a reboot series that I've hoping to be able to pitch to D+ at some point.
 
Great work again, I hope my comments don't sound like I'm nitpicking your work, I just was interested in figuring out how the original was constructed. Obviously, there's lots of ways to recreate it and still have it look like the screen worn costume.
I appreciate your comments/feedback. Without an original in-hand, there’s no way to know for sure how it was constructed. The fun part is figuring it out and solving the problems. Thank you for your thoughtful ideas.

I tend to agree that the spats look faux but I just didn’t have the skills or confidence yet to attempt something that involved. It’s also possible that a few safety pins were used in that promotional shot.

The shape of the shoes you found look great, although the heel looks a bit small. Here is another angle of the shoes, see what you think.

R07.jpg


I absolutely concur the belt and buckle were functional. You can clearly see the belt loop to the right and a buckle hole to the left in this photo. I will not be constructing mine like this for several reasons which I will note in my next post.

R02.jpg
 
I appreciate your comments/feedback. Without an original in-hand, there’s no way to know for sure how it was constructed. The fun part is figuring it out and solving the problems. Thank you for your thoughtful ideas.

I tend to agree that the spats look faux but I just didn’t have the skills or confidence yet to attempt something that involved. It’s also possible that a few safety pins were used in that promotional shot.

The shape of the shoes you found look great, although the heel looks a bit small. Here is another angle of the shoes, see what you think.

View attachment 1685758

I absolutely concur the belt and buckle were functional. You can clearly see the belt loop to the right and a buckle hole to the left in this photo. I will not be constructing mine like this for several reasons which I will note in my next post.

View attachment 1685759
Yes, the shoes I posted do look like the heel is too low. Plus, the original costume shoes appear to have more pointed toes. I don't know if there are other men's jazz shoes of that era (or earlier) that match. Another reason I thought they might've used dance shoes is the flexibility, seeing as how much running and jumping Katt would have to do in them, so dress shoes would seem impractical (and painful) for that type of movement.
If they weren't new shoes purchased for the show, they could be even older, maybe something found in the studio's costume shop or a vintage store. But the soles don't look too worn, so I'd still guess they were more likely to be new shoes, something "off the rack."

I was surprised the belt was a "real" belt and not just something sewn onto the shirt, so I'm sure whatever you have planned will work out well. I'd think that a "real" belt would be harder to keep looking consistent for a costume like this, especially with the amount of movement needed (like frequently stretching his arms out for the flying scenes).
 
I had a thought that you might be able to contact one of the costumers for the show directly and see if they remember anything about the shoes or costume construction. I checked imdb and there are two main costume designers listed, Kurt Warner and Jean-Pierre Dorléac. Warner unfortunately passed away not long after the series ended, but Dorléac is still around and is active on Twitter. He engarges with fans - I saw he recently has answered questions about his past costumes. If you want to try messaging him, here's the link to his Twitter:

https://mobile.twitter.com/spclsmthin
 
Home stretch. Let’s finish this!

There were at least two different belts used in the production. In the pilot episode, the loose end of the belt folds in front and the material seems to have been spray painted, perhaps silver. I say this because it has a splotchy appearance like the paint has worn off in places. In the second episode, the belt folds behind and has more of a natural fabric appearance. The different versions seem to connect in the same way as there are visible belt buckle holes. I note these observations even though I have no plans to recreate the belt & buckle in the same way.

Here you can see the belt is somewhat reflective and has some splotchy spots near the end, probably from passing the end through the buckle hardware. The belt overlaps the outside versus later episodes with the overlap on the inside...
R09.jpg


If you look carefully, you can see multiple belt buckle holes on either side of the buckle. In addition to a cleaner appearance in later episodes, folding the end behind the belt hides most or all of the buckle holes...
R10.jpg


I’m guessing the hardware for the original buckle looked something like this, perhaps store bought or constructed in house. The loop was oval but given the buckle holes seen in the previous photos, this method of connection seems likely.

R08.jpg


Unfortunately, I can’t find hardware with the required size of 2.5”. There are 2” versions and even 3” versions but nothing at 2.5”. I don’t have the time, or perhaps even the skills to make one myself so I’ve decided to simplify the construction.

Since my back will be covered by the cape, I will put the ends of the belt there and close with Velcro. This will provide better adjustments than a hook-and-hole belt anyway. With the buckle made of lightweight resin, a Velcro connection to the front should also work fine.

The belt appears somewhat stiff so I will need some underlying interfacing to attach the outside fabric to. I settled on some tough outdoor fabric for the structure of the belt and darker grey for the skin.

IMG-8880.jpg

IMG-8878.jpg


I cut a 5" wide piece of the outdoor fabric, folded it in half and stitched the open end together for a 2.5" belt. For the skin fabric, there are visible straight stitch lines near each edge. I tried sewing the skin directly to the belt but the material is quite slick and it moved substantially. Since I don't have a walker foot, I opted to use spray adhesive to bond the materials together before adding the stitches.

GAH27a.jpg

GAH27b.jpg


To finish the belt, I added Velco for the closure and the Buckle.

GAH27c.jpg

GAH27d.jpg

GAH27e.jpg


Because the belt seems to have some shine in the Pilot, I thought I'd try something different and add some spray fabric glitter. It says it is permanent, time will tell. It does give it a very 80's space feel, although the photo doesn't really convey what it looks like effectively.

GAH27f.jpg

GAH26.jpg

GAH27.jpg


Mistakes Made: Working alone, I didn't measure the spots for the Velcro accurately and I had to attach a second tab to keep the belt end from flapping around. Not a problem as it will be hidden by the cape anyway. Some of my stitches didn't set properly. I probably need to replace the needle or adjust the tension. Being a sewing knob, I'm not sure why that happened.
 
I started this thread noting the Pilot's premiere date of March 18, 1981. I watched that episode and immediately fell in love with the premise and the show.

By random chance or divine intervention, on March 18, 2023, EXACTLY 42 years after watching that Pilot episode, I put on The Suit for my local pop culture convention in Kansas City... Planet Comicon.

It's definitely not a perfect reproduction. Like I said early on, the fabric seems a bit too red, should be more scarlet or brick perhaps. The sheen isn't quite right, something a little softer looking with a more subtle stretch. The fit and the sewing aren't professional in appearance. BUT for my first major effort into creating a costume almost entirely from scratch, I'm proud of the result.

People of a certain age recognized me and expressed how much they also loved the show once upon a time. Seeing the faces of fellow fans light up and exclaim, "I loved that show and haven't thought about it in ages! I need to go watch it again!" Bringing back memories and keeping The Greatest American Hero alive in our minds made all the effort and frustration worth it, even if just for one day.

GAH28.jpg

GAH29.jpg

GAH30.jpg
 
Last edited:
Dorléac is still around and is active on Twitter. He engarges with fans
Funny you should mention this. I don't Twitter but a friend of mine posted the convention photos I shared with him to Twitter and he tagged JPD. While I know JPD was simply being kind, it was really, really nice to have the person who designed The Suit comment that my reproduction was done well. This puts a big exclamation point on the building experience for me, one that will sit with fondness beside those made watching the show all those years ago.

JPDT.jpg
 
That looks AMAZING! Don't apologize for any of it! You knocked it out of the park and should be absolutely proud of your work. I'm sure the reaction of the fans who are our age and recognized the Suit made it all worth while. :) You look like you could just "fly away on a wing and a prayer" :) Thanks for sharing the progress and the awesome results of your passion and effort. Well done!
 
It was an amazing experience from start to finish. I really appreciate that each of you took the time to post some kind words. You didn’t have to but you did and that means a lot. Thank you.

Also, I know humor was the intent but let’s remember to be kind to ourselves. The best thing about The Greatest American Hero is that it could be any one of us. No birthright, no special powers, no trust fund… just a person of great moral character. The “little green guys” can make the suit in any size or shape.
 
Back
Top