Love these kits. They are going to look awesome. Your attention to detail is really brilliant. I'm really excited to see the engineering kit come together!!!
You are using an out of date browser. It may not display this or other websites correctly.
You should upgrade or use an alternative browser.
You should upgrade or use an alternative browser.
Star Trek: TNG Medkit
- Thread starter MGC
- Start date
MGC
Sr Member
Thanks!
Sean - yep - once I have a successful finished kit, I'll post the DXFs - still a few tweaks etc as I'm doing this one (which I forgot to change on these files, grrr). The key thing was coming undone with the thickness of some internal parts - the Tric pocket back wall was cut in 3mm which fouls access to the 5mm LEDs above it. Changing that to 0.5 mm styrene fixed that problem so all a case of making notes...
Got the kit primed and with the first round of putty on (no sanding yet) - almost back to where I was ~6 months ago :/
MGC
Sr Member
Got the door fitted, so finally past where I was with V1. Two nuts epoxied into the pockets in the door, with an allan bolt screwed through the compartment walls. Bit basic, but it does mean you can fine-tune the fit of the shut lines.

Still a lot of sanding to go.


Finished up a medical PADD to go inside it, not too sure about the colour/thickness though.


Still a lot of sanding to go.
Finished up a medical PADD to go inside it, not too sure about the colour/thickness though.
Got the door fitted, so finally past where I was with V1. Two nuts epoxied into the pockets in the door, with an allan bolt screwed through the compartment walls. Bit basic, but it does mean you can fine-tune the fit of the shut lines.
View attachment 742199
Still a lot of sanding to go.
View attachment 742202View attachment 742203
Finished up a medical PADD to go inside it, not too sure about the colour/thickness though.
View attachment 742200View attachment 742201
The Medkit looks great.
What colour did you use fos the blue PADD? It's a nice shade, ideal for some VOY med props!
Thanks
Hey,
It's Rover Henley Blue from Halfords. The colour on the can looks way lighter (the colour of the TNG med PADD, which is what I hoped it'd be). Going with a different brand for the next one - thinking Montana Gold Himalayas or Mt Everest.
Thanks
I too find the Halfords colours and lids seldom match up.
The build is looking great, looking forward to seeing it finished
Good luck.
DMC 12
Active Member
What a brilliant build! I couldn't help notice the LCARS screen you're positioning the med kit on for photos, is that printed on perspex directly or another method?
You've got a headstart on an engineering kit too as that medical scanner happens to be great at scanning ODN relays!
You've got a headstart on an engineering kit too as that medical scanner happens to be great at scanning ODN relays!
MGC
Sr Member
What a brilliant build! I couldn't help notice the LCARS screen you're positioning the med kit on for photos, is that printed on perspex directly or another method?
You've got a headstart on an engineering kit too as that medical scanner happens to be great at scanning ODN relays!
Thanks! Yes, reverse printed on perspex and then sat on a lightbox with lots of tracing paper to diffuse it... bit of a faff but worth it for the photos. And yeah, the ODN scanner started life as a medical scanner I think. It's has the look of later DS9 props (more details, darker colours etc) but the shape was so simple I couldn't help but model it.
Excellent username btw...
Got the door fitted ok.


I scratchbuilt the latch area from styrene - I heat formed the round section and then built a box around it with a magnet inside. This wasn't the exact same shape as the latch on the original props, which was out of my skillset to scratchbuild.

For a while, I was happy with it, but knowing it wasn't right was gnawing at me, so it was off to Sketchup to model up the latch and then have it printed by Shapeways. It was my first time doing this and I was amazed how easy it was - this could be the start of an expensive addiction. It make sense to print in the more expensive acrylic as the rest of the kit is made from it, and the MEK solvent gives a really good bond.
Sketchup Render:

Frosted part with the magnet inserted into it:

Much better!

The magnet holds the door in with the hypo + 3 vials fine. Really pleased with how neatly this section has come together, which is the result of a) actually planning it properly this time, and b) luck.

The body still needs loads of sanding + filling and I can't face that right now, so have been playing with the cosmetic dressing and the electronics...

Aquaman
Sr Member
I am just catching up with this. WOW... beautiful. I am so jealous. Any updates.? I "know" gates and she has told me stories about using those props. How they would hand them things and they would have to figure things out relatively quickly and make it all look real. What show do u work on?
MGC
Sr Member
Thanks! Not many updates - have been slowly filling + sanding as I want to get the body looking as good as possible. Takes time and I've been away with work. Getting there, though... maybe one or two rounds to go. Halfords filler primer and 2500 grit paper give a lovely finish, but I *hate* sanding. Kind of want to avoid doing the other kit now.
I just finished 6 months on Black Mirror which is where we had the 3D printers... off to the next thing now!


I just finished 6 months on Black Mirror which is where we had the 3D printers... off to the next thing now!
MGC
Sr Member
Slow progress as work hours are just insane; we also just bought a house that needs a lot of work but on the upside, I have a workspace!
Finished off the upper section of the Transifigurations add on - still need to do the magnet + labelling for the scanner pouch section.


I also started drawing up the things that are stored in it, which would go on to be the cortical stimulator headband bits:

Finished off the upper section of the Transifigurations add on - still need to do the magnet + labelling for the scanner pouch section.
I also started drawing up the things that are stored in it, which would go on to be the cortical stimulator headband bits:
MGC
Sr Member
Phenomenal work here. Looks great. Color also matches the show prop. Its awesome to see everything coming together. The couple things I really appreciate about Trek props is how functional and real they look.
I always thought Rick Sternbach & Mike Okuda worked really well within the limitations of the show/budget - Rick's sense of shapes/panelling was always pretty smart, lots of layering on top of open spaces, and Mike's labelling / trim tapes etc are quite bold but suggest a function. That minimalist and strongly geometric look is worth a revisit, I think. Having spent so much time designing very detailed props and screens it's lovely to actually work on clean, clear stuff.
Tomorrow I’ll do a final wetsand, spray the body colour on (this is just the primer), install the electronics, add the cosmetic panels, and then if the weather is kind, do the clearcoat, which is the bit I’m most scared of. Once that’s cured I can do the vinyls and then I’m 95% of the way there!


MGC
Sr Member
Assembling this was kinda stressful - after ruining V1 I didn't want to wreck this one, but I tend to rush when I have a list ahead of me.

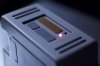
All panels, electronics, and clearcoat applied, and then vinyl decals over the top of it:


The compartment has a dummy green LED, a flashing red, and a counting 10-segment bargraph. I really enjoy the retro vibe of the bargraphs! The battery is accessed through the bottom corner panel, which attaches magnetically.

I couldn't ID a power switch on the originals - I hid mine behind the door lip so it's practically invisible - I'd quite like to make something a bit more high tech or integrated though.

Really loving seeing these come together. I've always loved these props and to be able to make reasonable replicas thanks to the kits RPF members put out and some time spent on Illustrator is a real dream:

At this point I feel more relieved than happy… still to do:
• Foam inserts in the Tricorder pocket
• Foam inserts in the Hypo pocket
• A vial rack for the pocket w/magnets
• Sort out the magnetic catch for the battery panel bottom left
• Final vinyls
• Strap
The Tricorder end strap is pushed into a place where you can pull it through the second notch by the roof of the pocket - if that makes sense. The other end you are supposed to get to it through the holes I left in the body under the panels - which I’ve since sealed up. Cross that bridge when I come to it, I suppose…
After that - finish the hand scanner, a new PADD, then... the Engineering ISO kit...
All panels, electronics, and clearcoat applied, and then vinyl decals over the top of it:
The compartment has a dummy green LED, a flashing red, and a counting 10-segment bargraph. I really enjoy the retro vibe of the bargraphs! The battery is accessed through the bottom corner panel, which attaches magnetically.
I couldn't ID a power switch on the originals - I hid mine behind the door lip so it's practically invisible - I'd quite like to make something a bit more high tech or integrated though.
Really loving seeing these come together. I've always loved these props and to be able to make reasonable replicas thanks to the kits RPF members put out and some time spent on Illustrator is a real dream:
At this point I feel more relieved than happy… still to do:
• Foam inserts in the Tricorder pocket
• Foam inserts in the Hypo pocket
• A vial rack for the pocket w/magnets
• Sort out the magnetic catch for the battery panel bottom left
• Final vinyls
• Strap
The Tricorder end strap is pushed into a place where you can pull it through the second notch by the roof of the pocket - if that makes sense. The other end you are supposed to get to it through the holes I left in the body under the panels - which I’ve since sealed up. Cross that bridge when I come to it, I suppose…
After that - finish the hand scanner, a new PADD, then... the Engineering ISO kit...
Attachments
protonpack
Active Member
Absolutely gorgeous work!
Similar threads
- Replies
- 24
- Views
- 2,228