New alternative for Solo Blaster

Mine came with the scope in the rings, but everything else I had to put together. I got mine from KWA in Hong Kong, so they had to ship the flash hider assembly separately.
 
Mine have come partially assembled. The pistol had already the grill already on in one bag, the bull barrel flash hider in a second bag, and the scope on the mount with the hardware lightly attached......except to the one part that was jammed.

I'm without tools right now....... or I just would have re-cut the threads on the unfinished scope mounting disk on the first one pistol.

These minor but very annoying defects aside, It is a nice blaster. Get rid of the selector switch and make the lanyard ring like the ANH DL-44 and I'd call it great. Both pistols have functioned without issue which is why I wish I could do a part swap but Evike doesn't want to play.

Ignore my rants..... if you are on the fence and want a metal DL-44 don't wait. Get one now while you can.... and still be able to swap it out if it doesn't work.

It just looks and feels so good. I don't have my modified Rubies with me but I do have the Disney Blaster Strike (Orange and Gray G.K. ish) and unless you have an M.R. or a custom build metal DL-44. You will want nothing else.

Credit card debt, dirty looks from your spouse, overtime..... do want ever you have to and get a metal DL-44.
 
I also ordered mine from KWA in HK but I never got the flash hider. How far apart were the shipments? I just got the gun and scope boxes today. Thanks!
 
Thanks for the thread guys. I just ordered mine. Hopefully it will come un assembled....I like putting things together.
 
You'll get the chance to completely disassemble and re-assemble it if you want to weather it :)

I did some basic weathering on mine selectively removing paint, but now that I made my Halloween deadline for my Han Solo rig, I'm thinking of completely stripping the paint to refinish it more authentically.
 
Last edited:
Just received mine mine today and did some light weathering around the edges, etc. This thing is a beautiful beast! I've never had an ANH DL-44 before, so this is a childhood dream come true. Is it 100% accurate? No, but it shoots stuff! It really shoots stuff! I love that it's all metal (except for the grips and ribbed grill.) The price point can't be beat. If you're on the fence about it, do yourself a favor and grab one while they still have them available.

IMG_4113.JPGIMG_4114.JPG
 
OK, got mine today. Very impressed for the money. This is such a great product for $200. All metal (besides the grips), scope works and it has weight. It went together in about 5 minutes max. Rock solid.

Gripes (and I say gripes but more like im comparing it to a $4-500 professional job): Grips are plastic but I can get real wood grips from ebay for cheap. Front vent looks a little undersized. Thats it.

Im not a DL-44 expert, but this would be an excellent addition to any display.

With some weathering, this is a no brainer.
 
Welp, I bit the bullet (so to speak) and completely disassembled mine. Actually, I stripped and put it back together a couple of times to make sure I could put it back in working order. I'm not planning to fire it, but the working slide makes such a satisfying sound.

Now that Halloween's past, I want to go from the quick weathering job I did on the factory paint to a proper blued and weathered finish. Here's the parts as they are today.

PB051815.jpg

One thing I can't figure out is how to remove the knob from the scope. The two screws on top seem to have absolutely nothing to do with holding it on. They seem to be cosmetic.
 
OK, got mine today. Very impressed for the money. This is such a great product for $200. All metal (besides the grips), scope works and it has weight. It went together in about 5 minutes max. Rock solid.

Gripes (and I say gripes but more like im comparing it to a $4-500 professional job): Grips are plastic but I can get real wood grips from ebay for cheap. Front vent looks a little undersized. Thats it.

Im not a DL-44 expert, but this would be an excellent addition to any display.

With some weathering, this is a no brainer.

I'd add that the scope is definitely too big and the brass knob definitely isn't right, but otherwise I completely agree. Fantastic buy for $200!
 
Hi there been following along and waiting for mine to turn up :) and thought I'd add a few pics to the clutch of these fine weathering jobs I'm seeing on here.


So far it's had grain cut into the plastic grips with a hobby knife first and then 40 grit sandpaper.
asdl87.jpg

The grips then had red primer followed by a fine dusting of black which is then mostly sanded away to taste.


Metal bits had fine sandpaper to expose edges then a slight misting with matt black on everything but the flash hider and scope to make it appear that they all come from different factories if you get me.

asdl84.jpg

Flash hider had mistings of dark grey and red primers and then matt black before a little sanding again.

asdl85.jpg

The brass bits had the black sanded primer treatment and the turney bit had the groove cut in with a junior hacksaw.

asdl83.jpg

Oh and a little rust/dirt painted into the apropriate spots.

asdl86.jpg

Looks ok but I may do the grips again to add the extra grooves.
Iv'e got the real tomtit cylinders but forgot about them, I'll cut them in one day.
These really are great for the money and I can shoot ewok targets all day baby (um, when I get some gas).
 
Welp, I bit the bullet (so to speak) and completely disassembled mine. Actually, I stripped and put it back together a couple of times to make sure I could put it back in working order. I'm not planning to fire it, but the working slide makes such a satisfying sound.

Now that Halloween's past, I want to go from the quick weathering job I did on the factory paint to a proper blued and weathered finish. Here's the parts as they are today.

View attachment 680713

One thing I can't figure out is how to remove the knob from the scope. The two screws on top seem to have absolutely nothing to do with holding it on. They seem to be cosmetic.

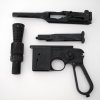
Yikes, I had no idea this thing broke down into this many pieces! Im guessing the scope knob is pressed on, like you windshield wiper arm is pressed onto the post, then held in place with a nut. Thats my guess.
 
And there's actually plenty that I didn't disassemble :) it is a working airsoft pistol, after all, so there's going to be some complexity.

I've got the flash hider and lower almost completely stripped - the paint comes off pretty easily with good old fashioned abrasives and elbow grease. Using a combination of 220 grit wet sanding and a wire wheel.
 
Some progress - I've stripped most of the main body components. Still have a few small pieces and the scope and mount to do. My order of Aluminum Black should be arriving today, so I can start seeing how it works pretty soon.

PB091981.jpg
 
Annoyingly, I lost the spring for the cartridge release in the process. I might just epoxy those parts in (the release button and the cartridge itself), since I've no interest in preserving this as a firing airsoft gun. On the other hand, dropping and inserting the clip makes a satisfying thunk​. I like props with moving parts :)
 
I did the first round of blueing today, on the bolt, upper, lower, and flash hider. I prepped them all by sanding with 220, 320, and 400 grit sandpaper to get a decent finish (not too long on each stage, or my elbow would have fallen off).

Then I thoroughly degreased each piece by first washing with detergent, rinsing thoroughly, and air drying with a heat gun. That was followed by a wipe down with alcohol and another pass with the heat gun.

Each piece here has had 2 applications of aluminum black so far, and they're all going to get a third. For the first, I heated up each piece a bit with the heat gun, then applied the liquid with a swauber. For the second application I dumped them into a ziploc bag one by one, swishing them around thoroughly.

My observations:

  • Heating the parts first definitely improved the results (not surprising - heat accelerates chemical reactions)
  • Another thing that helped improve the coverage and overall consistency a lot was burnishing the pieces BEFORE rinsing them. I just thoroughly rubbed the surface of each part with my latex-gloved hands before rinsing, and the depth of the black and consistency was improved.

The upper has the worst consistency overall, while the bolt turned a very solid color (although with a trace of brown) very quickly - it's possible each piece of this gun is metallurgically a little different. Anyway, each of these will get a third application when I treat the remaining parts, before getting a protective coat of oil.

PB121998.jpgPB122002.jpgPB122006.jpg
 
This thread is more than 3 years old.

Your message may be considered spam for the following reasons:

  1. This thread hasn't been active in some time. A new post in this thread might not contribute constructively to this discussion after so long.
If you wish to reply despite these issues, check the box below before replying.
Be aware that malicious compliance may result in more severe penalties.
Back
Top