1/24 X-Wing near 100% from scratch

Here again friends.

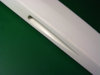
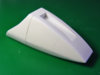
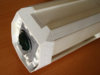
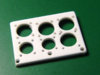
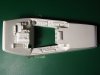
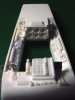
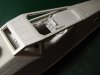
Currently working in the lower half of the fuselage. All external fuselage made of 2 mm styrene is finished, I'm working on internal reinforcements and other necessary details:

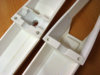
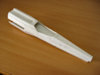
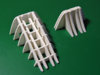
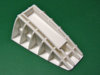
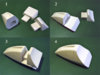
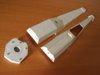
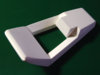
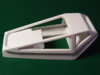
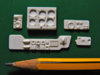
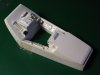
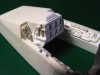
The part that more work has taken me is the armature insertion block. It's a piece of complex shapes and sizes to get the best possible fit inside the fuselage. As on previous occasions, I used the Google SketchUp to create a 3D virtual model that helped me to correctly define all necessary parts. The result, once constructed with styrene, is a nice piece that serves as insert for the octagonal block of armature, and also has guide holes for the central tube of the frame and another three for inserting the screws that allow to hold the model by the bottom and both sides.

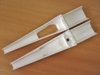
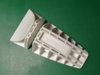
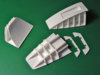
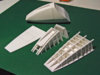
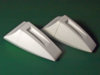
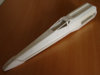
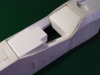
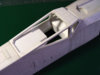
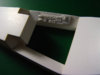
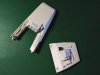
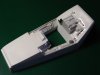
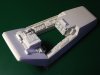
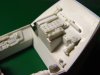
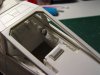
The next step is to create the internal shape of the torpedo launch tubes. To do this I built two boxes that I'll fill with Milliput putty for modeling the inner curvature.

I took advantage of to build these boxes for also add a third layer of 2 mm in the front zone of the lower fuselage. This third layer is needed so that the upper half of the body rests on a sufficiently wide base in the front, where there is a big difference in wideness between upper and lower fuselages.

Thanks for looking :)
Rafa
 
Rafa thats amazing, flawless even, I've not seen an X wing given this kind of treatment, you could teach many here including myself a good few things about scratch building!
I love the fact your work is so clean, and not covered in primer or gunk yet, so we can see the full styrene goodness.
Like your torpedo tube idea, that will work great i recall doing something similar to my old Cloud car when i modded the tubes on that.

lee
 
Hi guys.

I've been a little busy the last few weeks, but I managed to steal a few moments and continue with my model:

The curved surface inside the torpedo launch tubes was fine with Milliput putty.

I also spent some time to make small but important adjustments aimed at getting the two fuselage halves fit perfectly. These works include placing two small adjustment pins and two guides placed roughly half of the front zone, over the boxes of the torpedo launchers. These guides serve to make sure that the two strips of the lower half protruding on both sides of the upper are equal and perfectly symmetrical.

I'm currently working on the nose. As you can see from the pictures, I've divided the nose into four parts and I designed and built very nice rib structures. The pieces that make up these structures are very delicate but once glued together, the assembly is very strong and durable, allowing me to work on an almost final piece and in a very comfortable way. The four parts will be almost complete with styrene and I just need to fill in the gaps between the ribs with Milliput putty to finish them.

Thanks for looking :)
Rafa
 

Attachments

  • 01-Torpedo launchers.jpg
    01-Torpedo launchers.jpg
    105.5 KB · Views: 353
  • 02-Adjustment pins.jpg
    02-Adjustment pins.jpg
    154.7 KB · Views: 420
  • 03-Interior fuselage.jpg
    03-Interior fuselage.jpg
    251.7 KB · Views: 411
  • 04-Fuselage.jpg
    04-Fuselage.jpg
    242.9 KB · Views: 444
  • 05-Nose01.jpg
    05-Nose01.jpg
    232.4 KB · Views: 376
  • 06-Nose02.jpg
    06-Nose02.jpg
    256.2 KB · Views: 369
  • 07-Nose03.jpg
    07-Nose03.jpg
    245.4 KB · Views: 391
  • 08-Nose04.jpg
    08-Nose04.jpg
    257 KB · Views: 389
Hello 3d-builder, atom and Mike J.

Thank you very much for your kind comments.

Yes, ribbed structures do a very good job and the nose cone is almost finished.
It is worth taking to do a good job of planning, because it makes it much easier and ensures a good final result.;)

Will post a new update very soon.

Thanks for looking.:)
Rafa
 
Here again, folks.

Sorry I could not post earlier as promised, but I had some problems.

The nose cone was finished. I filled the gaps between the ribs with a few pieces of foamed PVC to save weight and putty, and then I covered the sides with putty that, once well sanded, left a perfectly finished piece.

Very nice, very smooth ... VERY BAD! :facepalm

I made a mistake with the measurements and, due the way as it is built, it was very difficult to fix, so I had no choice but to start over and build a new nose cone. I hate to repeat the same work, but it was my fault and that was my punishment.

I returned to recalculate and redesign the whole rib structure and, on this second occasion, I decided that I was not going to use putty, but it would make all the coverage with styrene. Thus, the lower half is covered with a layer of 1 mm. while the upper half is covered with a layer of 1.5 mm because I need thicker to round off the edges properly.

The curvature of the different faces of the piece is soft, so it was easy to bend manually the styrene parts before gluing to be well adapted to the internal structure. I also took the precaution of setting very well these pieces with rubber bands that should be well distributed throughout the piece while the glue dries to prevent distortion.

The result is far better than my first attempt. Besides the measures themselves are now correct, the side surfaces are also more uniform and easier to work on them.

The first three pics are of my first nose cone, the others corresponding to the new and correct nose cone. I also include two beautiful images that show how the internal structure looks translucent when illuminated with backlight.

Thanks for looking.:)
Rafa
 

Attachments

  • 01-wrong nose01.jpg
    01-wrong nose01.jpg
    257.6 KB · Views: 429
  • 02-wrong nose02.jpg
    02-wrong nose02.jpg
    166.5 KB · Views: 400
  • 03-wrong nose03.jpg
    03-wrong nose03.jpg
    145.8 KB · Views: 390
  • 04-nose comparison.jpg
    04-nose comparison.jpg
    80.9 KB · Views: 458
  • 05-right nose01.jpg
    05-right nose01.jpg
    338.2 KB · Views: 420
  • 06-right nose02.jpg
    06-right nose02.jpg
    266.8 KB · Views: 381
  • 07-right nose03.jpg
    07-right nose03.jpg
    302.5 KB · Views: 342
  • 08-both noses.jpg
    08-both noses.jpg
    251.2 KB · Views: 423
  • 09-translucent nose.jpg
    09-translucent nose.jpg
    151.1 KB · Views: 373
  • 10-translucent nose.jpg
    10-translucent nose.jpg
    194.2 KB · Views: 343
Hello friends.

More than two months since my last post ... sorry, I've been busy, but I've not stopped progressing with my model.

The second nose cone looks good on the model. I've joined it to the fuselage and does a great job as front closure, and the closure piece also serves to center correctly the two halves of the fuselage.

I've also completed the rear closure. I've incorporated a rear wall in both halves with some holes in which are inserted the pins that I've placed in the rear plate. Thus the fuselage is tightly closed and the rear piece perfectly aligned.

Once finished the close of the fuselage, I started working the IL&M cockpit. As always, I spend many hours studying in detail the few photographs I have of the original model to define all sizes, shapes and angles. I also drew the plans in 2D and then on the Google SketchUp 3D application. Even taking all these precautions, I had to make several attempts to get it as I wanted, tight and with no gaps in the adjustment to my fuselage.

Currently I'm back to microscopic work and I'm copying the details and instruments of the cockpit. This is a slow and painstaking work, and still take me a while to complete.

I hope you enjoy my progress.

Thanks for looking. :)
Rafa


I have followed for :cool years and hope to see this project finished is great is doing a great job and I congratulate you a genius Rafa


regards :)

Hello Indioskywalker.
Thank you very much for your comment.
And don't worry. I've invested a lot of time and material in this project, so it's too late to turn back. I wonder how long will it take yet but I assure you I'm gonna end this. :cool
 

Attachments

  • 01-nosecone-front closure.jpg
    01-nosecone-front closure.jpg
    170.1 KB · Views: 411
  • 02-rear closure.jpg
    02-rear closure.jpg
    263.6 KB · Views: 395
  • 03-rear closure.jpg
    03-rear closure.jpg
    226.9 KB · Views: 419
  • 04-closed fuselage.jpg
    04-closed fuselage.jpg
    214 KB · Views: 437
  • 05-IL&M cockpit.jpg
    05-IL&M cockpit.jpg
    150.3 KB · Views: 340
  • 06-IL&M cockpit.jpg
    06-IL&M cockpit.jpg
    150.5 KB · Views: 357
  • 07-IL&M cockpit.jpg
    07-IL&M cockpit.jpg
    205.8 KB · Views: 410
  • 08-IL&M cockpit.jpg
    08-IL&M cockpit.jpg
    154.1 KB · Views: 387
  • 09-IL&M cockpit.jpg
    09-IL&M cockpit.jpg
    176.5 KB · Views: 443
  • 10-IL&M cockpit details.jpg
    10-IL&M cockpit details.jpg
    188.7 KB · Views: 384
  • 11-IL&M cockpit details.jpg
    11-IL&M cockpit details.jpg
    209.6 KB · Views: 501
  • 12-IL&M cockpit details.jpg
    12-IL&M cockpit details.jpg
    164.1 KB · Views: 441
Hey Moska,great update,Those scratched Hurricane,Messerschmitt and Tiger looks really nice!:thumbsup
Looking forward for more of your cockpit.
 
Hello again, friends.

I took calmly the last months. I used the summer to relax and live a little more easy. :cool

Well, summer is over and it's time to put back to work and give the final push to my model.

I've completed the IL&M cockpit version. It was a difficult job because the reference pics I have are not very clear, and in the photographs of the original cockpit, details are poorly defined and with many bubbles, forcing me to use my imagination to try to define what could be its real forms.
I decided to divide the cockpit on two parts to make easier the resin copies.

Here you have some pictures of my completed IL&M cockpit. If any of you found a blunder in my work, please do not hesitate to let me know so that I can try to correct it. ;)

Now I've started the "real" version of the cockpit. Unfortunately, I have no reference pictures of all panels and angles so, once again, I'll try to copy everything I can see and use my imagination to the areas without information. I've assumed from the beginning that my model can't be 100% accurate.

REFERENCE IMAGES ARE WELCOME!! :D

I still have to invest some months of work to finish my model, but I'm starting to see light at the end of the tunnel.

Thanks for looking. :)
Rafa
 

Attachments

  • 01-IL&M cockpit.jpg
    01-IL&M cockpit.jpg
    289.5 KB · Views: 602
  • 02-IL&M cockpit.jpg
    02-IL&M cockpit.jpg
    211 KB · Views: 411
  • 03-IL&M cockpit.jpg
    03-IL&M cockpit.jpg
    219.7 KB · Views: 327
  • 04-IL&M cockpit.jpg
    04-IL&M cockpit.jpg
    946 KB · Views: 421
  • 05-IL&M cockpit.jpg
    05-IL&M cockpit.jpg
    224.8 KB · Views: 335
  • 06-IL&M cockpit.jpg
    06-IL&M cockpit.jpg
    232.4 KB · Views: 315
  • 07-IL&M cockpit.jpg
    07-IL&M cockpit.jpg
    245.6 KB · Views: 303
  • 08-IL&M cockpit.jpg
    08-IL&M cockpit.jpg
    244.9 KB · Views: 283
  • 09-IL&M cockpit.jpg
    09-IL&M cockpit.jpg
    220.7 KB · Views: 327
  • 10-IL&M cockpit.jpg
    10-IL&M cockpit.jpg
    228.8 KB · Views: 365
  • 11-IL&M cockpit.jpg
    11-IL&M cockpit.jpg
    223.9 KB · Views: 479
Hi Anakin and Talkierg.
Many thanks for your support. :love

Does anyone know why thumbnails no longer appear when a image is attached in a post? :confused
It was much more comfortable being able to see the thumbnails before deciding to open a full size image.

Rafa
 
Will look forward to it Rafa, you nutter!.
Amazing update with the cockpit mate, you really are a styrene master, beautiful!.
Stu
 
This thread is more than 5 years old.

Your message may be considered spam for the following reasons:

  1. This thread hasn't been active in some time. A new post in this thread might not contribute constructively to this discussion after so long.
If you wish to reply despite these issues, check the box below before replying.
Be aware that malicious compliance may result in more severe penalties.
Back
Top