OK, starting this thread is a little late to the party, but I find as time goes on that I spend more and more time studying details and ideas before getting stuck into projects. This makes things take longer of course, but the end result is usually all the better for it.
I've been tinkering away on and off on a 3d model for the baster since late last year, with the aim of making it with screen accurate functionality as in the Adam Savage Tested video where he visits with Doug Harlocker. I wanted the slide/hammer in my replica to move when the trigger is pressed. The model itself isn't too difficult even if there are several details you can miss if you don't really look at it, but the functionality had me scratching my head for a bit.
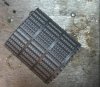
First I had to see if my printer could even replicate the tiny details of the barrel sides. (The originals were printed on pretty high-end machines after all.) So I did a quick test:
Note: The grille "mesh holes" in the above test aren't completely accurate. They are close, but I need to go back and add some things later. Also, the grille sections will be printed separately in the final version, just like they were in the real one. I did the test with a couple different nozzle sizes and they were similar enough that I can use the larger one, making them print faster.
Here is the current work-in-progress status of the 3d model (updated March 26, click to enlarge):


Since I'm generally a total novice when it comes to electronics, I first thought I'd make the functionality mechanical. One criteria would be that it had to be fairly easy to assemble since I was planning to offer it as a kit. But as time went on, I started realizing that making it mechanical would make it harder to build and put a lot of demands on the durability and tolerances of the parts. It also wouldn't be exactly how they did it in the movie. So I did a 180 and started looking into using an electromagnet (solenoid).
The plan was to use a capacitor to store a temp charge, like I was planning for my Glie 44 blaster from Star Wars (to make leds inside flash and fade), but as I would learn, solenoids are a bit more demanding in their power requirements. Again, I had to keep it SIMPLE so that anyone with the most basic knowledge of soldering could put it together. Finding a suitable magnet hasn't been easy- most of them need too much power or too have small movement. After a week of reading up and asking for help on various forums, I even ended up looking at timer circuitry... the hole was getting deeper. So I decided to go back to the basic setup and start experimenting.
I'm getting close to having a working setup, but I have to do some more experimenting with different capacitors and battery setups. ) I'll either be using a 9V or 4XAAA for 6 volts. Here ares some short vids. This is all REALLY basic electronics stuff, but when you've never really looked at it, setting it up can be tricky
First, the simple LED FADER test (the LED flashes and fades every time the trigger is released):
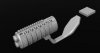
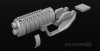
Small solenoid test with 6 volts. Power-on charges one large capacitor (green cylinder) and when the trigger is pressed, the charge is released into the electromagnet causing it to activate and release.
Large solenoid test with 9 volts. The 9V battery will not last for as many trigger clicks as four AAA, but it seems to give the capacitor a larger charge.
After testing, I'm leaning towards using the larger solenoid. It'll give a nicer heft to the gun and the inertia of it moving might give a little feeling of recoil. I just have to experiment a bit to make sure everything fits.
Some photos of test prints (updated March 26, click to enlarge):
Just testing the feel of how the parts will fit. The trigger guard was printed in one piece, which was not easy due to the shape. (Took about half a day.) The grip slotted tightly into the tguard.

I've done various recent tests on how to print the hollow barrel. The ridges create 90 degree undercuts that are very difficult to get around with a FDM (filament) printer, so I had to experiment with creating different types of support. After failing a few times, printing in halves and whatnot, I finally settled on settings that gave three "layers" (see the insert) that when pressed, "snap" the supports from the barrel, making them easy to pry off cleanly with a flat sculpting tool or screwdriver. (I admit to being a bit proud of that one.)

Test print of the top rail.

Test-fitting a grille plate and the rail. Looking good so far.

More stuff coming as soon as I have done additional testing...
I've been tinkering away on and off on a 3d model for the baster since late last year, with the aim of making it with screen accurate functionality as in the Adam Savage Tested video where he visits with Doug Harlocker. I wanted the slide/hammer in my replica to move when the trigger is pressed. The model itself isn't too difficult even if there are several details you can miss if you don't really look at it, but the functionality had me scratching my head for a bit.
First I had to see if my printer could even replicate the tiny details of the barrel sides. (The originals were printed on pretty high-end machines after all.) So I did a quick test:
Note: The grille "mesh holes" in the above test aren't completely accurate. They are close, but I need to go back and add some things later. Also, the grille sections will be printed separately in the final version, just like they were in the real one. I did the test with a couple different nozzle sizes and they were similar enough that I can use the larger one, making them print faster.
Here is the current work-in-progress status of the 3d model (updated March 26, click to enlarge):
Since I'm generally a total novice when it comes to electronics, I first thought I'd make the functionality mechanical. One criteria would be that it had to be fairly easy to assemble since I was planning to offer it as a kit. But as time went on, I started realizing that making it mechanical would make it harder to build and put a lot of demands on the durability and tolerances of the parts. It also wouldn't be exactly how they did it in the movie. So I did a 180 and started looking into using an electromagnet (solenoid).
The plan was to use a capacitor to store a temp charge, like I was planning for my Glie 44 blaster from Star Wars (to make leds inside flash and fade), but as I would learn, solenoids are a bit more demanding in their power requirements. Again, I had to keep it SIMPLE so that anyone with the most basic knowledge of soldering could put it together. Finding a suitable magnet hasn't been easy- most of them need too much power or too have small movement. After a week of reading up and asking for help on various forums, I even ended up looking at timer circuitry... the hole was getting deeper. So I decided to go back to the basic setup and start experimenting.
I'm getting close to having a working setup, but I have to do some more experimenting with different capacitors and battery setups. ) I'll either be using a 9V or 4XAAA for 6 volts. Here ares some short vids. This is all REALLY basic electronics stuff, but when you've never really looked at it, setting it up can be tricky
First, the simple LED FADER test (the LED flashes and fades every time the trigger is released):
Small solenoid test with 6 volts. Power-on charges one large capacitor (green cylinder) and when the trigger is pressed, the charge is released into the electromagnet causing it to activate and release.
Large solenoid test with 9 volts. The 9V battery will not last for as many trigger clicks as four AAA, but it seems to give the capacitor a larger charge.
After testing, I'm leaning towards using the larger solenoid. It'll give a nicer heft to the gun and the inertia of it moving might give a little feeling of recoil. I just have to experiment a bit to make sure everything fits.
Some photos of test prints (updated March 26, click to enlarge):
Just testing the feel of how the parts will fit. The trigger guard was printed in one piece, which was not easy due to the shape. (Took about half a day.) The grip slotted tightly into the tguard.
I've done various recent tests on how to print the hollow barrel. The ridges create 90 degree undercuts that are very difficult to get around with a FDM (filament) printer, so I had to experiment with creating different types of support. After failing a few times, printing in halves and whatnot, I finally settled on settings that gave three "layers" (see the insert) that when pressed, "snap" the supports from the barrel, making them easy to pry off cleanly with a flat sculpting tool or screwdriver. (I admit to being a bit proud of that one.)
Test print of the top rail.
Test-fitting a grille plate and the rail. Looking good so far.
More stuff coming as soon as I have done additional testing...
Attachments
Last edited by a moderator:

")


