Miketastic
Jr Member
Re: ST:TMP Drydock - larger scale
AMAZING! simply amazing. speechless... hats off to you sir.
AMAZING! simply amazing. speechless... hats off to you sir.


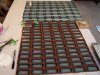
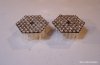
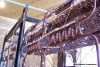
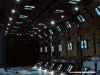
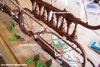
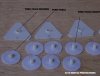
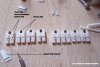
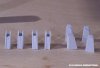
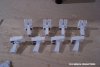
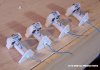
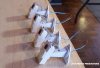
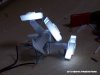
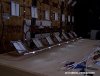
 hase II drydock as the side panel lights. They have a very complex configuration and I wanted to at least in some way be able to come as close as I could to getting these as accurate as possible. I stumbled on the simplest of solutions. At my local Hobby Lobby I came across a section that has all kinds of beads, glitter and most importantly of all Sequins. They were in various colors and I happened to notice that the silver ones had a reflective quality as that of mirrors or reflectors that are used in lamps and/or flash lights. JACKPOT! They had 3 or 4 different sizes, so I bought a couple of small bags. I notices that even though they are punched out into round shapes, the center of each sequins had a hexagon shape to it. So I lined up 60 sequins of 2 different sizes of each kind of sequins then measured out the overall size of both of them and decided I had a close match for the work light arrays. When lined up properly with the edges of the hexagon they reflect light similar to what is seen in ST:TMP. So I built 4 of these panels 2 for each of the docks.
Thanks joberg. I'm hoping to have this thing put together within the next couple of months! Hang in there!Tremendous work so far:cool, so many details! Eager to see it fully lit. Keep up the great work, it's pro-work for sure.
Hey Thanks joberg! I've been following your build as well. Love that station. I've always wanted to tackle that one also. But for now you da man! Thanks for the reply I should have another update in about 15 days from now. I can't wait to see mine finished as well.!I'll hang in there for sure. I know how repetitive a model like that can be (I'm building the 2001 A Space Odyssey Space Station, so I should know
Hi Al,Hi Mark,
I am working on a CGI model of the dry dock. Have the framing and sides done so far and am working on the top structure. Would you have any good reference photos of the detail the ends of the structure? I have photos of the restoration and some screen grabs from the movie, but no really good reference photos or drawings of the ends.
BTW, you are doing an amazing job on your physical model. Kudos to you for having the discipline to keep at this project.
Thanks in advance...
Al